TF2/Setting the cap point layout: Difference between revisions
< TF2
Jump to navigation
Jump to search
Brandished (talk | contribs) (added info) |
Thunder4ik (talk | contribs) m (Unicodifying, replaced: [[Image: → [[File: (9)) |
||
| (17 intermediate revisions by 5 users not shown) | |||
| Line 1: | Line 1: | ||
[[ | [[File:tf2_cpl_guide_00.png]] | ||
'''From the Hammer editor:''' Cap Layout, | '''From the Hammer editor:''' Cap Layout, a string that tells the HUD how to lay out the cap points. It should be a string with indexes of cap points separated by commas to denote a new line. So '''2,0 1''' would create a pyramid, with cap point 2 on the top and cap points 0 & 1 on the bottom. | ||
The cap layout value in the [[team_control_point_master]] entity does not change anything other then the layout of the control points on the HUD. | |||
== | ==General guidelines== | ||
<blockquote style="background: white; border: 1px solid rgb(153, 153, 153); padding: 1em;"> | |||
For the three cap layout examples below, assume that you're dealing with a three control point map with the [[team_control_point]] entities having these index settings: | |||
For | |||
<pre> | |||
0 = Red's Final Control Point | 0 = Red's Final Control Point | ||
1 = Neutral Center Control Point | 1 = Neutral Center Control Point | ||
2 = Blue's Final Control Point | 2 = Blue's Final Control Point | ||
</pre></blockquote> | |||
<blockquote style="background: white; border: 1px solid rgb(153, 153, 153); padding: 1em;"> | |||
{| width="100%" | |||
| | |||
[[File:tf2_cpl_guide_01.gif|right]] | |||
*The cap layout box is blank by default, by leaving it blank, the control points will be laid out on the HUD in a line from left to right, least to greatest, by order of their assigned index values. With a blank cap layout, the HUD would look like this in-game: | |||
|} | |||
</blockquote> | |||
:[[ | <blockquote style="background: white; border: 1px solid rgb(153, 153, 153); padding: 1em;"> | ||
{| width="100%" | |||
You can rearrange the order in the HUD | | | ||
[[File:tf2_cpl_guide_02.gif|right]] | |||
{| | *You can rearrange the order of the control points in the HUD by altering the order of their index values in the cap layout box | ||
:{| | |||
| Using: | | Using: | ||
| | | width=100 | | ||
2 0 1 | 2 0 1 | ||
| for your | | for your cap layout would give you this instead of the above: | ||
|} | |} | ||
|} | |||
</blockquote> | |||
: | <blockquote style="background: white; border: 1px solid rgb(153, 153, 153); padding: 1em;"> | ||
{| width="100%" | |||
{| | |||
| | | | ||
[[File:tf2_cpl_guide_03.gif|right]] | |||
*The control points can also be arranged in a vertical layout on the HUD by separating the index values with commas; all values to the right of the comma would lie underneath the values to the left of the comma. | |||
:{| | |||
| If you had | |||
| width=100 | | |||
0,1,2 | 0,1,2 | ||
| would | | for the cap layout, you would see this in-game: | ||
|} | |||
|} | |} | ||
</blockquote> | |||
==More examples== | |||
:{| class=standard-table | |||
! Cap layout setting | |||
! In-game appearance | |||
{| | |||
! | |||
! In-game | |||
|- | |- | ||
|align=center valign=top | | |align=center valign=top | | ||
0 2,1 | 0 2,1 | ||
|align=center | | |align=center | | ||
[[ | [[File:tf2_cpl_guide_04.gif]] | ||
|- | |- | ||
|align=center valign=top | | |align=center valign=top | | ||
1 3,0 2 4 | 1 3,0 2 4 | ||
|align=center | | |align=center | | ||
[[ | [[File:tf2_cpl_guide_05.gif]] | ||
|- | |- | ||
|align=center valign=top | | |align=center valign=top | | ||
2,0 1 3 4 | 2,0 1 3 4 | ||
|align=center | | |align=center | | ||
[[ | [[File:tf2_cpl_guide_06.gif]] | ||
|- | |- | ||
|align=center valign=top | | |align=center valign=top | | ||
0 1,2,3 4 | 0 1,2,3 4 | ||
|align=center | | |align=center | | ||
[[ | [[File:tf2_cpl_guide_07.gif]] | ||
|- | |- | ||
|align=center valign=top | | |align=center valign=top | | ||
0,1 2 3,4 | 0,1 2 3,4 | ||
|align=center | | |align=center | | ||
[[ | [[File:tf2_cpl_guide_08.gif]] | ||
|} | |} | ||
[[Category:Team Fortress 2|Setting]] | |||
Latest revision as of 13:49, 8 January 2024

From the Hammer editor: Cap Layout, a string that tells the HUD how to lay out the cap points. It should be a string with indexes of cap points separated by commas to denote a new line. So 2,0 1 would create a pyramid, with cap point 2 on the top and cap points 0 & 1 on the bottom.
The cap layout value in the team_control_point_master entity does not change anything other then the layout of the control points on the HUD.
General guidelines
For the three cap layout examples below, assume that you're dealing with a three control point map with the team_control_point entities having these index settings:
 0 = Red's Final Control Point
 1 = Neutral Center Control Point
 2 = Blue's Final Control Point
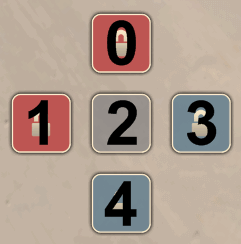
- The cap layout box is blank by default, by leaving it blank, the control points will be laid out on the HUD in a line from left to right, least to greatest, by order of their assigned index values. With a blank cap layout, the HUD would look like this in-game:

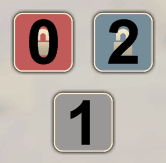
- You can rearrange the order of the control points in the HUD by altering the order of their index values in the cap layout box
Using: 2 0 1
for your cap layout would give you this instead of the above:

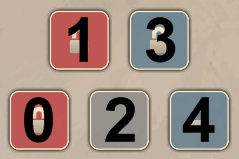
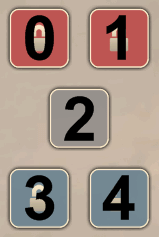
- The control points can also be arranged in a vertical layout on the HUD by separating the index values with commas; all values to the right of the comma would lie underneath the values to the left of the comma.
If you had 0,1,2
for the cap layout, you would see this in-game:

More examples
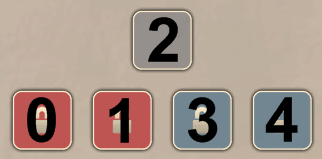
Cap layout setting In-game appearance 0 2,1
1 3,0 2 4
2,0 1 3 4
0 1,2,3 4
0,1 2 3,4