Source on Android: Difference between revisions
(Undo revision 446174 by SirYodaJedi (talk) Kept only the Discord link) Tag: Undo |
Mycatismycat (talk | contribs) (there was no "leak") |
||
| (28 intermediate revisions by 4 users not shown) | |||
| Line 5: | Line 5: | ||
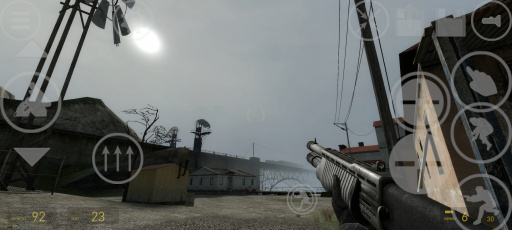
[[File:Hl2 on android.jpg|512px|thumb|{{hl2|4}} running on a {{w|icon=0|Redmi_Note_9|Redmi Note 9 Pro}} ]] | [[File:Hl2 on android.jpg|512px|thumb|{{hl2|4}} running on a {{w|icon=0|Redmi_Note_9|Redmi Note 9 Pro}} ]] | ||
Source Engine on Android is an unofficial port of the {{Source|4}} Engine to other {{w|icon=0|Android_(operating_system)|Android}} devices. Initial versions were made by modifying the APK of {{w|icon=0|NVIDIA}}'s {{w|icon=0|Nvidia_Shield_Portable|Shield }} port of {{hl2|4}} and {{portal|4}}, which were built specifically for NVIDIA Tegra hardware (which runs on Android). <br> | |||
Before the Source Engine code was leaked, this was the only way of playing these games on an '''Android''' based system. <br> | |||
Newer Releases use the leaked Source Engine 2018 code and have abandoned the ''Nvidia Shield'' version. | |||
==History== | ==History== | ||
In 2019 a user named "[https://www.youtube.com/@nillerusr | In 2019 a user named "[https://www.youtube.com/@nillerusr nillerusr]" started uploading development videos to YouTube showing off a modified version of the NVIDIA Shield version of '''Half-Life 2''' running on a standard Android device.<br> | ||
[https://www.youtube.com/watch?v=ocPByhSukRQ In his first video] on the topic he shows off the touch capabilities of the mod.<br> | [https://www.youtube.com/watch?v=ocPByhSukRQ In his first video] on the topic he shows off the touch capabilities of the mod.<br> | ||
Later versions of the port were based on leaked Source Engine code dated back to 2017-2018 (which was leaked in 2020). | Later versions of the port were based on leaked Source Engine code (specifically {{tf2|1}} version of {{src13mp|1}}) dated back to 2017-2018 (which was leaked in 2020). This allows more games to be ported and graphics & shaders will be rendered correctly on other devices without NVIDIA Tegra chip. | ||
A public build would be released on October 30, 2020. This build included playable versions of {{hl2|4}}, {{ep1|4}}, {{ep2|4}} and {{portal|2.bold}}. | A public build would be released on October 30, 2020. This build included playable versions of {{hl2|4}}, {{ep1|4}}, {{ep2|4}} and {{portal|2.bold}}. | ||
Since then many other games have been ported such as {{hl2dm|2.bold}}, {{hls|2.bold}}, {{dods|2.bold}} | Since then many other games have been ported such as {{hl2dm|2.bold}}, {{hls|2.bold}}, {{dods|2.bold}}, {{css|2.bold}} and {{hldms|2.bold}} | ||
==Installation== | ==Installation== | ||
| Line 24: | Line 24: | ||
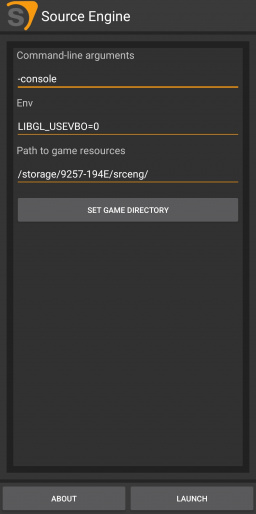
[[File:Main source app.jpg|256px|right|thumb|The main Source Engine app]] | [[File:Main source app.jpg|256px|right|thumb|The main Source Engine app]] | ||
{{Important|While the game files can be copied over from your PC it is highly recommended to use the download script since it is faster and avoids corruption.}} | |||
=== Windows === | |||
# Download the latest Source Engine apk and then the game apk of your choosing (the Source Engine app launches base Half-Life 2); see the '''External links''' section below. | |||
# In the phone's storage create a folder called {{path|srceng}} (or anything really) | |||
# Launch Steam, then [steam://nav/console click here] to open Steam developer console. | |||
# Download the game using this command as an example: {{code|download_depot 220 221 401613439882517483}} - this example here downloads {{hl2|1}} pre-Anniversary version. | |||
# Go to {{Path|Steam folder\steamapps\content\app_220\depot_221}} and copy the {{path|hl2}} (or other games) folder to {{path|srceng}} (or whatever you named it). | |||
# Optionally set any parameters (launch options) and launch. | |||
=== From your phone === | |||
# Download the latest Source Engine apk and then the game apk of your choosing (the Source Engine app launches base Half-Life 2); see the '''External links''' section below. | # Download the latest Source Engine apk and then the game apk of your choosing (the Source Engine app launches base Half-Life 2); see the '''External links''' section below. | ||
# In the phone's storage create a folder called {{path|srceng}} (or anything really) | # In the phone's storage create a folder called {{path|srceng}} (or anything really) | ||
# | # Install [https://github.com/termux/termux-app Termux]. | ||
# Go | # Once inside Termux, install [https://github.com/TheKingFireS/TermuxDepotDownloader Depot Downloader] | ||
# | # Download the games using this command as an example: {{code|depotdownloader -username user -password pass -app 220 -depot 221 -dir HL2 -validate -branch steam_legacy}} - this exmaple here downloads {{hl2|1}} pre-Anniversary version. | ||
# Verify with the Steam Mobile app or your email (if you use Steam Guard). | |||
# Go to your Downloads folder, find "depotdownload" directory and copy the {{path|hl2}} (or other games) folder to {{path|srceng}} (or whatever you named it). | |||
# Optionally set any parameters (launch options) and launch. | |||
{{tip|If the gallery app picks up the images from the game files, place a [https://drive.google.com/file/d/1-7DUU7F277Ek0jrocLnyt-MNCHOtByAD/ ".nomedia"] file in the srceng folder}} | {{tip|If the gallery app picks up the images from the game files, place a [https://drive.google.com/file/d/1-7DUU7F277Ek0jrocLnyt-MNCHOtByAD/ ".nomedia"] file in the srceng folder}} | ||
{{Note|'''(Half-Life 2 & TF2 branch only)''' This port is currently only compatible with pre-20th anniversary version files, these parameters have to be used {{code|-branch steam_legacy}} to choose the {{code|preset=3|steam_legacy}} build for Half-Life 2. For TF2 branch based game ({{css}}, {{dods}}), switch to {{code|-branch previous_build}}. | |||
}} | |||
==Installing Other Games== | ==Installing Other Games== | ||
To install games besides '''Half-Life 2''', simply copying the folder of the same name as the game to the srceng folder is all that is needed.<br> | To install games besides '''Half-Life 2''', simply copying the folder of the same name as the game to the srceng folder is all that is needed.<br> | ||
For example, to install '''Portal''', | For example, to install '''Portal''', these parameters can be used {{code|-app 400 -depot 401}} for Portal's resources which have to then simply be copied to the srceng folder. Then Portal can be launched from the separate Portal app. | ||
The following diagram showcases the game folder structure:<syntaxhighlight lang=""> | The following diagram showcases the game folder structure:<syntaxhighlight lang=""> | ||
| Line 40: | Line 57: | ||
| | | | ||
├── hl2 --> Half-Life 2, (REQUIRED FOR ALL GAMES) | ├── hl2 --> Half-Life 2, (REQUIRED FOR ALL GAMES) | ||
├── platform --> | ├── platform --> Files related to VGUI, (REQUIRED FOR ALL GAMES) | ||
| | | | ||
├── hl2mp --> Half-Life 2: Deathmatch | ├── hl2mp --> Half-Life 2: Deathmatch | ||
| Line 51: | Line 68: | ||
└── portal --> Portal | └── portal --> Portal | ||
</syntaxhighlight> | </syntaxhighlight> | ||
{{note|If help is needed, questions can be asked on the official Discord server: [https://discord.gg/7mBT2tq9Mw niIlerusr's Discord server]}} | |||
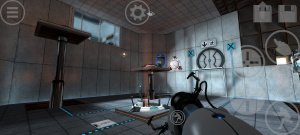
[[File:Portal on android.jpg|thumb|'''Portal''' running on a Redmi Note 9 Pro]] | [[File:Portal on android.jpg|thumb|'''Portal''' running on a Redmi Note 9 Pro]] | ||
==Installing on an SD | ==Installing on an SD Card== | ||
{{warning|Installing the game files on a SD Card is not recommended by the developers.}}<br> | |||
Installing all the game files on a SD Card can be beneficial if the internal storage is full or has slow read-write speeds.<br> | |||
However, since the app only allows for the selection of directories from the internal storage, the SD Card path has to be entered manually. | |||
<br> | |||
Getting the path to the SD Card alone can be challenging since regular file managers just report it as "SD Card" and don't give the actual path to it. | |||
The easiest and least "ad-riddled" way of getting the SD Card's path is to connect the device to a computer loaded with [https://developer.android.com/tools/releases/platform-tools#downloads ADB (Android Debug Bridge)] | |||
To use ADB, USB debugging has to be enabled which varies depending on your Android variant. | |||
{{tip|Simply look up your device on the internet for instructions on enabling USB debugging.}} | |||
To use ADB, USB debugging has to be enabled which varies | |||
{{tip|Simply look up your device on the internet for instructions on enabling USB debugging}} | |||
Once all that has been done, a command prompt has to be opened in the folder in which ADB is located in (this can be done by typing {{code|preset=3|cmd}} in the address bar)<br> | Once all that has been done, a command prompt has to be opened in the folder in which ADB is located in (this can be done by typing {{code|preset=3|cmd}} in the address bar)<br> | ||
| Line 73: | Line 92: | ||
If a string of numbers and letters followed with {{code|preset=4|device}} shows up, that means that it has been detected. | If a string of numbers and letters followed with {{code|preset=4|device}} shows up, that means that it has been detected. | ||
{{note|A pop-up will show up on the phone asking you to authorize the PC, press yes.}} | {{note|A pop-up will show up on the phone asking you to authorize the PC, press {{code|preset=3|yes}}.}} | ||
Next, type {{code|preset=3|adb shell}} | Next, type {{code|preset=3|adb shell}} | ||
| Line 88: | Line 107: | ||
==External Links== | ==External Links== | ||
<!-- Warning: Please do not put links to the APKs since the latest version was built on leaked Source SDK. --> | |||
[https://discord.gg/7mBT2tq9Mw niIlerusr's Discord server] | [https://discord.gg/7mBT2tq9Mw niIlerusr's Discord server] | ||
==See Also== | ==See Also== | ||
[[Source]] | *[[Source]] | ||
*[[Source SDK]] | |||
[[Source SDK]] | |||
Latest revision as of 23:02, 3 July 2025
Source Engine on Android is an unofficial port of the ![]() Source Engine to other Android devices. Initial versions were made by modifying the APK of NVIDIA's Shield port of
Source Engine to other Android devices. Initial versions were made by modifying the APK of NVIDIA's Shield port of ![]() Half-Life 2 and
Half-Life 2 and ![]() Portal, which were built specifically for NVIDIA Tegra hardware (which runs on Android).
Portal, which were built specifically for NVIDIA Tegra hardware (which runs on Android).
Before the Source Engine code was leaked, this was the only way of playing these games on an Android based system.
Newer Releases use the leaked Source Engine 2018 code and have abandoned the Nvidia Shield version.
History
In 2019 a user named "nillerusr" started uploading development videos to YouTube showing off a modified version of the NVIDIA Shield version of Half-Life 2 running on a standard Android device.
In his first video on the topic he shows off the touch capabilities of the mod.
Later versions of the port were based on leaked Source Engine code (specifically Team Fortress 2 version of Source 2013 Multiplayer) dated back to 2017-2018 (which was leaked in 2020). This allows more games to be ported and graphics & shaders will be rendered correctly on other devices without NVIDIA Tegra chip.
A public build would be released on October 30, 2020. This build included playable versions of ![]() Half-Life 2,
Half-Life 2, ![]() Half-Life 2: Episode One,
Half-Life 2: Episode One, ![]() Half-Life 2: Episode Two and
Half-Life 2: Episode Two and ![]() Portal.
Portal.
Since then many other games have been ported such as ![]() Half-Life 2: Deathmatch,
Half-Life 2: Deathmatch, ![]() Half-Life: Source,
Half-Life: Source, ![]() Day of Defeat: Source,
Day of Defeat: Source, ![]() Counter-Strike: Source and
Counter-Strike: Source and ![]() Half-Life Deathmatch: Source
Half-Life Deathmatch: Source
Installation
Windows
- Download the latest Source Engine apk and then the game apk of your choosing (the Source Engine app launches base Half-Life 2); see the External links section below.
- In the phone's storage create a folder called

srceng(or anything really) - Launch Steam, then click here to open Steam developer console.
- Download the game using this command as an example:
download_depot 220 221 401613439882517483- this example here downloads Half-Life 2 pre-Anniversary version. - Go to

Steam folder\steamapps\content\app_220\depot_221and copy the
hl2(or other games) folder to
srceng(or whatever you named it). - Optionally set any parameters (launch options) and launch.
From your phone
- Download the latest Source Engine apk and then the game apk of your choosing (the Source Engine app launches base Half-Life 2); see the External links section below.
- In the phone's storage create a folder called

srceng(or anything really) - Install Termux.
- Once inside Termux, install Depot Downloader
- Download the games using this command as an example:
depotdownloader -username user -password pass -app 220 -depot 221 -dir HL2 -validate -branch steam_legacy- this exmaple here downloads Half-Life 2 pre-Anniversary version. - Verify with the Steam Mobile app or your email (if you use Steam Guard).
- Go to your Downloads folder, find "depotdownload" directory and copy the

hl2(or other games) folder to
srceng(or whatever you named it). - Optionally set any parameters (launch options) and launch.
-branch steam_legacy to choose the steam_legacy build for Half-Life 2. For TF2 branch based game (-branch previous_build.
Installing Other Games
To install games besides Half-Life 2, simply copying the folder of the same name as the game to the srceng folder is all that is needed.
For example, to install Portal, these parameters can be used -app 400 -depot 401 for Portal's resources which have to then simply be copied to the srceng folder. Then Portal can be launched from the separate Portal app.
The following diagram showcases the game folder structure:
srceng
|
├── hl2         -->  Half-Life 2, (REQUIRED FOR ALL GAMES)
├── platform    -->  Files related to VGUI, (REQUIRED FOR ALL GAMES)
|
├── hl2mp       -->  Half-Life 2: Deathmatch
├── episodic    -->  Half-Life 2: Episode 1
├── ep2         -->  Half-Life 2: Episode 2
|
├── hl1         -->  Half-Life: Source
├── dod         -->  Day of Defeat: Source
├── cstrike     -->  Counter-Strike: Source
└── portal --> PortalInstalling on an SD Card
Installing all the game files on a SD Card can be beneficial if the internal storage is full or has slow read-write speeds.
However, since the app only allows for the selection of directories from the internal storage, the SD Card path has to be entered manually.
Getting the path to the SD Card alone can be challenging since regular file managers just report it as "SD Card" and don't give the actual path to it.
The easiest and least "ad-riddled" way of getting the SD Card's path is to connect the device to a computer loaded with ADB (Android Debug Bridge)
To use ADB, USB debugging has to be enabled which varies depending on your Android variant.
Once all that has been done, a command prompt has to be opened in the folder in which ADB is located in (this can be done by typing cmd in the address bar)
Then to confirm that the device is recognized by the system, typing in adb devices will show all attached devices.
If a string of numbers and letters followed with device shows up, that means that it has been detected.
yes.Next, type adb shell
Then, type df. This will list all directories on a root level. The directories we are interested in are usually at the bottom.
There should be 2 directories starting with ![]()
/storage/.
The internal storage will always be ![]()
/storage/emulated while the SD-Card is usually ![]()
/storage/ followed by a 8 character string divided into two by a dash (-)
For example:
/dev/fuse			109783884 53449520 56203292   49%  /storage/emulated		<- The Internal Storage
/dev/fuse			124835840 35815296 89020544   29%  /storage/9257-194E		<- The SD-Card
The path specified (in this example ![]()
/storage/9257-194E) is what we will write in the "Path to game resources" dialog in the app.


