Creating Angled Geometry: Difference between revisions
Speedvoltage (talk | contribs) m (→Introduction) |
Le Glaconus (talk | contribs) (formatting) |
||
| (8 intermediate revisions by 4 users not shown) | |||
| Line 1: | Line 1: | ||
{{languageBar}} | |||
==Introduction== | ==Introduction== | ||
Creating angled [[Brush|geometry]] in your level adds a lot more depth and realism | Creating angled [[Brush|geometry]] in your level adds a lot more depth and realism. In addition, your level becomes more interesting when compared to the real world. | ||
{{Note|It is recommended that you familiarize yourself with the [[Hammer Vertex Tool|vertex tool]].}} | {{Note|It is recommended that you familiarize yourself with the [[Hammer Vertex Tool|vertex tool]] beforehand.}} | ||
Once you understand how angled geometry works, you will get something like this. | Once you understand how angled geometry works, you will get something like this. | ||
[[ | [[File:Rotated Brushes.png|thumb|600px|center|3D View of angled geometry.]] | ||
[[ | [[File:Rotated Brushes 2D Views.png|thumb|600px|center|2D View of angled geometry.]] | ||
{{tip|You can use this method to create your own grid, which will help you at aligning brushes and/or props. Make sure you create a [[Grouping and VisGrouping|visgroup]] for those brushes so that you can disable it when you ship your level!}} | {{tip|You can use this method to create your own grid, which will help you at aligning brushes and/or props. Make sure you create a [[Grouping and VisGrouping|visgroup]] for those brushes so that you can disable it when you ship your level !}} | ||
{{warning|Never rotate a brush that | {{warning|Never rotate a brush that seals your world by using the corner handles. Doing so will cause your brush's vertex points to no longer snap to the grid, making it hard to work with. Always follow the method below should you want angled geometry in your level.}} | ||
==Creating Angled Geometry== | ==Creating Angled Geometry== | ||
In this example, we are going to use a simple 128x128x128 | In this example, we are going to use a simple 128x128x128 brush. | ||
{{note|This example shows you how to do 30-degree angled brushes but this method still works if you want to have a different degree rotation. Increase or decrease your grid size and apply this method again.}} | |||
[[ | [[File:Basic Block.png|thumb|600px|center|Creating a simple block.]] | ||
Once you have your block created, click on the vertex tool or use the [[Hammer Hotkey Reference|hotkey]] {{key|Shift|V}}. | Once you have your block created, click on the vertex tool or use the [[Hammer Hotkey Reference|hotkey]] {{key|Shift|V}}. | ||
[[ | [[File:Vertex Mode.png|thumb|600px|center|Vertex Mode.]] | ||
Either click on the vertex tool again or hit {{key|Shift|V}} again. We don't need the yellow dots for this, so we're hiding them. | Either click on the vertex tool again or hit {{key|Shift|V}} again. We don't need the yellow dots for this, so we're hiding them. | ||
[[ | [[File:Vertex Mode, White dots only.png|thumb|600px|center|Vertex Mode (Only White Dots).]] | ||
Select the top vertex points and move them to the right. | Select the top vertex points and move them to the right. | ||
[[ | [[File:Top Vertex points.png|thumb|600px|center|Selecting the top vertex points.]] | ||
[[ | [[File:Moving The Top Points.png|thumb|600px|center|Moving the vertex points.]] | ||
Deselect the top vertex points and select the ones on the left and move them up. | Deselect the top vertex points and select the ones on the left and move them up. | ||
[[ | [[File:Side Vertex Points.png|thumb|600px|center|Selecting the left side vertex points.]] | ||
[[ | [[File:Moving The Side Vertex points.png|thumb|600px|center|Moving the vertex points.]] | ||
Exit the vertex tool by clicking on the selection tool or by using the hotkey {{key|Shift|S}} | Exit the vertex tool by clicking on the selection tool or by using the hotkey {{key|Shift|S}} | ||
[[ | [[File:45-degree rotation.png|thumb|600px|center|On grid angled brush.]] | ||
==Aligning The Textures== | ==Aligning The Textures== | ||
| Line 39: | Line 42: | ||
When you use the vertex tool and move the vertex points around, the texture is stationary. To have the texture properly aligned, open the [[Hammer Face Edit Dialog|Face Edit Sheet tool]] by clicking on the icon or using the hotkey {{key|Shift|A}}. | When you use the vertex tool and move the vertex points around, the texture is stationary. To have the texture properly aligned, open the [[Hammer Face Edit Dialog|Face Edit Sheet tool]] by clicking on the icon or using the hotkey {{key|Shift|A}}. | ||
Select the side face and {{key|Alt|Right Click}} on the top face. | Select the side face and {{key|Alt|Right Click}} on the top face. | ||
[[ | [[File:Applying the texture.png|thumb|600px|center|Applying the texture.]] | ||
{{note|Because you have angled geometry, the top and bottom faces are wider than if they were vertical or horizontal geometry.}} | {{note|Because you have angled geometry, the top and bottom faces are wider than if they were vertical or horizontal geometry.}} | ||
| Line 45: | Line 48: | ||
==Angled Geometry Example== | ==Angled Geometry Example== | ||
Here is a quick example of what angled geometry can do to a level. | Here is a quick example of what angled geometry can do to a level. | ||
[[ | [[File:Angled Geometry Put In A Map.png|thumb|600px|center|2D View of angled geometry in a map.]] | ||
[[ | [[File:Angled Geometry In-Game.png|thumb|600px|center|In-game.]] | ||
==See | ==See also== | ||
* [[Creating a Curved Hallway]] | * [[Creating a Curved Hallway]] | ||
[[Category:Level Design | [[Category:Level Design]] | ||
Latest revision as of 14:53, 28 May 2025
Introduction
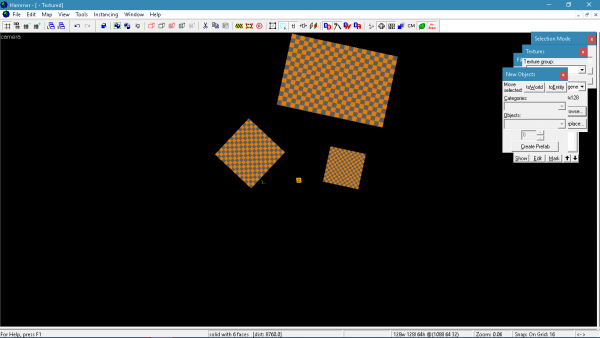
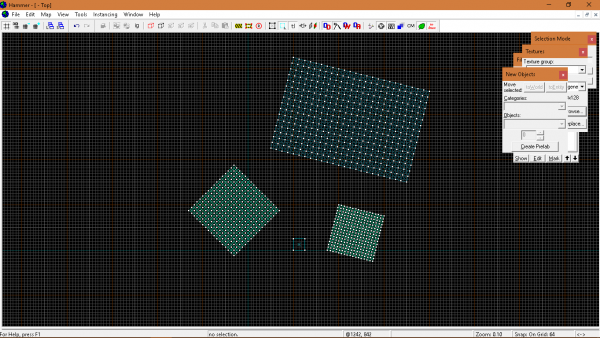
Creating angled geometry in your level adds a lot more depth and realism. In addition, your level becomes more interesting when compared to the real world.
Once you understand how angled geometry works, you will get something like this.
Creating Angled Geometry
In this example, we are going to use a simple 128x128x128 brush.
Once you have your block created, click on the vertex tool or use the hotkey ⇧ Shift+V.
Either click on the vertex tool again or hit ⇧ Shift+V again. We don't need the yellow dots for this, so we're hiding them.
Select the top vertex points and move them to the right.
Deselect the top vertex points and select the ones on the left and move them up.
Exit the vertex tool by clicking on the selection tool or by using the hotkey ⇧ Shift+S
Aligning The Textures
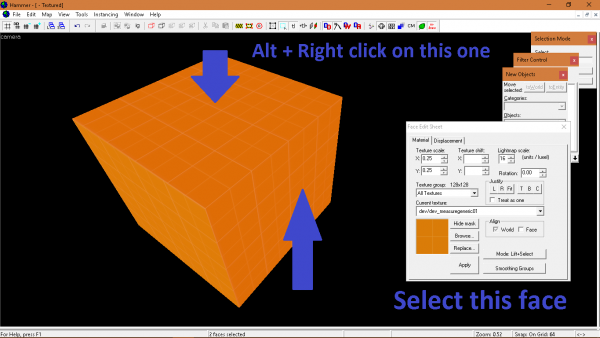
When you use the vertex tool and move the vertex points around, the texture is stationary. To have the texture properly aligned, open the Face Edit Sheet tool by clicking on the icon or using the hotkey ⇧ Shift+A. Select the side face and Alt+Right Click on the top face.
Angled Geometry Example
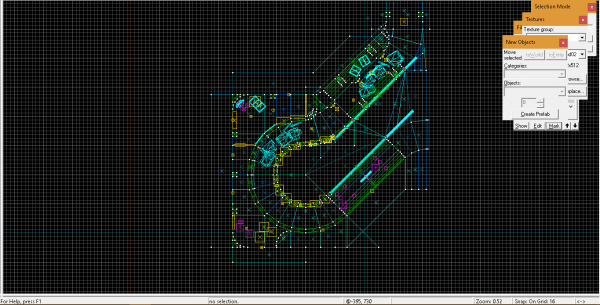
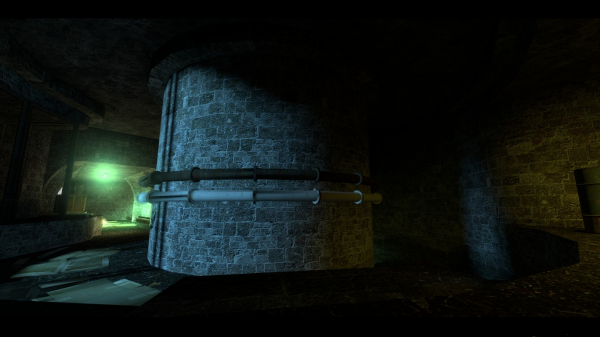
Here is a quick example of what angled geometry can do to a level.
