Ko/Teleporters: Difference between revisions
(Created page with "Teleporters can be created using standard Source entities. == One-way teleporter == Start by creating a brush and texturing it with [[Tool_textures#trigger|tools/toolstrigge...") |
m (obsolete language category) |
||
| (17 intermediate revisions by 7 users not shown) | |||
| Line 1: | Line 1: | ||
Teleporters | {{lang|Teleporters}} | ||
텔레포터들은 Source의 기본 엔티티들을 이용해서 만들수 있습니다. | |||
== | == 편도 텔레포터 == | ||
처음 시작으로 [[Tool_textures#trigger|tools/toolstrigger]] 텍스쳐로 발려진 블럭을 만드는 것으로 시작합니다. 이제 그 블럭을 누르고 {{key|CTRL}} + {{key|T}} 를 누르거나 우클릭을 사용해 ''Tie To Entity'' 를 선택하세요, {{L|trigger_teleport}}를 선택하시고 적용해주세요. 이제 이 공간은 플레이어가 순간이동 하려면 꼭 들어가야 하는 장소가 됬습니다 (오른쪽 그림). | |||
:* | :* 'Remote Destination'의 이름을 적절한걸로 설정해주세요 (예를 들자면'''teleport_destination_1'''처럼). | ||
:* | :* 'Flags'탭의 'Clients' 항목을 플레이어들이 순간이동 될수있게 체크해주세요. | ||
다음은, {{L|info_teleport_destination}}을 {{L|Entity creation|entity}}로 텔레포터의 ''출구'' 가 되길 원하는 곳에 설치해주세요. 이 점으로 이제 플레이어가 순간이동 됩니다. | |||
:* | :* 'Name' 항목을 전 단계에 사용했었던 ('''teleport_destination_1''')과 똑같은 적절한 이름을 넣어주세요. | ||
{{ | {{Note|이 엔티티를 바닥에서 조금 위로 올려서 배치해주세요. 이유인 즉슨 엔티티가 바닥과 나란하게 배치되면 플레이어들이 낄수가 있습니다. 어느 정도 띄위면 순간이동후 바닥으로 떨어집니다.}} | ||
{{clr}} | {{clr}} | ||
이제 게임에서, 당신이 {{L|trigger_teleport}}를 만지면, 당신은 {{L|info_teleport_destination}}로 나올것입니다. | |||
== | == 쌍방 텔레포터 == | ||
[[ | [[File:Trigger_teleport_ex.jpg|thumb|right|쌍방 텔레포터의 예.]] | ||
쌍방 텔레포터를 만드는 것은 편도 텔레포터를 만드는것과 매우 비슷합니다, 그리고 당신이 이것은 성공적으로 해낼수있다면, 이제 당신의 센스가 필요한것입니다. | |||
<br><br> | <br><br> | ||
첫째로, 당신의 순간이동 입구가 될 블럭을 [[Tool_textures#trigger|tools/toolstrigger]] 텍스쳐로 발라주세요. 이제 편도 텔레포터처럼 {{key|CTRL}} + {{key|T}}를 누르거나 우-클릭을 눌러서 ''Tie To Entity'' 를 두쪽다 선택해주세요 | |||
:* | |||
:* | :* {{L|keyvalues}} 와 {{L|flag|flags}}들은 편도 텔레포터와 같게 설정하세요 하지만 Remote Destination은 다르게 설정하셔야 합니다 | ||
:* | :* 한 텔레포터 입구의 Remote destination 값을 (예를 들자면, '''teleport_destination_1''')과 같은 적절한 것으로 설정해주세요 다른 입구는 '''teleport_destination_2'''과 같은것으로 설정해주세요. | ||
:* 이 블럭 엔티티들을 적절한 이름을 부여하세요 teleport_entrance_1 이나 teleport_entrance_2 와 같은. | |||
<br> | <br> | ||
이제 2개의 {{L|info_teleport_destination}} 엔티티들을 만들어주세요. 이것들은 당신이 어디로 순간이동될지 설정해주는것입니다. | |||
:* | |||
:* | :* 각각의 이름을 적절한 것으로 설정해주세요 방금 했던것을 생각해보세요!(예를 들면. '''teleport_destination_1''' 과 '''teleport_destination_2''' ) | ||
:* | :* 하나의''teleport destination'' 을 순간이동 하는 방향이 아닌 ''입구'' 에 놓아주세요. | ||
:* 다른 ''teleport destination'' 을 다른쪽의 ''텔레포터 입구'' 에 놓아주세요. | |||
{{warning| | {{warning:ko|''info_teleport_destination'' 엔티티가 ''trigger_teleport'' 블럭안에 들어가 있지 않도록 꼭 확인하세요. 만약 그런 일이 생긴다면, 당신이 순간이동 될때, 당신은 두 텔레포터와 두 목적지 사이를 영원히 반복적으로 멈추지 않고 돌고 도는 순간이동을 할것입니다 }} | ||
{{ | {{Note|엔티티들의 이름은 꼭 중요한것이 아닙니다, 단지 알아보기 편리하게 하기위해 하는것일뿐입니다.}} | ||
<br> | <br> | ||
이제 당신이 '''teleport_entrance_1''' 로 들어가면 '''teleport_destination_1'''로 나오고 똑같이 '''teleport_entrance_2'''로 들어가면 '''teleport_destination_2'''로 나옵니다. | |||
<!-- Suggestion to add appropriate image for this section --> | <!-- Suggestion to add appropriate image for this section --> | ||
== | ==팀 텔레포터 만들기== | ||
{{ | {{Note|이 부분은 {{Tf2}} {{L|Team Fortress 2}} 에 해당하는 부분입니다.}} | ||
만약 당신이 텔레포터들이 당신 맵에 있을때, 그리고 당신이 팀 텔레포터를 만들고 싶은떄, 당신은 하나의 텔레포터당 하나의 {{L|filter_activator_tfteam}}를 만들어야 합니다. | |||
:* | :*{{L|filter_activator_tfteam}}의 설정들중, 이름을 짓고, 텔레포터를 사용 할 수 있는 RED/BLU '팀'을 정해주세요. | ||
:* | :*{{L|trigger_teleport}} 설정들 중, 'Filter Name'을 {{L|filter_activator_tfteam}}에 이름에 해당하는 값으로 설정해주세요. | ||
<br> | <br> | ||
{{ | {{Note|당신은 또한 다른 필터를 사용해 순간이동 되는동안 물체에 적용시킬수 있습니다 (예를 들면, {{L|filter_activator_mass_greater}} 같은).}} | ||
== | ==외부 링크== | ||
*[http://sdknuts.net/tutorials/wiseTele.asp Teleporting (sdknuts)] | *[http://sdknuts.net/tutorials/wiseTele.asp Teleporting (sdknuts)] | ||
*[http://www.halfwit-2.com/?page=tutorials&id=12 Teleports (halfwit-2)] | *[http://www.halfwit-2.com/?page=tutorials&id=12 Teleports (halfwit-2)] | ||
| Line 52: | Line 54: | ||
*[http://www.snarkpit.net/index.php?s=articles&article=149 Random Teleporter (snarkpit)] | *[http://www.snarkpit.net/index.php?s=articles&article=149 Random Teleporter (snarkpit)] | ||
[[Category: | {{ACategory|Level Design}} | ||
[[Category:Korean]] | |||
Latest revision as of 03:37, 22 August 2024
텔레포터들은 Source의 기본 엔티티들을 이용해서 만들수 있습니다.
편도 텔레포터
처음 시작으로 tools/toolstrigger 텍스쳐로 발려진 블럭을 만드는 것으로 시작합니다. 이제 그 블럭을 누르고 CTRL + T 를 누르거나 우클릭을 사용해 Tie To Entity 를 선택하세요, trigger_teleport를 선택하시고 적용해주세요. 이제 이 공간은 플레이어가 순간이동 하려면 꼭 들어가야 하는 장소가 됬습니다 (오른쪽 그림).
- 'Remote Destination'의 이름을 적절한걸로 설정해주세요 (예를 들자면teleport_destination_1처럼).
- 'Flags'탭의 'Clients' 항목을 플레이어들이 순간이동 될수있게 체크해주세요.
다음은, info_teleport_destination을 entity로 텔레포터의 출구 가 되길 원하는 곳에 설치해주세요. 이 점으로 이제 플레이어가 순간이동 됩니다.
- 'Name' 항목을 전 단계에 사용했었던 (teleport_destination_1)과 똑같은 적절한 이름을 넣어주세요.
이제 게임에서, 당신이 trigger_teleport를 만지면, 당신은 info_teleport_destination로 나올것입니다.
쌍방 텔레포터
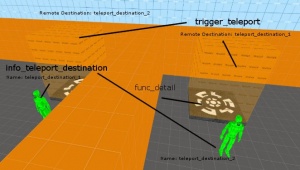
쌍방 텔레포터를 만드는 것은 편도 텔레포터를 만드는것과 매우 비슷합니다, 그리고 당신이 이것은 성공적으로 해낼수있다면, 이제 당신의 센스가 필요한것입니다.
첫째로, 당신의 순간이동 입구가 될 블럭을 tools/toolstrigger 텍스쳐로 발라주세요. 이제 편도 텔레포터처럼 CTRL + T를 누르거나 우-클릭을 눌러서 Tie To Entity 를 두쪽다 선택해주세요
이제 2개의 info_teleport_destination 엔티티들을 만들어주세요. 이것들은 당신이 어디로 순간이동될지 설정해주는것입니다.
- 각각의 이름을 적절한 것으로 설정해주세요 방금 했던것을 생각해보세요!(예를 들면. teleport_destination_1 과 teleport_destination_2 )
- 하나의teleport destination 을 순간이동 하는 방향이 아닌 입구 에 놓아주세요.
- 다른 teleport destination 을 다른쪽의 텔레포터 입구 에 놓아주세요.
이제 당신이 teleport_entrance_1 로 들어가면 teleport_destination_1로 나오고 똑같이 teleport_entrance_2로 들어가면 teleport_destination_2로 나옵니다.
팀 텔레포터 만들기
만약 당신이 텔레포터들이 당신 맵에 있을때, 그리고 당신이 팀 텔레포터를 만들고 싶은떄, 당신은 하나의 텔레포터당 하나의 filter_activator_tfteam를 만들어야 합니다.
- filter_activator_tfteam의 설정들중, 이름을 짓고, 텔레포터를 사용 할 수 있는 RED/BLU '팀'을 정해주세요.
- trigger_teleport 설정들 중, 'Filter Name'을 filter_activator_tfteam에 이름에 해당하는 값으로 설정해주세요.
