Discouragement Field: Difference between revisions
No edit summary |
Thunder4ik (talk | contribs) m (Unicodifying, replaced: [[Image: → [[File: (10)) |
||
| (8 intermediate revisions by 7 users not shown) | |||
| Line 1: | Line 1: | ||
{{lang|Discouragement Field}}{{p2 topicon}} | |||
[[File:Multiplediscouragementbeamsicon.png|thumb|right]] | [[File:Multiplediscouragementbeamsicon.png|thumb|right]] | ||
{{portal2}} The '''Discouragement Field''' or '''Laser Field''' is a special energy field in {{Portal2|3}} which blocks only the player (instantly killing them), not other objects. It can be considered as the counterpart to the [[Emancipation Grid]]. | |||
<!-- | |||
The | The website with these instances has been dead for years, and the only laserfield instance Valve provides is an unfinished beta version. | ||
Commenting this out until some new ones are made. - Luke18033 | |||
== Instance == | == Instance == | ||
[[File:Death field 1280.jpg|thumb|right|Laser Field example.]] | [[File:Death field 1280.jpg|thumb|right|Laser Field example.]] | ||
* Create a new [[func_instance]] in your map, select ''VMF Filename'' and click ''Browse...'' on the right and select one of the two death field instances. | * Create a new [[func_instance]] in your map, select ''VMF Filename'' and click ''Browse...'' on the right and select one of the two death field instances. | ||
* The Discouragement Field is now ready and active on default. If you want to activate or deactivate the field, follow these steps: | * The Discouragement Field is now ready and active on default. If you want to activate or deactivate the field, follow these steps: | ||
| Line 15: | Line 17: | ||
! || My Output || Target Entity || Target Input || Parameter || Delay || Only Once | ! || My Output || Target Entity || Target Input || Parameter || Delay || Only Once | ||
|- | |- | ||
| [[ | | [[File:Io11.png]] || OnTrigger || death_field_1 || instance:enable;Trigger || <none> || 0.00 || No | ||
|} | |} | ||
(for activation) | (for activation) | ||
| Line 22: | Line 24: | ||
! || My Output || Target Entity || Target Input || Parameter || Delay || Only Once | ! || My Output || Target Entity || Target Input || Parameter || Delay || Only Once | ||
|- | |- | ||
| [[ | | [[File:Io11.png]] || OnTrigger || death_field_1 || instance:disable;Trigger|| <none> || 0.00 || No | ||
|} | |} | ||
(for deactivation) | (for deactivation) | ||
--> | |||
== Manual Creation == | == Manual Creation == | ||
For this tutorial we're going to create a Laser Field with a width of 128 units. | |||
Select the '''tools/toolsnodraw''' texture and create a 128w 1l 128h block brush. | Select the '''tools/toolsnodraw''' texture and create a 128w 1l 128h block brush. | ||
Now click '''Shift + A''' to open the Texture Application Tool, select the front and the back face of the brush, apply the '''effects/laserplane''' texture and click "Fit". [[File:Laserplance tex.jpg|thumb|right|Click for preview.]] | Now click '''Shift + A''' to open the Texture Application Tool, select the front and the back face of the brush, apply the '''effects/laserplane''' texture and click "Fit". [[File:Laserplance tex.jpg|thumb|right|Click for preview.]] | ||
Next, tie the brush to | {{Note|I recommend that, after you hit "Fit", you also align it to the top, as well as adding 256 to the 'Y' axis. This will add to the visual effect by removing the annoying yet very common gap in the middle part of the field.}} | ||
Next, tie the brush to an entity by clicking the '''toEntity''' button on the lower right side of the Hammer Interface and make it a {{ent|func_brush}} with the following settings: | |||
::{| class=standard-table | ::{| class=standard-table | ||
! Property Name || Value | ! Property Name || Value | ||
| Line 44: | Line 45: | ||
Now, we want the Laser Field to kill the player when they try to pass through it. | Now, we want the Laser Field to kill the player when they try to pass through it. | ||
For this, create a 128w | For this, create a 128w 2l 128h block brush that overlaps the first brush you made, apply the <code>tools/toolstrigger</code> texture to every face and make it a {{ent|trigger_hurt}} with these settings: | ||
::{| class=standard-table | ::{| class=standard-table | ||
! Property Name || Value | ! Property Name || Value | ||
| Line 51: | Line 52: | ||
|- | |- | ||
| Damage || 1000 | | Damage || 1000 | ||
|- | |||
| Damage Cap || 1000 | |||
|- | |- | ||
| Damage Type || ENERGYBEAM | | Damage Type || ENERGYBEAM | ||
|} | |} | ||
And of course, make sure the '''Clients''' flag is enabled, otherwise it won't work. | And of course, make sure the '''Clients''' flag is enabled, otherwise, it won't work. | ||
To make it look like the lasers aren't just coming out of nowhere, create two | To make it look like the lasers aren't just coming out of nowhere, create two {{ent|prop_static}} entities. | ||
One to the left and one to the right of the Death Field brush. | One to the left and one to the right of the Death Field brush. | ||
Select the model | Select the model <code>models/props/fizzler.mdl</code> and set the skin to "2". | ||
[[File:deathfield_models.jpg|thumb|right|Click for preview.]] | [[File:deathfield_models.jpg|thumb|right|Click for preview.]] | ||
Now create an | Now create an {{ent|ambient_generic}} and place it roughly in the middle of the brush. | ||
Use the following settings: | Use the following settings: | ||
::{| class=standard-table | ::{| class=standard-table | ||
| Line 68: | Line 71: | ||
| Name || deathfield1_sound | | Name || deathfield1_sound | ||
|- | |- | ||
| Sound Name || | | Sound Name || LaserGreen.BeamLoop | ||
|- | |- | ||
| Volume || | | Volume || 4 | ||
|- | |- | ||
| SourceEntityName || deathfield1_brush | | SourceEntityName || deathfield1_brush | ||
| Line 76: | Line 79: | ||
The flags '''Start silent''' and '''Is NOT looped''' must be disabled! | The flags '''Start silent''' and '''Is NOT looped''' must be disabled! | ||
Alright, the Laser Field itself is ready to be used in game now, but for sure you want to use the | Alright, the Laser Field itself is ready to be used in-game now, but for sure you want to use the possibility of turning it on and off in your map. | ||
For this example we will use a | For this example we will use a {{ent|prop_floor_button}}. Name it something like "button" and create the outputs: | ||
::{| class=standard-table | ::{| class=standard-table | ||
! || My Output || Target Entity || Target Input || Parameter || Delay || Only Once | ! || My Output || Target Entity || Target Input || Parameter || Delay || Only Once | ||
|- | |- | ||
| [[ | | [[File:Io11.png]] || OnPressed|| deathfield1_brush || Disable || || 0.00 || No | ||
|- | |- | ||
| [[ | | [[File:Io11.png]] || OnPressed|| deathfield1_trigger || Disable || || 0.00 || No | ||
|- | |- | ||
| [[ | | [[File:Io11.png]] || OnPressed|| deathfield1_sound || StopSound || || 0.00 || No | ||
|- | |- | ||
| [[ | | [[File:Io11.png]] || OnPressed|| deathfield1_light || TurnOff || || 0.00 || No | ||
|- | |- | ||
| [[ | | [[File:Io11.png]] || OnUnPressed|| deathfield1_brush || Enable || || 0.00 || No | ||
|- | |- | ||
| [[ | | [[File:Io11.png]] || OnUnPressed|| deathfield1_trigger || Enable || || 0.00 || No | ||
|- | |- | ||
| [[ | | [[File:Io11.png]] || OnUnPressed|| deathfield1_sound || PlaySound || || 0.00 || No | ||
|- | |- | ||
| [[ | | [[File:Io11.png]] || OnUnPressed|| deathfield1_light || TurnOn || || 0.00 || No | ||
|} | |} | ||
Congratulations! You have created a fully | Congratulations! You have created a fully functional Laser Field for use in your map![[Category:Portal 2 Level Design]][[Category:Portal 2 Tutorials]] | ||
[[Category:Portal 2 Level Design]] | |||
[[Category:Portal 2 Tutorials]] | |||
Latest revision as of 07:47, 8 January 2024
![]() The Discouragement Field or Laser Field is a special energy field in Portal 2 which blocks only the player (instantly killing them), not other objects. It can be considered as the counterpart to the Emancipation Grid.
The Discouragement Field or Laser Field is a special energy field in Portal 2 which blocks only the player (instantly killing them), not other objects. It can be considered as the counterpart to the Emancipation Grid.
Manual Creation
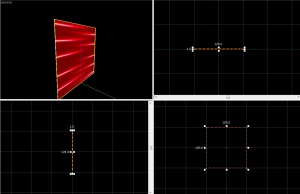
For this tutorial we're going to create a Laser Field with a width of 128 units. Select the tools/toolsnodraw texture and create a 128w 1l 128h block brush.
Now click Shift + A to open the Texture Application Tool, select the front and the back face of the brush, apply the effects/laserplane texture and click "Fit".
Next, tie the brush to an entity by clicking the toEntity button on the lower right side of the Hammer Interface and make it a func_brush with the following settings:
Property Name Value Name deathfield1_brush Render FX Constant Glow Solidity Never Solid
Now, we want the Laser Field to kill the player when they try to pass through it.
For this, create a 128w 2l 128h block brush that overlaps the first brush you made, apply the tools/toolstrigger texture to every face and make it a trigger_hurt with these settings:
Property Name Value Name deathfield1_trigger Damage 1000 Damage Cap 1000 Damage Type ENERGYBEAM
And of course, make sure the Clients flag is enabled, otherwise, it won't work.
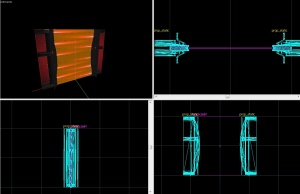
To make it look like the lasers aren't just coming out of nowhere, create two prop_static entities.
One to the left and one to the right of the Death Field brush.
Select the model models/props/fizzler.mdl and set the skin to "2".
Now create an ambient_generic and place it roughly in the middle of the brush. Use the following settings:
Property Name Value Name deathfield1_sound Sound Name LaserGreen.BeamLoop Volume 4 SourceEntityName deathfield1_brush
The flags Start silent and Is NOT looped must be disabled!
Alright, the Laser Field itself is ready to be used in-game now, but for sure you want to use the possibility of turning it on and off in your map. For this example we will use a prop_floor_button. Name it something like "button" and create the outputs:
Congratulations! You have created a fully functional Laser Field for use in your map!

