Screen (Portal 2): Difference between revisions
Jump to navigation
Jump to search
(Created page with 'Monitor Monitors are easy to make and they make the map more living. Monitors are made by making a func_monitor and a point_camera. Step 1 make a block and press ctrl + t and c…') |
Thunder4ik (talk | contribs) m (→Step 3: Unicodifying, replaced: [[Image: → [[File:) |
||
| (29 intermediate revisions by 10 users not shown) | |||
| Line 1: | Line 1: | ||
{{lang|Screen (Portal 2)}} | |||
Monitors are easy to make | {{stub}} | ||
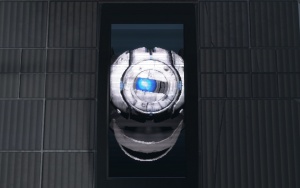
[[File:Wheatley monitor.jpg|thumb|right|300px|Wheatley on one of his monitors.]] | |||
Monitors are used mainly in the [[Wheatley (Portal 2)|Wheatley theme]] where Wheatley can be displayed. They are easy to make with <code>[[func_instance]]</code>. | |||
Step 1 | ==Creating monitors with func_instance== | ||
===Step 1=== | |||
Create a <code>func_instance</code> entity using the [[entity tool]]. Set its VMF filename to <code>instances\monitors\wheatley_bigscreen.vmf</code>. Set its fix-up name to <code>wheatley_monitor_1</code>. Use the [[Hammer_Clipping_Tool|clipping tool]] to create an opening for the monitor and move it into position. | |||
===Step 2=== | |||
Create another <code>func_instance</code>. Set its VMF filename to <code>instances\monitors\wheatley_studio.vmf</code>. Place it outside your map. | |||
===Step 3=== | |||
Create one more <code>func_instance</code> with the VMF <code>instances\choreo\glados_gen_actor.vmf</code>. To make Wheatley speak, fire an output like this: | |||
{| {{OutputsTable}} | |||
| [[File:Io11.png]] || OnTrigger || @glados || RunScriptCode || laser_catapult_test_start() || 0.00 || No | |||
|} | |||
[[Category:Portal 2 Level Design]] | |||
Latest revision as of 12:46, 8 January 2024
Monitors are used mainly in the Wheatley theme where Wheatley can be displayed. They are easy to make with func_instance.
Creating monitors with func_instance
Step 1
Create a func_instance entity using the entity tool. Set its VMF filename to instances\monitors\wheatley_bigscreen.vmf. Set its fix-up name to wheatley_monitor_1. Use the clipping tool to create an opening for the monitor and move it into position.
Step 2
Create another func_instance. Set its VMF filename to instances\monitors\wheatley_studio.vmf. Place it outside your map.
Step 3
Create one more func_instance with the VMF instances\choreo\glados_gen_actor.vmf. To make Wheatley speak, fire an output like this:
| My Output | Target Entity | Target Input | Parameter | Delay | Only Once | |
|---|---|---|---|---|---|---|
| OnTrigger | @glados | RunScriptCode | laser_catapult_test_start() | 0.00 | No |
