Entity creation: Difference between revisions
Jump to navigation
Jump to search
")


")
 Tip:You can also use the shortcut
Tip:You can access the Object Properties dialog for a brush-based entity the same way you do for a point-based entity: select it and press
Tip:You can also use the shortcut
Tip:You can access the Object Properties dialog for a brush-based entity the same way you do for a point-based entity: select it and press
Yellowblood (talk | contribs) (→Brush-based entity creation: GAH!) |
(move ?) |
||
| (15 intermediate revisions by 9 users not shown) | |||
| Line 1: | Line 1: | ||
{{LanguageBar|title=Entity creation in Hammer}} | |||
Entities are the monsters, doors, switches and lights that turn your static architecture into an interactive environment. The available selection depends on the game for which you are mapping. | |||
This article covers how to add them to your map. | |||
Point | == Point entity placement == | ||
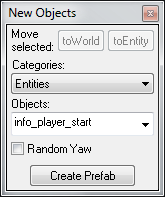
[[File:Hammer_newentity.png|frame|right|Select an entity to place using the New Objects toolbar.]] | |||
Placement of [[Point entity|point entities]] is simple: | |||
# Select the [[Hammer Entity Tool|Entity Tool]]. | # Select the [[Hammer Entity Tool|Entity Tool]] or press {{key|Shift+E}}. | ||
# From the [[Hammer New Objects Toolbar|New Objects toolbar]], select the entity you want from the "Objects" selection box. | # From the [[Hammer New Objects Toolbar|New Objects toolbar]], select the entity you want from the "Objects" selection box (which supports text search). If you can't find what you want in the list, it may be a brush entity. | ||
# Click in a 2D window, then position the entity cursor with the mouse. You can also click on a brush surface in the 3D view, and the point entity will be created there. | # Click in a 2D window, then position the entity cursor with the mouse. You can also click on a brush surface in the 3D view, and the point entity will be created there. | ||
# Pressing <code>Enter</code> will create the entity. | # Pressing <code>Enter</code> will create the entity. | ||
| Line 22: | Line 20: | ||
{{tip|You can also use the shortcut <code>Alt+Enter</code> to open the [[Hammer Object Properties Dialog|Object Properties]] dialog box for the current selection.}} | {{tip|You can also use the shortcut <code>Alt+Enter</code> to open the [[Hammer Object Properties Dialog|Object Properties]] dialog box for the current selection.}} | ||
== Brush | == Brush entity creation == | ||
# Create a brush | [[File:Hammer_objectproperties1.png|thumb|right|Select an entity for the solid from the Class list in Object Properties dialog.]] | ||
# Select the | |||
# Select "Tie to Entity" from the [[Hammer Tools Menu|Tools Menu]], or press the | [[Brush entity|Brush entities]] are a bit more complicated than point-based entities, but should not pose any difficulties once you know their basics. | ||
# [[Basic Construction|Create a brush]], or as many as you like. | |||
# Select everything you want to form the entity. | |||
# Select "Tie to Entity" from the [[Hammer Tools Menu|Tools Menu]], or press the {{key|Ctrl+T}} shortcut. This will turn the selected objects into a brush based entity. | |||
# In the Object Properties dialog, select the appropriate entity from the "Class" list box. Once the entity type is selected, you can modify the entity properties as needed. | # In the Object Properties dialog, select the appropriate entity from the "Class" list box. Once the entity type is selected, you can modify the entity properties as needed. | ||
{{tip|You can access the Object Properties dialog for a brush-based entity the same way you do for a point-based entity: select it and press <code>Alt+Enter</code>. ''' | {{tip|You can access the Object Properties dialog for a brush-based entity the same way you do for a point-based entity: select it and press <code>Alt+Enter</code>. '''''This will not work when the [[Hammer Selection Modes Toolbar|selection mode]] is "Solids"!'''''}} | ||
You will notice that brush-based entities appear as a different color in the 2D windows, typically purple. | |||
=== Combining solid entities === | |||
You can add new brushes to an existing brush entity, even if they are already tied to another one: | |||
# Select the | # Select the brushes you wish to combine. | ||
# Select "Tie to Entity" from the Tools menu, or press | # Select "Tie to Entity" from the Tools menu, or press {{key|Ctrl+T}}. | ||
# | # If you have selected more than one brush entity a dialog will open with a list of them to choose from. Select the one you wish to keep for the final, combined entity (it will be highlighted in the 2D and 3D Views when selected) and press OK. | ||
The Object Properties dialog will then appear, allowing you to change the parameters for the combined entity. | |||
== Using entities == | == Using entities == | ||
* You can move and rotate entities in the same manner as brushes. But you can't resize point entities. | |||
* Entities can be manipulated when the map is running with the [[Inputs and outputs|I/O system]]. | |||
* You can change which type of entity each entity is at any time. KeyValues shared between the first and second types will be preserved. | |||
== See also == | == See also == | ||
* [[ | * [[Basic Construction]] | ||
* [[Inputs and Outputs]] | * [[Inputs and Outputs]] | ||
* [[ | * [[Hammer Entity Tool]] | ||
* [[ | * [[Entity parameters inputs outputs]] - List of entities parameters, Inputs and Outputs (Advanced stuff) | ||
[[Category:Level Design]] | [[Category:Level Design]] | ||
Latest revision as of 09:05, 26 April 2025
Entities are the monsters, doors, switches and lights that turn your static architecture into an interactive environment. The available selection depends on the game for which you are mapping.
This article covers how to add them to your map.
Point entity placement

Select an entity to place using the New Objects toolbar.
Placement of point entities is simple:
- Select the Entity Tool or press Shift+E.
- From the New Objects toolbar, select the entity you want from the "Objects" selection box (which supports text search). If you can't find what you want in the list, it may be a brush entity.
- Click in a 2D window, then position the entity cursor with the mouse. You can also click on a brush surface in the 3D view, and the point entity will be created there.
- Pressing
Enterwill create the entity. - Fine tune the entity position in the 2D and 3D views.
- Choose Properties under the Edit menu if you wish to edit the entity parameters.
Alt+Enter to open the Object Properties dialog box for the current selection.Brush entity creation

Brush entities are a bit more complicated than point-based entities, but should not pose any difficulties once you know their basics.
- Create a brush, or as many as you like.
- Select everything you want to form the entity.
- Select "Tie to Entity" from the Tools Menu, or press the Ctrl+T shortcut. This will turn the selected objects into a brush based entity.
- In the Object Properties dialog, select the appropriate entity from the "Class" list box. Once the entity type is selected, you can modify the entity properties as needed.
Alt+Enter. This will not work when the selection mode is "Solids"!You will notice that brush-based entities appear as a different color in the 2D windows, typically purple.
Combining solid entities
You can add new brushes to an existing brush entity, even if they are already tied to another one:
- Select the brushes you wish to combine.
- Select "Tie to Entity" from the Tools menu, or press Ctrl+T.
- If you have selected more than one brush entity a dialog will open with a list of them to choose from. Select the one you wish to keep for the final, combined entity (it will be highlighted in the 2D and 3D Views when selected) and press OK.
The Object Properties dialog will then appear, allowing you to change the parameters for the combined entity.
Using entities
- You can move and rotate entities in the same manner as brushes. But you can't resize point entities.
- Entities can be manipulated when the map is running with the I/O system.
- You can change which type of entity each entity is at any time. KeyValues shared between the first and second types will be preserved.
See also
- Basic Construction
- Inputs and Outputs
- Hammer Entity Tool
- Entity parameters inputs outputs - List of entities parameters, Inputs and Outputs (Advanced stuff)