Counter-Strike 2 - Weapon Finishes
You can help by
January 2024
这篇文章是关于武器皮肤的技术性内容。
武器修饰的所有基础知识,包括风格指南,都可以在上面的页面中找到。
参见Econ item.
对于贴纸和喷雾,请查看其他尚不存在的页面。
在![]() 反恐精英2中,武器皮肤使用一个名为
反恐精英2中,武器皮肤使用一个名为customweapon的着色器。
下载.obj格式的武器模型
你可以在 https://www.counter-strike.net/workshop/workshopresources 找到并下载CS2的 .obj 格式武器模型文件, 你可以导入到Photoshop, Substance Painter或更多的应用程序。
默认情况下,这些网格的面和顶点是彼此分开/分离的。但是,如果你在Substance Painter中导入其中一个武器模型,当从Substance Painter导出网格时,顶点实际上会按距离合并。如果你使用投影工具的“网格填充”选择工具,它能够选择整个网格,就像Blender可以做的那样“选择链接”,如果顶点被合并的话。
这些合并顶点的法线在视觉上不会受到影响,只会影响元数据。如果这导致了任何其他副作用,则没有记录在案。 然而,当面孔被分割回来时,法线会恢复到之前的值。
应该可以在Blender中为每个.obj创建网格组,使用“按距离合并”将它们导入Substance Painter中以隐藏网格,以便可视化视觉上不可到达的区域,例如弹匣胶囊。
.obj文件会在按距离合并顶点时破坏法线Patterns
喷漆、水文、阳极氧化多彩和阳极氧化喷涂风格中使用的图案都具有相同的基本属性。每种风格最多可以使用四种颜色。图案一次施加一层,从覆盖武器所有可涂漆区域的基础涂层开始。彩色图像通常存储在红色、绿色和蓝色通道中,这些通道以加和方式组合在一起,表示大范围的色值。对于我们的图案,我们利用这种配置存储三个单独的图像。最终结果有点亮,但别担心,它看起来不像武器上的样子。[1]
图案放置
种子
一些武器修饰具有偏移和旋转范围。在应用中,在这些范围内选择随机值,以便每次应用都不同。[2]
纹理
有各种纹理文件组合成一种武器皮肤的材质。
基色
The Base Color texture painting of a weapon finish, which can be combined with other paintkit templates that support "Paint by Number". This can be used to make the wearing of a skin, reveal a different color.
Wearness Mask - Alpha
The Wearness Mask is a grayscale map defined by a range between black and white. This mask can overwrite the "Wear" behaviour of paintkits. The wearness is defined in a .tga of the Base Color texture in the Alpha Channel.
The behaviour of that mask has yet to be documented here. If you set an entire surface with the same greyscale color, the wearness won't immediately take away all of the paint, but it will scatter across that masked area.
This could refer that values close to that number will immediately remove the paint even if on Factory New.
Pearlescent
This does something with color shifting. The scale value could be defining how much it should offset the colors in Hue from HSV.
The Pearlescent effect seems to have no effect on grayscale colors.
Pearlescent Mask
The Pearlescent Mask defines what can be affected by the Pearlescent effect when it's scale value is higher than 0. Where the value 0 (Black) won't make it get affected by Pearlescent at all. But the value 255 (White) will. Anything inbetween defines how strong it should be.
Roughness
Controls roughness which also controls a part of the reflectivity. Where RGB 0 is most reflective.
Roughness Mask
Can be in a separate file. According to the documentation some can be included in the Alpha Channel for certain Pattern templates.
The Roughness mask for Weapon Finishes are effective on all RGB channels. Unlike the actual Weapon Shader, where the Roughness mask can also include the Metalness mask. Weapon Finishes don't have a Metalness mask on the Roughness Mask.
Normal Map
A map that gives things 3D effects without affecting the original mesh file, It is useful for showing things such as engravings.
Ambient Occlusion
Style Presets
Anodized Multicolored
Composite Inputs
Composite Inputs, seems to be the mapping from the old legacy-version meshes from CS:GO, to the new weapon meshes from CS2.
Debugging
Albedo
Albedo is a helpful mode to see your skins in fullbright it should be used when trying to see the finish without shaders/lighting
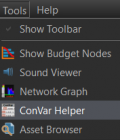
1. In the VConsole click on ConVar Helper
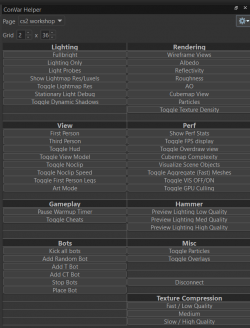
2. These options show up on the side when selecting cs2workshop.
3. When clicking Albedo you get put into a mat_fullbright mode.
- Any too light color will blink Red.
- Any too dark color will blink Blue.
See also
External links


