Ваш первый уровень инструкции (Portal 2)
A brush является простой 3D фигурой, созданная с помощью инструмента "Block Toll Hammer. Браши используются для создания большинства крупных поверхностей в вашем уровне, например, потолков и полов. Теперь мы создадим простую комнату, используя браши.
Создание пола с помощью брашей
- Из меню в левой части экрана "Tool" ("Инструменты") выберем
 Block Tool.
 - Теперь щелкните левой кнопкой мыши по Top 2D виду двигайте мышкой чтобы расширить или уменьшить объект.
- Вы увидите пунктирный контур прямоугольника или квадрата при перетаскивании.
- Создайте квадрат 512x512 единиц и отпустить левую кнопку мыши.
- Нажмите ↵ Enter на клавиатуре, чтобы создать этот браш, который вы нарисовали.
To go back to selection mode, click on the ![]() Selection tool icon on the Tool bar or press the Esc key.
Selection tool icon on the Tool bar or press the Esc key.
In selection mode, with the brush selected, you can change the size of the brush by left-clicking on any of the boxes that appear on the borders of the brush and dragging them out or in.
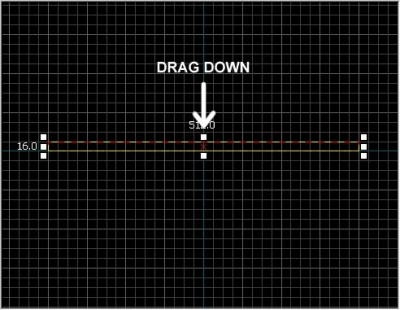
Let's decrease the thickness of the brush (which we'll be using as a floor) from the default 64 units to 16. To do this, we need to change the size of the grid.
Сетка
Сетка отображается во всех 2D-видах. По умолчанию все объекты привязки к сетке. Хотя вы можете отключить это, считается хорошей практикой, оставлять ее на, поскольку она предотвращает утечки и другие ошибки в вашей карте.
По умолчанию размер сетки составляет 64 единиц, что означает, что каждой линии составляет 64 единиц друг от друга. Текущий размер сетки отображается в строке состояния в нижней части окна Hammer.
- Кликните Smaller Grid
 will make the grid half as big, for finer adjustments. You can also decrease the grid size with the [ key
 - Clicking the Larger Grid icon
 сделает сетку вдвое больше. Для более точной настройки вы также можете уменьшить размер сетки с помощью кнопки ] .
To bring the grid size down to 16 units, press the [ key twice. Look at the Status bar at the bottom right of the Hammer window and make sure it reads Grid: 16. If it doesn't, press [ or ] until is does.(может потом переведу не так важно)
Изменение размера пола
Теперь, когда сетка стала меньше, переключитесь в нижнее правое окно.
Убедитесь, что оно называется Side, наведя курсор в левый верхний угол этого окна. Проделав вышеописанные действия, можно приступить к изменению пола. Для этого, возьмите верхнюю часть пола и потяните вниз так, чтобы высота равнялась 16 юнитам.
Moving brushes
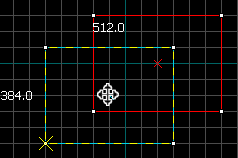
You can move brushes around once they're created. Select the Selection Tool ![]() and mouse over the brush in one of the 2D views, staying clear of the corner handles. The pointer will change into four arrows pointing in all four directions
and mouse over the brush in one of the 2D views, staying clear of the corner handles. The pointer will change into four arrows pointing in all four directions ![]() , indicating the option to move the object.
, indicating the option to move the object.
Click and drag the brush to move the brush in any of the 2D views. Upon release, the brush will be moved to that position.
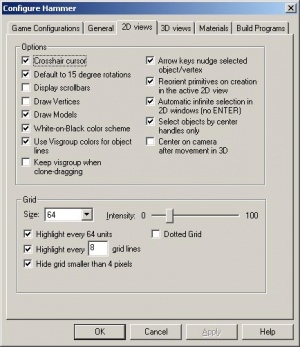
You can also move objects with the arrow (cursor) keys. To do that, we'll need to change a setting in the Hammer options to allow the arrow keys to be used:
- Go to Tools menu and pick Options to bring up the Configure Hammer dialog box.
- Click on the 2D Views tab.
- There are other settings here as well, but for now, we just need to check the box marked Arrow keys nudge selected object/vertex.
- Press OK to confirm the change and close the settings.
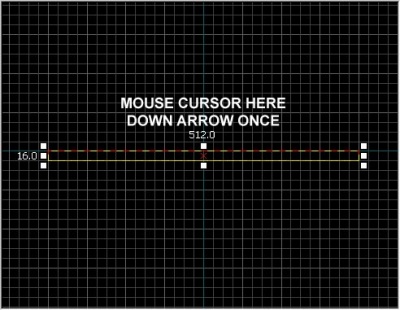
Now let's move the floor brush down 16 units by placing the mouse cursor over the Side viewport and pressing the Down_arrow once.
- Use can use the scrollbars to pan the view.
- For a faster method, hold down the Space bar and left-click and drag to pan.
- Use the Mouse Wheel to zoom in and out.
Texturing
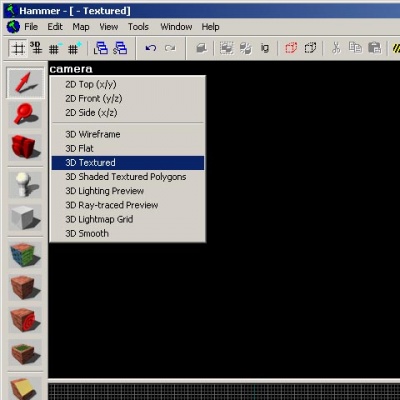
To see textures in the 3D Camera viewport, right-click on the camera text in the 3D Camera viewport and select 3D Textured.
Moving around in 3D is a bit different from the 2D viewports:
- Hold down the Space and left-click and drag to rotate the camera.
- Hold down the Space and right-click amd drag to move up/down and left/right.
- Hold down the Space and both right and left-click and drag to move forward and backward.
- You can also use W, A, S, and D to move forward, backward, strafe left and strafe right respectively.
- The Z key toggles on and off "mouse look" mode. Move your mouse cursor over the 3D Camera viewport and press the Z key. You can now move your mouse around as if mouse look was on in the game.
Move up in the 3D Camera viewport and look downward at the floor that you've just created.
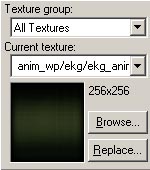
You'll notice there's a default texture on your floor. You'll probably want to change it. To change the current texture, click on the Browse button on the Texture Box.
This will bring up the Texture Browser window.
In the Filter field at the bottom of the browse, you can filter the textures shown based on name. For this tutorial, type in the word "dev_measure" (with the underscore) into the field. This will bring up a listing of "developer" textures that will make it easier to create something quickly.
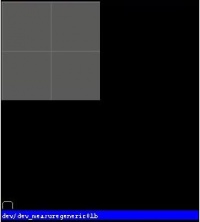
Now, find the texture called dev/dev_measuregeneric01b and double-click on it.
This should bring back the 4 viewports of the editor and place the generic developer texture as the current one in the Texture bar.
Select the floor brush, if it isn't already selected, by clicking on it in the Camera viewport. It should turn red.
After the brush is selected, click on the ![]() Apply current texture icon on the Tool bar to apply the current texture to the selection. The gray developer texture should appear on the floor as shown.
Apply current texture icon on the Tool bar to apply the current texture to the selection. The gray developer texture should appear on the floor as shown.
Creating the walls and ceiling
Now let's go over how to create the walls and ceiling of the room. The easiest way to do this is to duplicate the floor brush.
Duplicating
You can also select an existing brush and duplicate it to create them.
To duplicate:
- Select the floor brush that you've created.
- Move your cursor over the Side viewport.
- Hold the ⇧ Shift key down and press the Up_arrow key to create a duplicate and move it up 1 grid unit.
This will create a brush exactly like the floor on top of the existing floor.
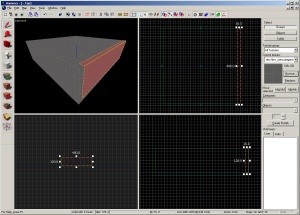
You can now change the size and dimensions of this new brush to create a wall grabbing the corner handles on the brush and dragging it to the size you wish. Let's make the wall 128 units tall and 16 units thick.
Now duplicate the wall 3 more times to outline the floor.
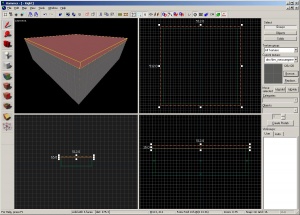
Duplicate the floor brush 1 more time and raise it to become the ceiling.
Deleting brushes
To delete a brush, select it with the Selection Tool ![]() and press the Delete key.
and press the Delete key.
Multiple selection
You'll notice that in the Camera viewport, if you navigate inside the room, it's hard to tell what's going on because all of the walls, floor and ceiling are the same texture. Next we'll change the walls to a different texture.
You can select all of the walls by holding down the Ctrl key and clicking on them one at a time in the Camera viewport. You will have to use the SPACE camera controls to rotate the camera around so you can select each wall.
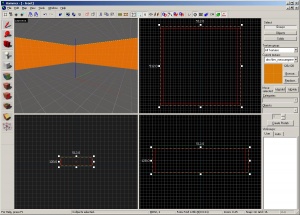
After you have all of the walls selected, click on the Browse button in the Texture bar. This time, select the orange texture next to the current one, labeled dev/dev_measuregeneric01. Double-click it to select it and close the browser window.
Use the ![]() tool on the Tool Bar to apply the orange texture to the walls.
tool on the Tool Bar to apply the orange texture to the walls.
Saving the file
To save a level, you can use Ctrl+S or Save from the File menu.
You will need to give the map a file a name and choose the directory to place it in.
For this tutorial, name the map "tutorial01" and save it into the mapsrc directory, located by default at:
C:\Program Files\Steam\steamapps\common\portal 2\sdk_content\maps\
Your directory may be slightly different, depending upon where you have installed Steam.
Included sample maps
When you went to save your map, you may have noticed other directories underneath the mapsrc path. The Portal 2 Authoring Tools come with some example maps to help you.
| Directory | Contents |
|---|---|
maps\mp_coop_doors |
Coop map. |
maps\mp_coop_paint_red_racer |
Coop map with Propulsion Gel. |
maps\sp_a2_column_blocker |
Single Player map with Bridges. |
maps\sp_a2_trust_fling |
Single Player map with Aerial Faith Plates. |
maps\sp_a3_speed_ramp |
Single Player map with Propulsion Gel. |
maps\sp_a4_laser_catapult |
Single Player map with Tractor Beams, Lasers and an Aerial Faith Plate. |
maps\zoo_mechanics |
Contains most of the the gameplay mechanics used in Portal 2. |
Placing entities
Next we'll place an entity in our level:
- Select the
 Entity Tool on the Tool Bar.
 - Once the Entity Tool is enabled, the Entity selection list on the Object bar becomes active.
- Keep the Categories entry as Entities.
- Click the arrow on the Objects drop down list and select
info_player_start. - Now, navigate in the Camera viewport to the middle of the inside of the room.
- left-click on the floor to place the entity.
This will place an info_player_start entity in the middle of the room.
Placing a light
Now we'll place a source of illumination in the map:
- Select the Entity Tool again
- Select
lightfrom the Objects drop down list on the Object bar. - This time, place the light on the ceiling (above the player's head).
- Go back into selection mode by clicking on the
 Selection tool in the Tool Bar or by pressing the Esc key.
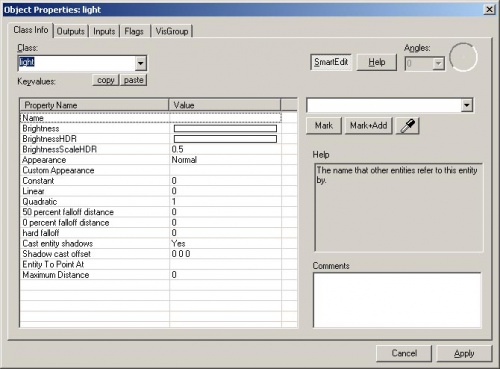
Next we'll change some settings on the light. Bring up the light's properties by double-clicking it in the Camera viewport or by selecting it (left-clicking on it) and then pressing the Alt+↵ Enter keys. This will bring up the Object Properties dialog box.
From the Object Properties, you can change various properties of the entity. For example, you can change the Brightness of this light. Click on the Brightness row under Keyvalues and you will see a set of numbers on the drop down menu on the right side. The default setting for the brightness of a light is 255 255 255 200. The first three numbers represent the RGB values (color) and the last number represents the intensity of the light.
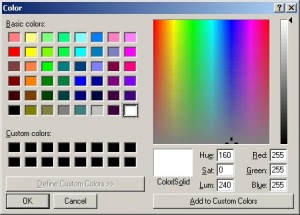
You can click on the Pick Color button to select a color rather than input values for it.
Simply click on the color you want the light to be and click OK.
This will bring you back to the Object Properties dialog box for the light. You should see any changes you made to the brightness on the Brightness row and the drop down field on the right side if the Brightness row is selected.
Click the Apply button to set your changes to the entity and close the dialog box by clicking on the "X" at the upper right side of the window.
Placing a prop_static
Entities also consist of props like furniture, decoration, and complex parts of architecture. There are a variety of different kinds of props. Prop_static entities are props that are static – they don't move, animate, turn on or turn off. There are also prop_dynamic entities that can move, animate, be enabled and disabled. There are also prop_physics entities which the player can interact with and behave physically as they would in the real world.
To place a prop:
- Select on the Entity Tool again.
- Go to the Object bar and change the Objects field to
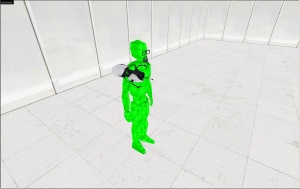
prop_static. - Point to the floor in front of the model of Francis and left-click to place a prop_static. You will see a red cube that represents the
prop_staticbefore a model is attached to it. - Go back into selection mode by clicking on the
 Selection tool in the Tool Bar or by pressing the Esc key.
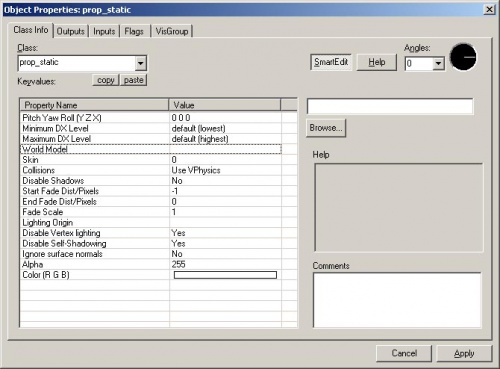
 - Double-click on the red cube to open the properties.
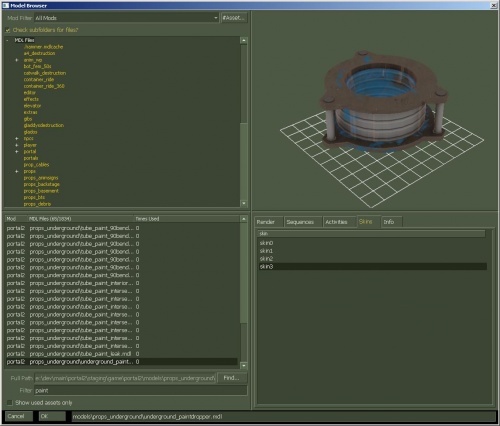
- Double-click on the World Model field to open the Model Browser.
Выбор модели
- В поле Filter введите "
paint". Так вы найдете все модели, названия которых содержат в себе слово "paint" - Найдите модель с следующим названием:
- "
props_underground\underground_paintdropper.mdl". - Она должна выглядеть как на изображении справа.
- "
- Нажмите OK, чтобы выбрать её и вернуться к окну Object Properties. В поле World Model можно увидеть имя выбранной нами ранее модели.
- Нажмите кнопку Apply, чтобы применить изменения к энтити.
- Закройте окно Properties.
Перемещение энтити
Перемещение энтити происходит тем же способом, что и перемещение брашей. Просто зажмите ЛКМ и перемещайте Ваш энтити.
Вращение энтити
Чтобы вращать предмет, Вам необходимо выделить предмет с помощью Selection Tool ![]() , затем кликнуть один раз на нём. На углах предмета должны появиться круги. Наведите курсор на круг в любом 2D окне, а затем зажмите ЛКМ и двигайте курсор, чтобы вращать предмет.
, затем кликнуть один раз на нём. На углах предмета должны появиться круги. Наведите курсор на круг в любом 2D окне, а затем зажмите ЛКМ и двигайте курсор, чтобы вращать предмет.
Запуск Вашего уровня в игре
Для того, чтобы сыграть в Вашу карту, Вам необходимо скомпилировать её.
Процесс компиляции конвертирует Ваш "сырой" .VMF файл в формат .BSP, который используется игровым движком.
Вот несколько простых шагов, которые надо проделать чтобы скомпилировать карту:
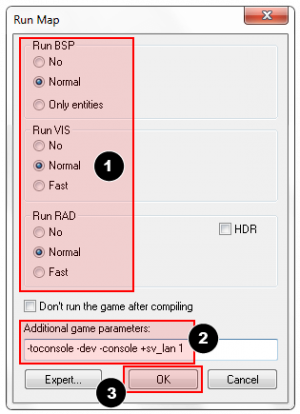
- Открыть меню File и выбрать Run Map..., или нажать клавишу F9.
- Откроется диалоговое окно Run Map.
- Оно используется для настройки параметров компиляции.
- Убедитесь, что у параметров Run BSP, Run VIS и Run RAD выставлено значение Normal.
- В поле Additional game parameters: должны быть введены следующие значения:
-toconsole -dev -console +sv_lan 1
- Теперь можно нажать OK, чтобы запустить процесс компиляции.
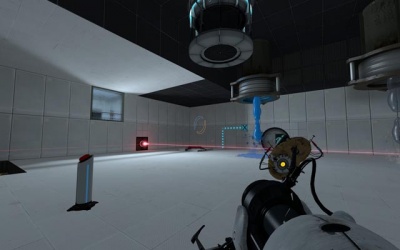
Окно Compile Process Window будет показывать процесс компиляции. Когда компиляция закончится, игра автоматически запустится и загрузит Вашу карту.
Ваш уровень запустится сразу после компиляции. Это займет одну или две минуты.
Консоль разработчика
Создавая уровни для Portal 2, иногда приходится прибегать к помощи консоли разработчика. Например для спавна кубов или турелей при тестировании.
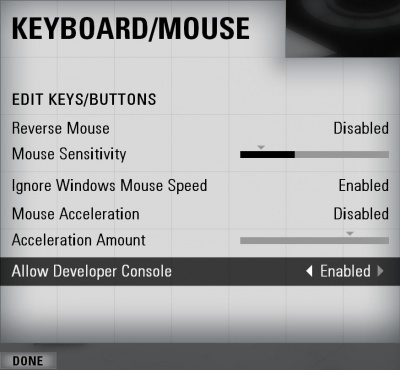
Для того, чтобы включить консоль, Вам необходимо проделать несколько простых шагов:
- Нажать клавишу Esc в игре.
- Нажать кнопку Options, а затем Keyboard/Mouse.
- Нажать на Allow Developer Console и выбрать "Enabled".
- Нажать кнопку Done.
- Вернуться к игре.
Использование консоли:
- Чтобы отобразить её, нажмите клавишу ` (tilde).
- Введите любую консольную команду и нажмите клавишу ↵ Enter.
- Скройте консоль, нажав клавишу ` снова.
Режим noclip
Одна из консольных команд, которая будет Вам полезна - это режим noclip. Этот режим позволяет Вам перемещаться по уровню, летая сквозь предметы и стены.
Чтобы перейти в режим noclip, Вам необходимо:
- Нажать клавишу `, чтобы перейти к консоли разработчика.
- Ввести команду
noclipи нажать клавишу ↵ Enter. - Полетать по уровню.
- Ввести
noclipснова, чтобы выключить этот режим. - Вы можете переключать режим нажатием клавиши, забиндив команду noclip на какую-нибудь из них. Например
bind mouse3 noclip, чтобы забиндить на среднюю кнопку мыши.
Полезные консольные команды
Существует множество консольных команд. Вот некоторые из них:
- sv_cheats 1
- Включает режим читов. Необходим для большинства консольных команд.
- map <name of map>
- Загружает карту, или перезагружает текущую.
- changelevel <name of map>
- Загружает карту, продолжая сессию.
- god 1
- Включает режим бога для всех игроков. Игроки становятся неуязвимыми.
- noclip
- Позволяет Вам летать по всему миру.
