Introducción al Diseño de Nivel/Tú Primer Nivel (Portal 2)
Brush
Un brush o boceto, es una simple forma en 3D creada con Hammer's Block. Los Brushes son usados mayormente para la creación de largas superficies de niveles, tanto como techos y suelos. Nosotros ahora crearemos un cuarto simple usando brushes.
Creando un Suelo con Brush
- En la barra de Tools (Herramientas) de la izquierda, seleccionar el
 Block Tool.
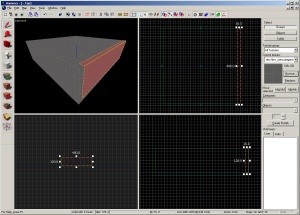
 - Ahora, click izquierdo y arrastrar en la parte Top de la vista 2D en un movimiento hacia la Derecha y Diagonal abajo como se muestra a continuación.
- Debería ver un contorno punteado de un rectángulo o cuadrado mientras arrastra.
- Creando un cuadro de 512x512 unidades y suelta el botón izquierdo del mouse.
- Presionar ↵ Enter en tú teclado para crear este brush que has dibujado.
Volviendo al modo de selección, click en ![]() Selection Tool icono que se encuentra en la barra de herramientas o también presionando la tecla Esc.
Selection Tool icono que se encuentra en la barra de herramientas o también presionando la tecla Esc.
En el modo de selección, con el brush seleccionado, tu puedes cambiar el tamaño del brush con click-izquierdo en cualquiera de los cuadros que aparecen en los bordes del brush y arrastrando hacia afuera o adentro.
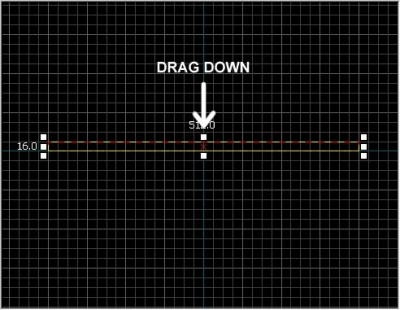
Vamos a diminuir el grosor del brush (Que lo vamos a usar como piso) de las predeterminadas 64 unidades a 16 unidades. Para esto, nosotros necesitamos cambiar el tamaño de la cuadricula (grid).
La Cuadricula (Grid)
La cuadricula o grid esta desplegado en todas las vistas 2d por predeterminado, todos los objetos se ajustan a la cuadricula. Aunque también puede desactivarse, esto es considerado una buena practica para evitar inconvenientes y errores en tú mapa.
El tamaño predeterminado del grid es de 64 unidades, lo que significa que cada linea tiene 64 unidades de separación. El tamaño actual de la cuadrícula se muestra en la Status Bar (Barra de Estado) en la parte inferior de la ventana del programa Hammer.
- Clickeando el icono de Smaller Grid
 hará que el grid sea mitad de grande, para ajustes más finos. También puede disminuir el tamaño del grid con la tecla [
- Clickeando el icono de Larger Grid
 hará que el grid sea el doble de grande, para ajustes más grandes. También puede aumentar el tamaño del grid con la tecla ].
Para hacer que el tamaño del grid disminuya a 16 unidades, presionar dos veces la tecla [. Mire la Status bar (Barra de Estado) en la esquina inferior derecha de la ventana de Hammer y asegúrese de leer Grid: 16. Si no es correcto, presione [ o ] hasta que lo haga.
Cambiando el Tamaño del Suelo
Ahora el grid debería ser lo suficientemente pequeño.
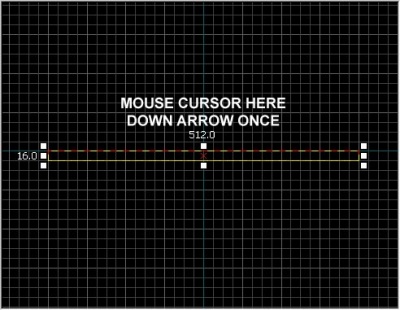
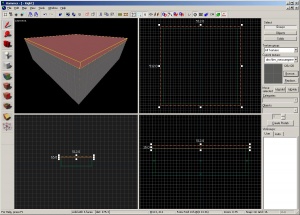
Cambie a la ventana inferior derecha. Esto deberá trabajar de manera "Lateral" cuando el mouse este encima. Arrastre el borde superior del brush hacia abajo para que tenga 16 unidades de grosor.
Moviendo los Brushes
Tu puedes mover los brushes una vez que los hayas creado. Selecciona la Selection Tool (Herramienta de Selección)
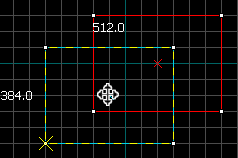
![]() y coloca el mouse encima del brush en una de las vistas 2D, sin tocar los indicadores de las esquinas. El puntero se cambiara en 4 flechas, apuntando en 4 direcciones
y coloca el mouse encima del brush en una de las vistas 2D, sin tocar los indicadores de las esquinas. El puntero se cambiara en 4 flechas, apuntando en 4 direcciones ![]() , esto indica la opción de que muevas el objeto.
, esto indica la opción de que muevas el objeto.
Haz click y arrastra el brush para mover el brush en cualquiera de las vistas 2D. Al soltarse, el brush se moverá en esa posición
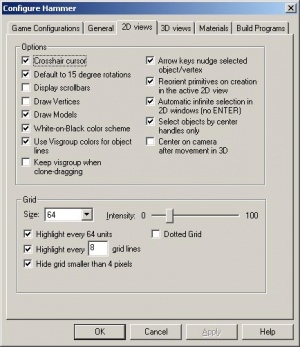
Tu también puedes mover con las teclas de flechas. Para esto, debemos ajustar en las opciones de Hammer para permitir el uso de las teclas de flechas
- Anda al Tools menu (Menú de herramientas) y selecciona Options para abrir el cuadro de Configure Hammer.
- Click en la pestaña de 2D Views (Vistas en 2D).
- Encontraremos otros ajustes, pero por ahora, necesitamos que esta marcada la casilla "Arrow keys nudge selected object/vertex".
- Presione Ok para confirmar el cambio, y cierre la ventana de ajustes.
Ahora moveremos el suelo del brush 16 unidades hacia abajo, posicionando el cursor del mouse sobre la ventana Lateral y presionando Down_arrow una vez.
- Puedes usar las scrollbars (barras de desplazamiento) para tener una vista panorámica.
- Para un rápido medo, es mantener presionado la barra space y click izquierdo para arrastrar el panorama.
- Use la rueda del mouse para acerca y alejar.
Texturizando
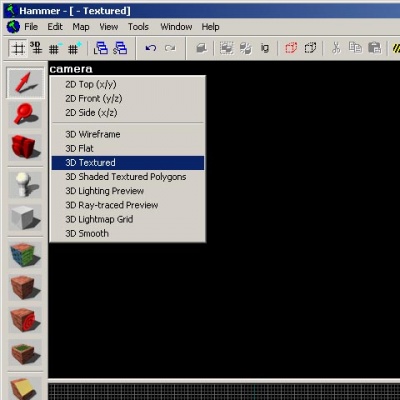
Para ver las texturas en la ventana de la cámara 3D, presione click derecho en el texto camera en ventana de la cámara 3D y seleccione 3D Textured.
Moviéndonos sobre 3D es un poco diferente de las ventanas 2D:
- Mantener presionado Space y click izquierdo y arrastra, para rotar la camara.
- Mantener presionado Space y click derecho y arrastra, para mover arriba/abajo e izquierda/derecha.
- Mantener presionado Space y click izquierdo tanto como click derecho, para mover hacia adelante y hacia atras.
- También puedes usar W, A, S, y D para mover hacia adelante, hacia atrás, moverse lateralmente de izquierda a derecha y moverse lateralmente de derecha a izquierda respectivamente.
- La tecla z permite un modo para "Bloquear el mouse" para activar y desactivarlo. Cuando el cursor del mouse este encima de la ventana de la Camara 3D y presionas la tecla z. Puedes ahora mover el mouse como si el aspecto del mouse estuviera dentro del juego.
Movámonos en la ventana Camara 3D y mire hacia abajo, al suelo que acaba de crear.
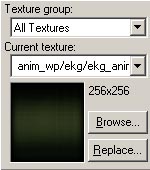
Notaras que hay una textura predeterminada en el piso. Probablemente quieras cambiarlo. Para cambiar la textura actual, click en el botón Browse' en la caja Texture
Debería aparecer una la ventana Texture Browser (Buscador de Texturas)
En Filter que se
In the Filter field at the bottom of the browse, you can filter the textures shown based on name. For this tutorial, type in the word "dev_measure" (with the underscore) into the field. This will bring up a listing of "developer" textures that will make it easier to create something quickly.
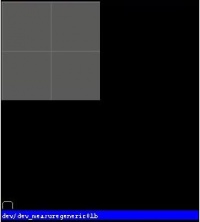
Ahora, busca la textura llama dev/dev_measuregeneric01b y doble click en esta.
This should bring back the 4 viewports of the editor and place the generic developer texture as the current one in the Texture bar.
Select the floor brush, if it isn't already selected, by clicking on it in the Camera viewport. It should turn red.
After the brush is selected, click on the ![]() Apply current texture icon on the Tool bar to apply the current texture to the selection. The gray developer texture should appear on the floor as shown.
Apply current texture icon on the Tool bar to apply the current texture to the selection. The gray developer texture should appear on the floor as shown.
Creating the walls and ceiling
Now let's go over how to create the walls and ceiling of the room. The easiest way to do this is to duplicate the floor brush.
Duplicating
You can also select an existing brush and duplicate it to create them.
To duplicate:
- Select the floor brush that you've created.
- Move your cursor over the Side viewport.
- Hold the ⇧ Shift key down and press the Up_arrow key to create a duplicate and move it up 1 grid unit.
This will create a brush exactly like the floor on top of the existing floor.
You can now change the size and dimensions of this new brush to create a wall grabbing the corner handles on the brush and dragging it to the size you wish. Let's make the wall 128 units tall and 16 units thick.
Now duplicate the wall 3 more times to outline the floor.
Duplicate the floor brush 1 more time and raise it to become the ceiling.
Deleting brushes
To delete a brush, select it with the Selection Tool ![]() and press the Delete key.
and press the Delete key.
Multiple selection
You'll notice that in the Camera viewport, if you navigate inside the room, it's hard to tell what's going on because all of the walls, floor and ceiling are the same texture. Next we'll change the walls to a different texture.
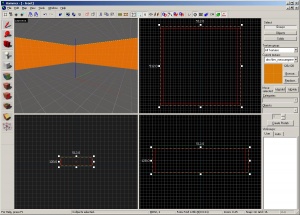
You can select all of the walls by holding down the Ctrl key and clicking on them one at a time in the Camera viewport. You will have to use the SPACE camera controls to rotate the camera around so you can select each wall.
After you have all of the walls selected, click on the Browse button in the Texture bar. This time, select the orange texture next to the current one, labeled dev/dev_measuregeneric01. Double-click it to select it and close the browser window.
Use the ![]() tool on the Tool Bar to apply the orange texture to the walls.
tool on the Tool Bar to apply the orange texture to the walls.
Saving the file
To save a level, you can use Ctrl+S or Save from the File menu.
You will need to give the map a file a name and choose the directory to place it in.
For this tutorial, name the map "tutorial01" and save it into the mapsrc directory, located by default at:
C:\Program Files\Steam\steamapps\common\portal 2\sdk_content\maps\
Your directory may be slightly different, depending upon where you have installed Steam.
When naming your file, dont give it too long a name. Maps with names of excessive length will not load in-game.
Included sample maps
When you went to save your map, you may have noticed other directories underneath the mapsrc path. The Portal 2 Authoring Tools come with some example maps to help you. (The Portal 2 maps can be decompiled using a tool named BSPSource.)
| Directory | Contents | Useful for Studying |
|---|---|---|
maps\mp_coop_doors |
Simple coop map. | How to begin and end coop maps; how to use glass in coop. |
maps\mp_coop_paint_red_racer |
Underground-themed coop map with Propulsion Gel. | How to begin and end coop maps in Underground-themed maps; how to use turrets, lasers and gel in Underground-themed coop maps. |
maps\sp_a2_column_blocker |
Single Player map with a Hard Light Bridge and some other stuff. | Using and placing hard light bridges, lasers, laser catchers, laser relays, panels, turrets, glass, grating, deadly goo, and aerial faith plates in a Portal 2 map. |
maps\sp_a2_trust_fling |
Single Player map with Aerial Faith Plates. | Great for learning about how to make panels for reconstructing-themed maps. |
maps\sp_a3_speed_ramp |
Underground-themed Single Player map with Propulsion and Repulsion Gel. | How to make a simple Underground-themed map for Portal 2. |
maps\sp_a4_laser_catapult |
Single Player map with Excursion Funnels, a Laser and a couple of Piston Platforms. | How to place excursion funnels; making piston platforms; working with the Wheatley theme. |
maps\zoo_mechanics |
Contains a sampling of some of the gameplay mechanics used in Portal 2. | More information on creating excursion funnels, gel droppers, deadly goo, etc. |
Placing entities
Next we'll place an entity in our level:
- Select the
 Entity Tool on the Tool Bar.
 - Once the Entity Tool is enabled, the Entity selection list on the Object bar becomes active.
- Keep the Categories entry as Entities.
- Click the arrow on the Objects drop down list and select
info_player_start. - Now, navigate in the Camera viewport to the middle of the inside of the room.
- left-click on the floor to place the entity.
- Do the same with
weapon_portalgunand try to place it in a position so theinfo_player_startis touching it.
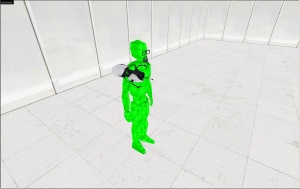
This will place an info_player_start entity in the middle of the room. You will also receive a Portal Gun when you spawn.
Placing a light
Now we'll place a source of illumination in the map:
- Select the Entity Tool again
- Select
lightfrom the Objects drop down list on the Object bar. - This time, place the light on the ceiling (above the player's head).
- Go back into selection mode by clicking on the
 Selection tool in the Tool Bar or by pressing the Esc key.
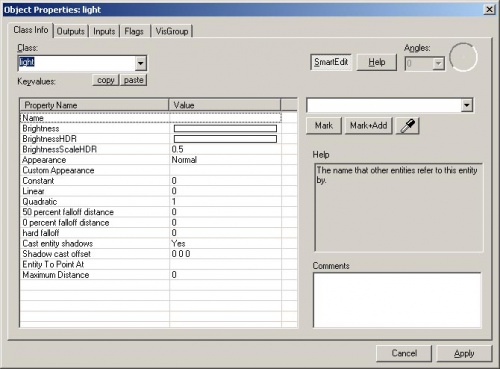
Next we'll change some settings on the light. Bring up the light's properties by double-clicking it in the Camera viewport or by selecting it (left-clicking on it) and then pressing the Alt+↵ Enter keys. This will bring up the Object Properties dialog box.
From the Object Properties, you can change various properties of the entity. For example, you can change the Brightness of this light. Click on the Brightness row under Keyvalues and you will see a set of numbers on the drop down menu on the right side. The default setting for the brightness of a light is 255 255 255 200. The first three numbers represent the RGB values (color) and the last number represents the intensity of the light.
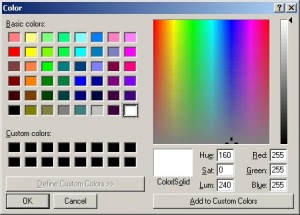
You can click on the Pick Color button to select a color rather than input values for it.
Simply click on the color you want the light to be and click OK.
This will bring you back to the Object Properties dialog box for the light. You should see any changes you made to the brightness on the Brightness row and the drop down field on the right side if the Brightness row is selected.
Click the Apply button to set your changes to the entity and close the dialog box by clicking on the "X" at the upper right side of the window.
Placing a prop_static
Entities also consist of props like furniture, decoration, and complex parts of architecture. There are a variety of different kinds of props. Prop_static entities are props that are static – they don't move, animate, turn on or turn off. There are also prop_dynamic entities that can move, animate, be enabled and disabled. There are also prop_physics entities which the player can interact with and behave physically as they would in the real world.
To place a prop:
- Select on the Entity Tool again.
- Go to the Object bar and change the Objects field to
prop_static. - Point to the floor in front of the
info_player_startand left-click to place a prop_static. You will see a red cube that represents theprop_staticbefore a model is attached to it. - Go back into selection mode by clicking on the
 Selection tool in the Tool Bar or by pressing the Esc key.
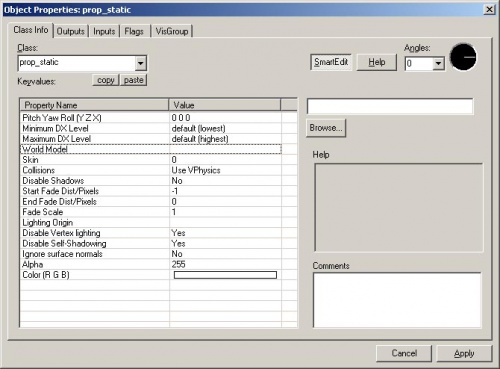
 - Double-click on the red cube to open the properties.
- Double-click on the World Model field to open the Model Browser.
Selecting the model
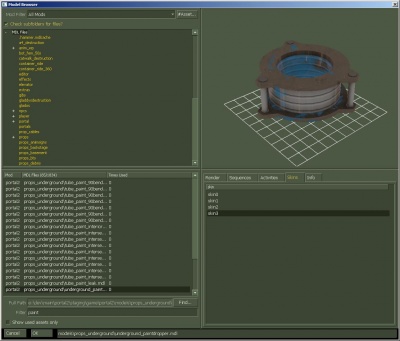
- In the Filter field at the bottom of the dialog box, type in "
paint". This will show all the models that have the word "paint" in their name. - Scroll down to the one named:
- "
props_underground\underground_paintdropper.mdl". - It should look like the image shown.
- "
- Click OK to select it and close the browser and return to the Object Properties dialog box. You should see the name of the model now in the World Model row.
- Click the Apply button to set your changes to the entity.
- Close the Properties box.
You will see the paintdropper that you just placed in the room in the viewports in the editor.
Moving entities
You can move entities like our paintdropper the same way you can move brushes. Click and drag inside the bounding box of the selected entity to move it around with your mouse or put your mouse over any of the viewports and use the arrow keys on your keyboard to move them around.
Rotating entities
To rotate an object , you simply select the object you wish to rotate using the Selection Tool ![]() , then click once on the object. You should see the object surrounded at the corners with circles. Mouse over a circle in any 2D view, then click and drag to rotate the object.
, then click once on the object. You should see the object surrounded at the corners with circles. Mouse over a circle in any 2D view, then click and drag to rotate the object.
Use your mouse wheel to zoom into the Front viewport and click once inside the bounding box of the paintdropper model to make its four corners highlight with circles around each one.
Left-click and drag in a counter-clockwise motion to rotate the paintdropper so that it can drop paint from the ceiliing.
Corriendo tu nivel en el juego
Debes tener guardado el mapa, pero tambien debe You have saved your map, but you will also need to compile it before it can be played in the game engine.
Cuando el mapa esta compilado, esto When a map is compiled, it is converted from the raw .VMF file that you just saved, into the .BSP format used by the game engine. The geometry is processed and the proper lighting and shadows are pre-calculated with several compile programs.
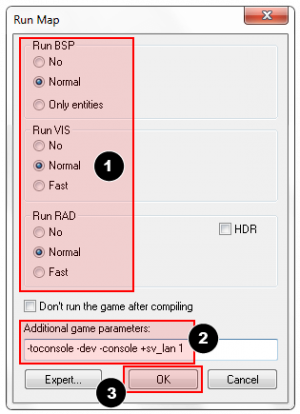
- Abrir el menú File. y elegir Run Map... o presiona la tecla F9.
- El Run Map debería abrir cuadro de dialogo.
- Este dialogo es usado para establecer parámetros básicos de la compilación.
- Open the File menu, and choose Run Map... or press the F9 key.
- The Run Map dialog will open.
- This dialog is used to set some basic compile parameters.
- Make sure that Normal is set under the Run BSP, Run VIS, and Run RAD settings.
- Under Additional game parameters:, make sure these settings are present, and type them in if not:
-toconsole -dev -console +sv_lan 1
- You may wish to check "Wait for keypress" so that you can see any error messages that occur.
- Now click the OK button to start the map compile process.
La Ventana del Proceso de Compilación" deberá mostrarte el progreso de compile. Cuando la compilación se haya completado, en el juego que estés creando el mapa, debería iniciar/lanzarse automáticamente , y cargar tu mapa con el motor.
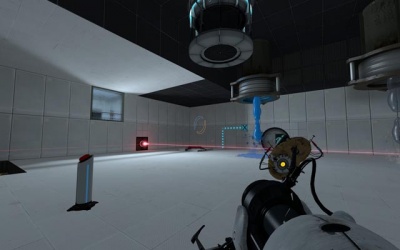
Tu nivel en el juego deber haber cargado luego de la compilación. Esto debe tomar uno o dos minutos.
La siguente vez que compiles, tu debes poder marcar la casilla de "Don't run the game after compiling" (No correr el juego después de compilar). Otherwise, it will complain that only one instance of the game can run at once. Instead of exiting and relaunching the game (slow!), you can simply recompile the map (F9) and then type map myMapFileName in the developer console to reload the map.
La Consola del Desarrolador
Al estar realizando niveles para Portal 2 a veces nos vemos involucrados a usar comandos inscritos en la ventana de Consola de Desarrolador. La consola también puede ser usada para cosas como spawnear cubos y torreas para probar en tu nivel.
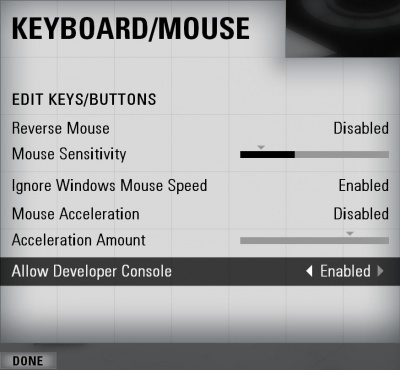
Sí aun no lo has hecho, asegurate de que la consola este habilitada en el juego:
- Presiona la tecla Esc en el juego.
- Click en Opciones luego en Keyboard/Mouse.
- Clicl en Permitir la Consola de Desarrollador y seleccionar "Activado".
- Click en el botón Listo
- Click en Regresar al Juego
Usando la consola de desarrollador:
- Haz aparecer la consola del desarrollador con ` (tilde).
- Escribe cualquier comando y presiona la tecla ↵ Enter.
- Esconde la consola otra vez con `.
Modo Noclip
Un comando de consola que lo puedes apreciar constantemente de gran ayuda es el modonoclip. Este es un modo te permite volar alrededor del nivel sin ser detenido ("clipped") por cualquier cosa en el nivel. Es útil para moverse en grandes niveles rápidamente.
Para entrar al modo noclip:
- Presione la tecla ' para entra a la consola.
- Escriba
noclipen la consola y presione ↵ Enter. - Vuele por todo el nivel.
- Escriba
noclipotra vez para desactivar el modo noclip y caminar normalmente por el nivel. - Puede alternar noclip con solo presionar un boton con el comando de la consola bind. Por ejemplo,
bind mouse3 noclippara el botón de la mitad del mouse.
Algunos comandos útiles de consola
Hay muchos Comandos de Consola disponibles. Aqui hay una peque muestra y simple.
- sv_cheats 1
- Permite el uso de trucos. Es necesario para cualquier comando de consola.
- map <name of map>
- Carga o recarga el nivel donde estas.
- changelevel <name of map>
- Carga el mapa a continuación de la sesión.
- god 1
- Permite el modo "dios" para todos los jugadores. Los jugadores son invulnerables.
- noclip
- Te permite volar por el mundo.
