Particle Effect Tutorial 1
Simple Sprite Effect
Here we'll walk through a few steps to create a simple effect in the Particle Editor.
- If you haven't already created an addon in the Workshop Tools, do that now.
- Hit the PET icon to launch the Particle Editor:

- File menu->New to create an empty new effect.
- In the Functions window (which should be the central column) click the plus (+) sign next to Renderer.
- In the list of Renderers, pick Render sprites.
- In the Functions window, click the plus sign next to Operator.
- In the list of Operators, pick Lifespan Decay.
- In the Functions window, click the plus sign next to Operator.
- In the list of Operators, pick Movement Basic.
- In the Functions window, click the plus sign next to Initializer.
- In the list of Initializers, pick Position Within Sphere Random.
- In the Functions window, click the plus sign next to Emitter.
- In the list of Emitters, pick Emit continuously.
- You should now see a single small particle in the center of the grid in the Preview panel:

- In the Functions window, select the Position Within Sphere Random Initializer by clicking on it. You will see its properties appear in the Properties panel of the PET.
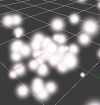
- In the speed max property field, type 200 and hit Enter. In the Preview panel, you should now see glowing sprites shooting forth continuously from the center of the grid:
- Go ahead and save: File menu->Save As. Save the file to [your addon]/particles/test_sprite.vpcf.
- You're now free to play around with your effect and modify properties to see how they affect particles' behavior. Some good candidates include:


- Base Properties->color
- Base Properties->lifetime
- Render sprites->texture
- Movement Base->gravity (try values around -200 in the "z", or third, field, which defines up/down forces)
- Movement Base->drag (values over 0.5 won't be much fun unless you raise your speed max property in the Position Initializer...)
- Position Within Sphere Random->distance max (hint: the ground grid is 128x128 units)
- Emit continuously->emission rate
- Emit continuously->emission duration
- Emit continuously->emission start time
Simple Sprite Effect: In-Depth
Now let's look at what we did there, why we did it, and why it produced the results it did.
1. File menu->New to create an empty new effect.
 Tip:This is a "shell" effect, but it isn't really empty - it comes with lots of useful default properties in its Base Properties (at the top of the Functions panel.) Base Property defaults that directly define the effect we see include radius, color, lifetime, rotation, and rotation speed.
2. In the Functions window (which should be the central column) click the plus (+) sign next to Renderer.
3. In the list of Renderers, pick Render sprites.
- Tip:This tells the engine how to render the particle on-screen - as a sprite. It also gives us a default sprite texture, base_sprite.vtex.
4. In the Functions window, click the plus sign next to Operator.
5. In the list of Operators, pick Lifespan Decay.
- Tip:This enabled particles to be destroyed when their lifetime is complete. Without a decay function, particles will sit around forever, and we'll quickly hit our max particle cap. You'll likely be using Lifespan Decay in most, if not all, of your effects.
6. In the Functions window, click the plus sign next to Operator.
7. In the list of Operators, pick Movement Basic.
- Tip:As soon as this is added, particles are able to move. However, we won't actually tell them to move until later...
8. In the Functions window, click the plus sign next to Initializer.
9. In the list of Initializers, pick Position Within Sphere Random.
- Tip:This tells each particle how to choose its starting position, relative to the Control Point specified in the Function. (This is usually CP0, which is the default.)
10. In the Functions window, click the plus sign next to Emitter.
11. In the list of Emitters, pick Emit continuously.
- Tip:This tells the system how we want our particles to be created - in this case, as a continuously and infinitely. The default emission rate is 100, which means the system will create 100 particles per second.
12. In the Functions window, select the Position Within Sphere Random Initializer by clicking on it. You will see its properties appear in the Properties panel of the PET.
13. In the speed max property field, type 200 and hit Enter. In the Preview panel, you should now see glowing sprites shooting forth continuously from the center of the grid.
- Tip:Here we finally tell the particles to move. The Position Within Sphere Random Initializer carries extra behavior enabling it to assign motion to particles (specifically, motion away from the specified Control Point.) The default minimum and maximum speeds are both 0; when we change the maximum to 200, we're telling the system that we want particles to spawn moving away from the Control Point at a randomly-chosen speed between 0 and 200.
Property Defaults in Action
This effect can produce results with just a few Functions because it relies on default properties for many important things: Radius, color, lifetime, rotation, texture, emission rate, and lots of under-the-hood properties.
However, if you're making an effect for your addon, you're probably going to want to change some of those defaults. You might even want to specify more complex behavior for some of them.
In Particle Effect Tutorial 2, we'll look at overriding Base Property defaults with Functions.