Counter-Strike 2 - Weapon Finishes
This article is about the technical things for Weapon Finishes.
All the basics for Weapon Finishes, including the Style Guide, can be found in the page above.
See also Econ item.
For Stickers and Sprays, check the other pages which do not exist yet.
In ![]() Counter-Strike 2, Weapon Finishes use a Shader called
Counter-Strike 2, Weapon Finishes use a Shader called customweapon.
Downloadable Weapon Mesh .obj
From https://www.counter-strike.net/workshop/workshopresources one can find CS2 .obj Weapon Mesh files, that you can import into Photoshop, Substance Painter or many more applications.
By default, the Faces and Vertices of those Meshes are split / separated from eachother. If you import one of those weapon models in Substance Painter however. When exporting the mesh out from Substance Painter the vertices actually get merged by Distance. If you utilize the Projection Tool's "Mesh Fill" selection tool, it is capable of selecting the entire mesh, just how Blender could do "Select Linked" IF the vertices would be merged though.
The Normals of those merged vertices don't get affected visually, only the metadata. If this causes any other side-effect is not documented.
When the faces get split back however, the Normals return to their previous value.
It should be possible to create mesh groups for each .obj in Blender using "Merge by Distance" to import them into Substance Painter to hide meshes, in order to visualize areas that would be visually unreachable, such as the magazine capsule.
.obj file import in Blender will ruin the Normals when merging the Vertices by DistancePatterns
The patterns used in the Spray-Paint, Hydrographic, Anodized Multicolored and Anodized Airbrushed styles all have the same basic properties. Each style can use up to four colors. The pattern is applied one layer at a time, starting with a base coat that covers all paintable areas of the weapon. Color images are typically stored in red, green and blue channels that combine additively to represent a large range of color values. For our patterns, we take advantage of this configuration to store three separate images. The final result is a bit bright, but don’t worry, what it looks like here isn’t how it’ll look on a weapon.[1]
Pattern Placement
Seed
Some weapon finishes have ranges for offsets and rotations. On application, random values are chosen within those ranges so that each application is different.[2]
Textures
There are various of texture files that combine into a material for a Weapon Finish.
Base Color
The Base Color texture painting of a weapon finish, which can be combined with other paintkit templates that support "Paint by Number". This can be used to make the wearing of a skin, reveal a different color.
Wearness Mask - Alpha
The Wearness Mask is a grayscale map defined by a range between black and white. This mask can overwrite the "Wear" behaviour of paintkits. The wearness is defined in a .tga of the Base Color texture in the Alpha Channel.
The behaviour of that mask has yet to be documented here. If you set an entire surface with the same greyscale color, the wearness won't immediately take away all of the paint, but it will scatter across that masked area.
This could refer that values close to that number will immediately remove the paint even if on Factory New.
Pearlescent
This does something with color shifting. The scale value could be defining how much it should offset the colors in Hue from HSV. The hue shift appears to be based on the angle of the surface, relative to the view, so surfaces which angled away from the camera will have their hue shifted further than surfaces facing the camera.
The Pearlescent effect has no effect on grayscale colors, as these areas have no saturation, so they don't really have a "hue" which can be shifted.
Pearlescent Mask
The Pearlescent Mask defines what can be affected by the Pearlescent effect when it's scale value is higher than 0. Where the value 0 (Black) won't make it get affected by Pearlescent at all. But the value 255 (White) will. Anything inbetween defines how strong it should be.
Roughness
Controls roughness which also controls a part of the reflectivity. Areas with values closer to black appear more reflective, whereas areas with values closer to white will appear more matte.
Roughness Mask
Can be in a separate file. According to the documentation some can be included in the Alpha Channel for certain Pattern templates.
The Roughness mask for Weapon Finishes are effective on all RGB channels. Unlike the actual Weapon Shader, where the Roughness mask can also include the Metalness mask. Weapon Finishes don't have a Metalness mask on the Roughness Mask.
Normal Map
A map that gives things 3D effects without affecting the original mesh file, It is useful for showing things such as engravings.
Ambient Occlusion
Paint-By-Number Mask (Hydrographic, Spray Paint, Anodized Multicoloured and Anodized Airbrushed finish styles)
Hydrographic and Spray Paint finish style
This texture is used to define which areas use the Pattern, and which areas have a flat colour applied to them. The red channel doesn't affect anything, but the green and blue channels can be used to create static areas of color on the finish. The third and fourth user defined colours of the finish will be used, so you may want to design your pattern to take this into account. If Use Custom Paint-By-Number Masks is unchecked, the finish will instead use a default mask instead.
Anodized Multicoloured and Anodized Airbrushed
Anodized finish styles appear to not function quite the same way. The red channel will define where the finish shows up, and the other channels do nothing. This may indicate that Anodized finishes have been deprecated in favor of Hydrographic and Spray-Paint finishes. Users who want to create randomizing finishes with Metallic areas should use Hydrographic or Spray-Paint finishes instead, as these do actually allow you to define both the metallic and roughness for each color. If Use Custom Paint-By-Number Masks is unchecked, the finish will instead use a default mask instead.
Patina Mask (Patina finish style)
A Grayscale texture which is used to control where the Patina finish will appear. Areas which are white in this texture will use the Patina material created by the user, while areas which are black will use the default weapon material. The user defined Pearlescent and roughness textures will be confined to the white area, but the normal map is used will apply over the whole of the weapon.
If Use Custom Patina Mask is Unchecked, the finish will use a default mask instead.
Material Mask (Gunsmith finish style)
A Grayscale texture which is used to control which areas will be treated like Custom Paint Job or Patina finish styles. It's use is quite similar to the metallic channel used in Metallic-Roughness PBR. Areas which are white in this texture will act like a Patina finish, with metallic shading and user defined colours for grime and scratches at higher wear levels. Areas which are black will act like a custom paint job finish, with the paint being scratched off at higher wear levels. The user defined Pearlescent, roughness and normal map textures will be used across the whole finish (though the pearlescent and roughness will be subtracted from the custom paint areas which are worn off)
If Use Custom Material Mask is Unchecked, the finish will use a default mask instead. (Identical to the default Patina mask, but with the areas which aren't Patina showing up as Custom Paint instead.
Style Presets
Anodized Multicolored
Composite Inputs
Composite Inputs, seems to be the mapping from the old legacy-version meshes from CS:GO, to the new weapon meshes from CS2.
Debugging
Albedo
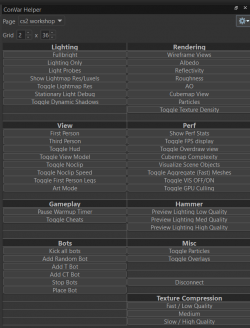
Albedo is a helpful mode to see your skins in fullbright it should be used when trying to see the finish without shaders/lighting
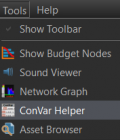
1. In the VConsole click on ConVar Helper
2. These options show up on the side when selecting cs2workshop.
3. When clicking Albedo you get put into a mat_fullbright mode.
- Any too light color will blink Red.
- Any too dark color will blink Blue.
See also
External links


