Hello, Gordon: Getting Started with JavaScript in Counter-Strike 2
Hello, Gordon: Getting Started with JavaScript in Counter-Strike 2
This tutorial aims to teach you the basics of scripting in Counter-Strike 2. You will create a simple script which prints "Hello, Gordon" to the console when the map starts. This tutorial assumes you know the basics of the Counter-Strike 2 Workshop Tools.
Note: make sure you have the Counter-Strike 2 Workshop tools installed!
What is cs_script?
cs_script is a JavaScript-based scripting system introduced for Counter-Strike 2. Adding scripts to your map allows for custom functionality that would be difficult, or otherwise impossible, to create using the entities provided by the Hammer editor. Valve has created a map called "script_zoo", which showcases what are possible with scripting, such as creating a grenade throwing minigame, a model inspector and even an automated game of chess!
Setup
First, you need to create a folder to store your scripts in.
- Find your CS2 addon folder. It should be under
<wherever your Steam games are installed>/steamapps/common/Counter-Strike Global Offensive/content/csgo_addons/<name of your addon> - Inside your addon folder, create a folder called
scripts. This folder will contain all of your script files. The path to your script files should be as follows:<wherever your Steam games are installed>/steamapps/common/Counter-Strike Global Offensive/content/csgo_addons/<name of your addon>/scripts

Creating a new Script
Create a new file in your scripts folder. Name it hello_gordon.js. The .js at the end denotes a JavaScript file. JavaScript files are plain text files and can be created by first creating a text file (with .txt at the end) and then changing the ending to .js. If you do not see the file extensions, click on "View" in the File Explorer's bar, then "Show" and click "File name extensions".
With your script created, open it in the text editor of your choice. You can use Notepad to start, but it is recommended to use editors such as Notepad++ or Visual Studio Code. Once you have opened the file, insert the following:
import { Instance } from "cs_script/point_script";

Instance.Msg("Hello, Gordon!");
Adding the Script to the map
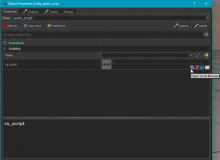
Creating a point_script entity
Start by placing down a new point_script entity to reference your script file.
- Use the Entity Tool (Shift + E) to create a new entity.
- Change the entity type by typing
point_scriptin the class field.

Next up, we're gonna reference our script file, so that our script is executed in-game.
- Below the
cs_scriptfield, click on "Open Local Browser". - An Asset Browser window will open with a filter set to scripts.
- Find your script and select it. It will be called
hello_gordon.vjshere.
Browsing available scripts
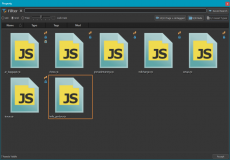
Browsing available scripts


And that's all you need to do!
Results
Press F9 to open the build menu. Chose a compile mode and then build your map. Once the CS2 comes into focus, press the console key (grave key by default). Your message should be printed there.

Building your map
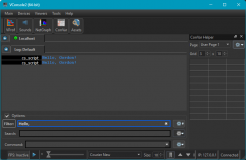
The message shown in VConsole2


Code changes are reloaded every time you run your map, so you can use "Run (Skip Build)" to quickly test your code without having to re-compile your map every time.
Next Steps
If you feel comfortable with the steps shown so far, you can move on to this more advanced tutorial: Creating a Glowing Chair with JavaScript in Counter-Strike 2