Applying Textures/v2draft
Jump to navigation
Jump to search

This article has been marked as a candidate for speedy deletion for the following reason:
Administrators / Moderators - Remember to check if anything links here and the page history before deleting.
Old draft of existing page. See Applying Textures
If you object to this decision, then please discuss why here (If you make a discussion section also create this redirect page). If this page doesn't meet the criteria for speedy deletion, then please remove this notice, but do not remove it from pages that you have created yourselfAdministrators / Moderators - Remember to check if anything links here and the page history before deleting.
Our next job is to change our room's textures. A texture is simply an image that covers a 3D surface. Because this is Source we are using materials, but you can ignore that fact for now. We'll call them textures for the time being. This is only a very simple guide to get you used to the principle of applying textures: if you want more depth, including how to texture individual faces and some useful shortcuts, see ???.


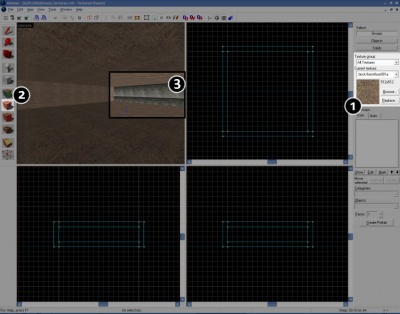
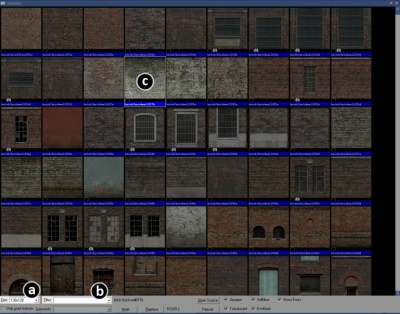
- In Hammer, all texture work is done with the Texture Bar, which by default can be found to the right of the screen (1). As you can see, the texture displayed in the thumbnail view is the same texture that all of our surfaces are using: this is because new brushes are always created with the last selected texture. The default texture might make a good floor, but it doesn't look to good covering the whole room! Click on Browse... and we can choose a new texture from the database of available ones from the Texture Browser. There's a heck of a lot of stuff in here and it can be very easy to get lost. To make things a little more ergonimic you can change the size of the thumbnails, if you like. Choose 128x128 from the Size drop-down list (a).
- Now that we have a better view, it's time to choose a texture. For the purpose of this tutorial, choose
brick/brickwall017b. If you have trouble finding it, try typing part of its name (preferably017b, as it is the most unique) into the Filter box (b). When you have found the texture (c), double-click it and the Texture Browser will close and you will see the texture we just chose as the thumbnail in the Texture Bar. This means it is active, and we can start using it! - Left click one of the wall brushes in your room. This is easiest in the 3D view. To apply the texture, click Apply Current Texture to the left of your Hammer window, in the Maptools Bar (2). The wall will change to show the texture we have picked (3). Don't worry if your texture ends up offset for now.
- It's no use only texturing one wall of course. Rotate the camera in the 3D view using the technique you learned earlier and perform the same action on the remaining three walls: select them in the 3D view, then click Apply Current Texture. You can hold down the Ctrl button to select multiple brushes at the same time.
You've just about got the hang of texturing now. If you want to experiment some more, try adding textures to the floor and ceiling. concreteceiling002a is a good choice for the ceiling, and concretefloor001a works well for a floor. When you are happy, our next step is to add some entities!