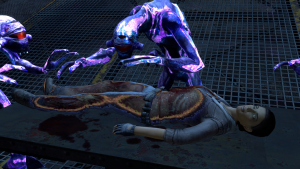
$flesh
New in the Orange Box: inside-your-body rendering effects!
While it was only used during the cutscene in Half-Life 2: Episode Two where Alyx is revived, it is pretty versatile due to its amount of parameters.
It displays a second rendering pass on top of the base material which can be blended by adding point_flesh_effect_target entities. When your model gets close to the sphere of these entities, the flesh will start to appear.
The Infected shader works similarly, but instead of faking the internal render, it actually cuts out parts of a model and allows you to render different models inside.
Usage
In addition to specifying the essential shader parameters for a VertexLitGeneric material, you have to ensure that your material defines a proxy as such:
 "Proxies"
 {
     "FleshInterior"
     {
     }
 }
This is required to make the shader work, as it has to interact with the world and needs to also animate and update in real-time.
Shader Parameters
The following shader parameters allow you to enable and control the flesh effect:
$fleshinteriorenabled <bool>- Enables or disables the flesh effect for the material.
$fleshinteriortexture <texture>- The texture used as a base for rendering the flesh. Its alpha value functions as a mask, whereas a higher alpha value (visible) result in that part of the texture showing flesh when an effect target comes close.
$fleshnormaltexture <texture>- Normal map for the interior flesh.
$fleshbordertexture1d <texture>- A texture similar to those used by
$lightwarptexture. Determines the colors used by the border between the flesh interior and exterior model.Todo: Where on the texture is the "inside" or "outside" of the border effect? Note:Even when using a fully white border texture and tint, a black tint can still be seen on the border. This is a limitation of the shader and can not be changed.
 $fleshsubsurfacetexture <texture>- A texture which is multiplied with the
$fleshinteriortexturetexture. Note:Use a fully white texture (e.g.
 vgui/white.vtf) to skip this rendering pass. $fleshsubsurfacetint "[<red float> <green float> <blue float>]"- Allows tinting the
$fleshsubsurfacetexture. Default is"[1 1 1]", so no tint at all. $fleshinteriornoisetexture <texture>- Used on the border of the flesh effect, adding a distortion effect on the transition between exterior and interior. Scrolls based on the value of
$fleshscrollspeed. $fleshscrollspeed <float>- Determines how fast the
$fleshinteriornoisetextureshould scroll. $fleshbordernoisescale <float>- Changes the scale of the
$fleshinteriornoisetexture. $fleshborderwidth <float>- Determines the width of the border transition between interior and exterior. May change from which camera angles the effect is visible, as well. Must be greater than 0 for the effect to work at all.
$fleshbordersoftness <normal>- Changes how soft the transition between interior and exterior is. Values must be greater than 0 but no higher than 0.5.
$fleshbordertint "[<red float> <green float> <blue float>]"- Allows tinting the effect border. Default is
"[1 1 1]", meaning no tint at all. $fleshcubetexture <texture>- The cubemap texture to use for reflections on the flesh interior. Accepts values similar to
$envmap(includingenv_cubemap). $fleshglossbrightness <float>- Changes the strength or brightness of the cubemap reflection (if
$fleshcubetextureis specified).
Debugging
Some shader parameters were included to allow for easier debugging, but don't have much use otherwise:
$fleshglobalopacity <normal>- Opacity of the entire flesh effect. Essentially a
$alphafor the entire effect. Note:Since this effect is rendered as a second pass on top of the existing material, you can *not* see through the material when setting this to values less than one. You will instead be seeing the original material behind the flesh effect.
 $fleshdebugforcefleshon <bool>- If set to 1, shows the flesh rendering pass on the entire model, regardless of the mask specified on the
$fleshinteriortextureor the effect targets. $flesheffectcenterradius<1/2/3/4> "[<x float> <y float> <z float> <radius float>]"- This is how the position of point_flesh_effect_targets is communicated to the shader. The flesh effect target functionality is applied at the specified world location using the specified radius. The
FleshInteriorproxy sets these to the first 4 effect targets it finds, or[0 0 0 0]if not present/active.
