Color Correction
- For the entities used to implement color correction, see color_correction, color_correction_volume, and

 fog_volume.
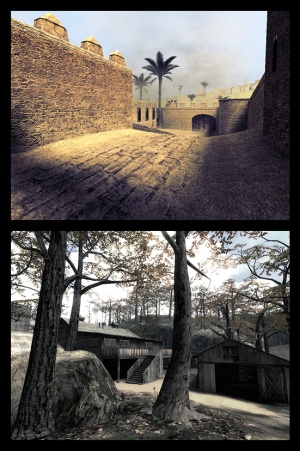
Color correction is the concept of altering the color balance of an image to achieve a desired effect. It is primarily used to set an emotional tone or convey important information.
- By tinting towards blue or grey, a feeling of cold or isolation is achieved (e.g.,
 Minority Report).
 - Brighter, more saturated colors like red or yellow will have the opposite effect, intensifying emotion (
 Hero).
 - Correction can also help to replicate the effects of other mediums (
 Sin City).
Correction in games has the unique benefit of being dynamic. It can reflect the state of the world or player or be attached to a specific location or object.
Using Color Correction
Source stores color correction profiles in 'lookup tables', which are 96Kb binary files with the extension .raw. Normally, a set of in-game tools are used to create them, and they are added to maps with color_correction (point, with falloff) and color_correction_volume (brush). Correction is very cheap.
To use color correction in your map, create at least one color_correction or color_correction_volume entity. In the case of color_correction, disable falloff. You must be in range of the entity before the correction tools have any visible effect. If you intend to create your own color correction, do not give the entity a lookup table. On games prior to ![]() Left 4 Dead, you may need to ensure that color correction is enabled in Video options > Advanced (or set mat_colorcorrection 1).
Left 4 Dead, you may need to ensure that color correction is enabled in Video options > Advanced (or set mat_colorcorrection 1).
There are a number of ways to create color lookup tables. The original and most common method is through the in-game colorcorrectionui. Other methods involve using Photoshop or Paint.NET to import and export a .raw file. These methods are all listed below.
Creating Color Correction using colorcorrectionui
To use colorcorrectionui:
- If you are working in a multiplayer game, enable sv_cheats.
- Type colorcorrectionui into the console.
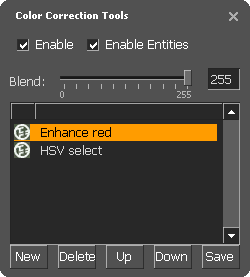
In the window that appears, correction filters can be:
- Created and managed with the buttons in the bottom of the layers window.
- Enabled or disabled by clicking their circular icon.
- Made stronger or weaker with the Blend slider.
- Duplicated with Alt + Double-click.
There is also a layers window for managing filters and a 'Lookup View' for previewing their effect on a grid of colored pixels.
The Filters
- Curves - Search for tutorials
- Works in exactly the same way as a curves tool in an image editor. The horizontal axis represents a color value in the original image; the vertical axis represents its brightness in the final image. Click and drag to manipulate the line. Black is in the bottom left and white is in the top right.
 Bug:Points cannot be deleted.
 Bug:Drag release is only registered when the cursor is over the graph area. This makes placing points very close to its edge difficult.
- Levels - Search for tutorials
- Again, this filter is directly analogous to levels tools in image editors. Both sliders control the range of colors in the image: the top slider 'cuts off' values outside its range to pure black (left) or white (right), while the bottom slider compresses the image's range to fit inside it. The top slider's middle pip weights the image's range (i.e. adjusts gamma).
 Bug:If two pips come to overlap, separating them can be impossible.
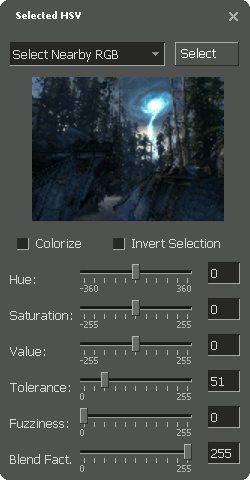
- Selected HSV
- This is the most complex filter. The image is a real-time thumbnail of the current scene in which colors currently selected are highlighted red. It can be clicked to select a color, or the Select button can be pressed to select a color directly from the scene (hit Esc afterwards). Hold Ctrl to select multiple colors in either situation.
- Tolerance and Fuzziness allow the selection to be tweaked; Hue, Saturation and Value (i.e. HSV) allow effects to be applied to it. Colorize causes the hue slider to replace instead of adjust.
 Tip:The drop-down menu contains many different algorithms, not all of which require clicking to pick color(s).
 Bug:There are several situations where the preview thumbnail can lock up. The only known solution is to restart the engine.
- Lookup
- Loads a pre-existing lookup table.
 Bug:Folder view starts in the root of the underlying game, not the current mod.
- Balance - Search for tutorials
- Another tool identical to its desktop brethren. It biases color channels across bright, middling and/or dark areas of the scene.
Creating Color Correction using Photoshop
Photoshop has the ability to import and export .raw files. This means you can import a color lookup table, apply adjustments within Photoshop, and then export it for use in-game. This may be preferable if you have issues using the in-game tools, or if you're more comfortable making adjustments in Photoshop.
You can create new color lookup tables in Photoshop with the following steps:
- Disable color correction in-game, which can be done using colorcorrectionui or by typing mat_colorcorrection 0 into the console.
- Take a screenshot of your map which you'd like to use as a reference.
- Open the screenshot in Photoshop.
- Import a default lookup table into Photoshop. In
 Left 4 Dead 2, one can be found in the files as materials/correction/off.raw.
 - If Photoshop prompts import options, use: Width 32px, Height 1024px, 3 Channels, Interleaved, 8 Bits, and 0 header size.
- Copy the lookup table directly into your screenshot.
- Apply adjustments to your screenshot until you get the desired result. Ensure the layers for these adjustments are above the screenshot and the lookup table.
- Hide the screenshot layer and merge all layers into one, then copy the adjusted lookup table back into the imported file.
- Export the lookup table into a new .raw file with a new name.
You should now be able to use the color lookup table in your color_correction or color_correction_volume entities. You can re-enable color correction using colorcorrectionui or by typing mat_colorcorrection 1 into the console.
Creating Color Correction using Paint.NET
By default, Paint.NET does not have the ability to import or export .raw files in the same way Photoshop can. This tutorial makes use of a community plugin which adds the capability specifically for the purposes of creating color correction. To install it, go to Paint.NET Source Engine RAW plugin and download the .dll from the latest release. Then, place it in Program Files\paint.net\FileTypes.
Once this is done, you can create new color lookup tables in Paint.NET with the following steps:
- Disable color correction in-game, which can be done using colorcorrectionui or by typing mat_colorcorrection 0 into the console.
- Take a screenshot of your map which you'd like to use as a reference.
- Open the screenshot in Paint.NET.
- Import a default lookup table into Paint.NET. In
 Left 4 Dead 2, one can be found in the files as materials/correction/off.raw. You can also download and use the image in the top right corner of this section.
 - Copy the lookup table directly into the top left corner of your screenshot.
- Apply adjustments to your screenshot until you get the desired result.
- Export the lookup table into a new .raw file with a new name. Make sure "Allow any resolution" is disabled when prompted to configure the save.
You should now be able to use the color lookup table in your color_correction or color_correction_volume entities. You can re-enable color correction using colorcorrectionui or by typing mat_colorcorrection 1 into the console.
Console Commands
- colorcorrectionui
- mat_colcorrection_disableentities 0/1
- mat_colorcorrection 0/1
- sv_allow_color_correction 0/1 (Allow or disallow clients to use color correction on this server)
Color Intensity Fixes
In some cases, a .raw file you've made will appear much more intense when loading it in-game than it did in the editor when it was created. This is caused by a problem in the client-side color correction code causing the weights to be applied twice. There are a few possible solutions:
If you're working in an existing game or can't write your own code, then you can simply halve the strength of the color correction .raw files themselves. The simplest way to do this is to halve the 'Blend' values of each filter before saving the .raw file in the color correction tools. Alternatively, you can do it in Photoshop:
- Create a neutral .raw file (i.e., delete all .raw files, open your map, open the color correction UI, and click Save without creating filters)
- Create your desired color correction and save it.
- Open both .raw files in Photoshop, paste your .raw over the neutral one, set the layer opacity to 50% for your color correction and then save it as a RAW with the appropriate filename (i.e., the one your map will be looking for)
 Note:If Photoshop prompts import options, use: Width 32px, Height 1024px, 3 Channels, Interleaved, 8 Bits, and 0 header size.
It's also possible to fix it with code. This is preferable because it only needs to be done once and will fix all subsequent color correction, rather requiring you to adjust each and every .raw when you save it. It is a tradeoff, however; the results are not 100% identical, though they are very close. The easiest way is to adjust the weights applied by the color_correction and color_correction_volume entities:
In client/c_colorcorrection.cpp, line 140, change
g_pColorCorrectionMgr->SetColorCorrectionWeight( m_CCHandle, m_flCurWeight * ( 1.0 - weight ) );
to
g_pColorCorrectionMgr->SetColorCorrectionWeight( m_CCHandle, (m_flCurWeight * ( 1.0 - weight )) * 0.675f );
Then in client/c_colorcorrectionvolume.cpp, line 105, change
g_pColorCorrectionMgr->SetColorCorrectionWeight( m_CCHandle, m_Weight );
to
g_pColorCorrectionMgr->SetColorCorrectionWeight( m_CCHandle, m_Weight * 0.675f );
A better but more difficult solution would be to find where and why CColorCorrectionMgr::SetColorCorrectionWeight() is called twice without being reset in between, and devise a workaround. If you'd like to investigate that, the best first step would be to read the comment about it in client/colorcorrectionmgr.cpp, line 77.
 Note:If you have existing .raw files that you've halved the intensity of using the non-code methods, don't forget to go back and double their strength!
Fixing Color Correction on an sv_pure Server
Sometimes color correction will not work on a sv_pure server. Add this code to your whitelist:
whitelist
{

//MATERIALS

    materials\colorcorrection\correction_file_name_here.raw                from_steam      //Refers to a single file
    materials\colorcorrection\*.*                from_steam      //Allow custom color correction on this server.

}
RAW File Format
The file serves as a look up table for RGB values. Each entry is a 3 byte RGB value, first byte being the red value. The table is 3 dimensional 32x32x32, taking an RGB value as a coordinate and looking up the output RGB value. Each subsequent entry indicates an increase in the R byte by a value of 4 (since 256 intensities divided by 32 entries equates to a step of 4). At the entry where the R value would be 256, the value wraps to zero and increases the G byte by a value of 4. The same occurs with the green value wrapping at 256, and increasing the B byte by 4. The index of the entry can be determined as such, where R, G, and B are integer values from 0 to 255.
//note that integer division is used, and any decimal values are truncated before the next operation
int EntryIndex = (R / 4) + ((G / 4) + (B / 4) * 32) * 32
When used in game, the values from the 32x32x32 table are interpolated to fit the 256x256x256 color space.
See also
External links
- Color Correction Video Tutorial
- Color Correction Video Tutorial specifically for Left 4 Dead 2. Uses ingame CC menu and Photoshop.
- Paint.NET Source Engine RAW plugin


