This page has not been fully translated.You can help by finishing the translation.
If this page cannot be translated for some reason, or is left untranslated for an extended period of time after this notice is posted, the page should be requested to be deleted.
Also, please make sure the article complies with the
alternate languages guide.(en)
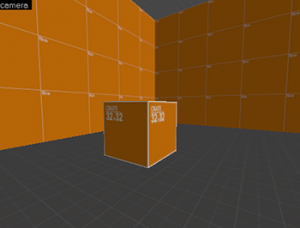 Properly-sized cube with 32x32 texture. |
|
Dans Hammer, un Primitif
This article has been marked as a candidate for speedy deletion for the following reason:If you object to this decision, then please discuss why
here (If you make a discussion section also
create this redirect page). If this page doesn't meet the criteria for speedy deletion, then please remove this notice, but do not remove it from pages that you have created yourself
Administrators / Moderators - Remember to check if anything links here and the page history before deleting.
est tout simplement un Brush (un objet solide). Les Primitifs peuvent être en "world geometry" (Assimilez ça à l'ossature du niveau) ou en entités interactives pouvant être sujette à la physique et aux dommages. Dans cet exemple, nous allons créer un primitif interactif, sujet à la physique & aux dommages dans la map, plus particulièrement, une caisse
This article has been marked as a candidate for speedy deletion for the following reason:If you object to this decision, then please discuss why
here (If you make a discussion section also
create this redirect page). If this page doesn't meet the criteria for speedy deletion, then please remove this notice, but do not remove it from pages that you have created yourself
Administrators / Moderators - Remember to check if anything links here and the page history before deleting.
de 32 unités (32 inchs) .
- Selectionnez le Block Tool
This article has been marked as a candidate for speedy deletion for the following reason:If you object to this decision, then please discuss why
here (If you make a discussion section also
create this redirect page). If this page doesn't meet the criteria for speedy deletion, then please remove this notice, but do not remove it from pages that you have created yourself
Administrators / Moderators - Remember to check if anything links here and the page history before deleting.
 et créez un cube dans votre map.
- Ouvrez le Texture Browser
This article has been marked as a candidate for speedy deletion for the following reason:If you object to this decision, then please discuss why
here (If you make a discussion section also
create this redirect page). If this page doesn't meet the criteria for speedy deletion, then please remove this notice, but do not remove it from pages that you have created yourself
Administrators / Moderators - Remember to check if anything links here and the page history before deleting.
et filtrer les textures pour trouver "dev crate". Dev/dev_measurecrate02 devrait être une texture de caisse de 32*32.
- Appliquez la texture
dev/dev_measurecrate02 à votre cube.  Note:Si la grille 2D est trop grosse pour descendre à 32 inchs, pressez sur la touche
 [ ou cliquez sur le boutton Smaller Grid  pour créer des objets plus petit sur votre grille.
- Redimensionnez votre cube en utilisant le Selection Tool
This article has been marked as a candidate for speedy deletion for the following reason:If you object to this decision, then please discuss why
here (If you make a discussion section also
create this redirect page). If this page doesn't meet the criteria for speedy deletion, then please remove this notice, but do not remove it from pages that you have created yourself
Administrators / Moderators - Remember to check if anything links here and the page history before deleting.
 jusqu'à ce que la texture aille bien au cube.
Note:A ce point là, créer des primitifs pour le World Geometry et des objets interactifs est la même chose. Dans le but de spécifier la nature de notre caisse, c'est à dire, un bloc en world geometry ou un objet interactif, il faut le sélectionner et le changer de groupe, soit toWorld ou toEntity
This article has been marked as a candidate for speedy deletion for the following reason:If you object to this decision, then please discuss why
here (If you make a discussion section also
create this redirect page). If this page doesn't meet the criteria for speedy deletion, then please remove this notice, but do not remove it from pages that you have created yourself
Administrators / Moderators - Remember to check if anything links here and the page history before deleting.
- Sélectionnez votre caisse avec le Selection Tool(en).
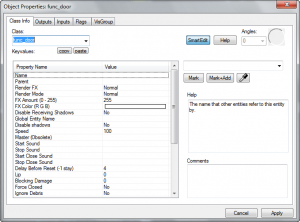
func_breakable object properties
- cliquez sur le bouton toEntity pour donner une fonction function
This article has been marked as a candidate for speedy deletion for the following reason:If you object to this decision, then please discuss why
here (If you make a discussion section also
create this redirect page). If this page doesn't meet the criteria for speedy deletion, then please remove this notice, but do not remove it from pages that you have created yourself
Administrators / Moderators - Remember to check if anything links here and the page history before deleting.
à votre primitif. Ce qui se résultera par l'apparition d'une boîte de dialogue Object Properties
This article has been marked as a candidate for speedy deletion for the following reason:If you object to this decision, then please discuss why
here (If you make a discussion section also
create this redirect page). If this page doesn't meet the criteria for speedy deletion, then please remove this notice, but do not remove it from pages that you have created yourself
Administrators / Moderators - Remember to check if anything links here and the page history before deleting.
vous permettant de choisir la fonction de votre bloc.
- Selectionnez func_breakable depuis le menu déroulant Class:.
- Dans Keyvalues, selectionnez Name et donnez un nom qui décrit bien votre objet. Par exemple "Breakable_crate"
- Dans Keyvalues, selectionnez Strength. La valeur "Strength" va spécifier combien de dommages la caisse va t-elle pouvoir encaisser avant de se briser. Mettez 1.
- Dans Keyvalues, selectionnez Material Type. Le "material type" va spécifier la matière de votre brush, et donc les que la caisse produira mais aussi le genre des débris qui seront générés lors de la casse. Slectionnez Wood (bois) Depuis le menu déroulant.
- Dans Keyvalues, selectionnez Physics Impact Damage Scale. Cette valeur va être un facteur de damage quand l'objet sera percuté par un autre.
Note:Une valeur de 0 signifie que cette fonctionnalité est désactivée . Mettez le à 1.0 pour des matériaux aussi résistant que la chaire, les petits nombres indiquent que l'objet est résistant.
- Cliquez sur Apply Et fermez la boîte de dialogue des propriétés de l'objet.
Texture de la caisse
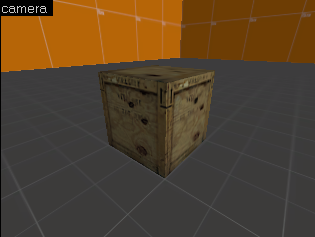
Textured functional crate
Une fois que votre caisse est correctement dimensionnée, nous pouvons lui appliquer proprement une texture en utilisant la même technique que précédemment.
- Ouvrez le Texture Browser
This article has been marked as a candidate for speedy deletion for the following reason:If you object to this decision, then please discuss why
here (If you make a discussion section also
create this redirect page). If this page doesn't meet the criteria for speedy deletion, then please remove this notice, but do not remove it from pages that you have created yourself
Administrators / Moderators - Remember to check if anything links here and the page history before deleting.
et filtrez
This article has been marked as a candidate for speedy deletion for the following reason:If you object to this decision, then please discuss why
here (If you make a discussion section also
create this redirect page). If this page doesn't meet the criteria for speedy deletion, then please remove this notice, but do not remove it from pages that you have created yourself
Administrators / Moderators - Remember to check if anything links here and the page history before deleting.
les textures à la recherche d'une texture de crate (de caisse donc).
- Selectionnez props/woodcrate001a et appliquez la à votre cube. Vous devrez utiliser le "Face Edit Sheet" pour faire coïncider correctement la texture au cube.
Note:Assurez vous que la texture est bien alignée aux Faces.
Liens externes
Stub
This article or section is a stub. You can help by expanding it.


