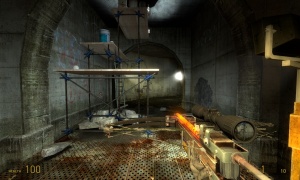
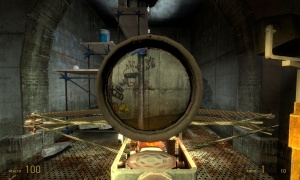
添加动态狙击镜
这篇文章会创建一个动态狙击镜,它使用一个渲染目标的武器模型得出当前玩家的视角。这些代码可以运行在半条命2:第一章
Administrators / Moderators - Remember to check if anything links here and the page history before deleting.
的引擎,应该也可以在其他版本引擎工作。
Administrators / Moderators - Remember to check if anything links here and the page history before deleting.
创建代码
首先创建两个文件分别命名为tne_RenderTargets.cpp和tne_RenderTargets.h,并添加到cl_dll项目,这些代码能够自定义渲染目标。此外,为了避免未知错误,baseclientrendertargts.cpp(及其头文件)需要添加到cl_dll项目。然而,其他版本的SDK都有这文件。
tne_RenderTargets.cpp (新文件)
#include "cbase.h"
#include "tne_RenderTargets.h"
#include "materialsystem\imaterialsystem.h"
#include "rendertexture.h"

ITexture* CTNERenderTargets::CreateScopeTexture( IMaterialSystem* pMaterialSystem )
{
//	DevMsg("Creating Scope Render Target: _rt_Scope\n");
	return pMaterialSystem->CreateNamedRenderTargetTextureEx2(
		"_rt_Scope",
		1024, 1024, RT_SIZE_OFFSCREEN,
		pMaterialSystem->GetBackBufferFormat(),
		MATERIAL_RT_DEPTH_SHARED,
		TEXTUREFLAGS_CLAMPS | TEXTUREFLAGS_CLAMPT,
		CREATERENDERTARGETFLAGS_HDR );

}

//-----------------------------------------------------------------------------
// Purpose: Called by the engine in material system init and shutdown.
//			Clients should override this in their inherited version, but the base
//			is to init all standard render targets for use.
// Input  : pMaterialSystem - the engine's material system (our singleton is not yet inited at the time this is called)
//			pHardwareConfig - the user hardware config, useful for conditional render target setup
//-----------------------------------------------------------------------------
void CTNERenderTargets::InitClientRenderTargets( IMaterialSystem* pMaterialSystem, IMaterialSystemHardwareConfig* pHardwareConfig )
{
	m_ScopeTexture.Init( CreateScopeTexture( pMaterialSystem ) );

	// Water effects & camera from the base class (standard HL2 targets)
	BaseClass::InitClientRenderTargets( pMaterialSystem, pHardwareConfig );
}

//-----------------------------------------------------------------------------
// Purpose: Shut down each CTextureReference we created in InitClientRenderTargets.
//			Called by the engine in material system shutdown.
// Input  :  -
//-----------------------------------------------------------------------------
void CTNERenderTargets::ShutdownClientRenderTargets()
{
	m_ScopeTexture.Shutdown();

	// Clean up standard HL2 RTs (camera and water)
	BaseClass::ShutdownClientRenderTargets();
}

//add the interface!
static CTNERenderTargets g_TNERenderTargets;
EXPOSE_SINGLE_INTERFACE_GLOBALVAR( CTNERenderTargets, IClientRenderTargets, CLIENTRENDERTARGETS_INTERFACE_VERSION, g_TNERenderTargets  );
CTNERenderTargets* TNERenderTargets = &g_TNERenderTargets;
这段代码类似于CBaseClientRenderTargets。CreateScopeTexture()函数在引擎中被InitClientRenderTargets()函数呼应,为了初始化m_ScopeTexture(就是渲染目标贴图),他也呼应ShutdownClientRenderTargets()。
tne_RenderTargets.h (新文件)
#ifndef TNERENDERTARGETS_H_
#define TNERENDERTARGETS_H_
#ifdef _WIN32
#pragma once
#endif

#include "baseclientrendertargets.h" // Base class, with interfaces called by engine and inherited members to init common render   targets

// externs
class IMaterialSystem;
class IMaterialSystemHardwareConfig;

class CTNERenderTargets : public CBaseClientRenderTargets
{
	// no networked vars
	DECLARE_CLASS_GAMEROOT( CTNERenderTargets, CBaseClientRenderTargets );
public:
	virtual void InitClientRenderTargets( IMaterialSystem* pMaterialSystem, IMaterialSystemHardwareConfig* pHardwareConfig );
	virtual void ShutdownClientRenderTargets();

	ITexture* CreateScopeTexture( IMaterialSystem* pMaterialSystem );

private:
	CTextureReference		m_ScopeTexture;
};

extern CTNERenderTargets* TNERenderTargets;

#endif //TNERENDERTARGETS_H_
这是头文件,它重写一个虚函数来自CBaseClientRenderTargets。
rendertexture.cpp
static CTextureReference s_pScopeTexture;
ITexture *GetScopeTexture( void )
{
	if ( !s_pScopeTexture )
	{
		s_pScopeTexture.Init( materials->FindTexture( "_rt_Scope", TEXTURE_GROUP_RENDER_TARGET ) );
		Assert( !IsErrorTexture( s_pScopeTexture ) );
		AddReleaseFunc();
	}
	return s_pScopeTexture;
}
把这段代码放到GetCameraTexture函数附近,它的作用是返回渲染目标贴图。
rendertexture.h
ITexture *GetScopeTexture();
把这行代码放到GetCameraTexture之后。
view.cpp
void CViewRender::DrawScope( const CViewSetup &viewSet )
{
	C_BasePlayer *localPlayer = C_BasePlayer::GetLocalPlayer();

	if(!localPlayer)
		return;

	if( !localPlayer->GetActiveWeapon() )
		return;

	if( !localPlayer->GetActiveWeapon()->GetViewModel() )
		return;

	//Copy our current View.
	CViewSetup scopeView = viewSet;

	//Get our camera render target.
	ITexture *pRenderTarget = GetScopeTexture();

	if( pRenderTarget == NULL )
		return;

	if( !pRenderTarget->IsRenderTarget() )
		Msg(" not a render target");

	//Our view information, Origin, View Direction, window size
	//	location on material, and visual ratios.
	scopeView.width = pRenderTarget->GetActualWidth();
	scopeView.height = pRenderTarget->GetActualHeight();
	scopeView.x = 0;
	scopeView.y = 0;
	scopeView.fov = localPlayer->GetActiveWeapon()->GetZoomFOV();
	scopeView.m_bOrtho = false;

	scopeView.m_flAspectRatio = 1.0f;

	int nClearFlags = VIEW_CLEAR_DEPTH | VIEW_CLEAR_COLOR;
	bool bDrew3dSkybox = false;	// bDrew3dSkybox = true turns the skybox OFF. DO NOT SET IT TO TRUE.
	bool bSkyboxVisible = true;

	//Set the view up and output the scene to our RenderTarget (Scope Material).
	render->Push3DView( scopeView, VIEW_CLEAR_DEPTH | VIEW_CLEAR_COLOR, true, pRenderTarget, m_Frustum );
	Draw3dSkyboxworld( scopeView, nClearFlags, bDrew3dSkybox, bSkyboxVisible);
	ViewDrawScene( bDrew3dSkybox, bSkyboxVisible, scopeView, 0, VIEW_MONITOR );

	render->PopView( m_Frustum );
}
这段代码有点像DrawCamera,基本上,它复制当前的视角,分配渲染目标到贴图,然后设置一些基本属性给scopeView例如高度、宽度、位置等等,FOV在这里参考了武器脚本的值。
viewrender.h
void DrawScope( const CViewSetup &cameraView );
把这行代码放在DrawCamera之后。
view_scene.cpp
//Draw the scope too
if(g_pMaterialSystemHardwareConfig->GetDXSupportLevel() >= 70 )
{
	DrawScope( view );
}
如果你是DirectX 7的显卡它的作用是切出瞄准镜,把这段代码放到RenderViewEx(),在#ifdef USE_MONITORS #endif这块代码之前。
vmt文件
创建一个新的vmt文件来创建贴图,并用它来与相关的武器对应。把以下文字放到此文件:
UnlitGeneric { $basetexture _rt_Scope $model 1 }
它创建_rt_Scope贴图并应用于可用的武器,然后把_rt_Scope放到你的武器模型!
半条命第二章引擎文件修复
viewrender.cpp
在viewrender.cpp文件,在DrawMonitors之后,更换DrawScope函数,代替view.cpp。
更换:
	int nClearFlags = VIEW_CLEAR_DEPTH | VIEW_CLEAR_COLOR;
	bool bDrew3dSkybox = false;	// bDrew3dSkybox = true turns the skybox OFF. DO NOT SET IT TO TRUE.
	bool bSkyboxVisible = true;

	//Set the view up and output the scene to our RenderTarget (Scope Material).
	render->Push3DView( scopeView, VIEW_CLEAR_DEPTH | VIEW_CLEAR_COLOR, true, pRenderTarget, m_Frustum );
	Draw3dSkyboxworld( scopeView, nClearFlags, bDrew3dSkybox, bSkyboxVisible);
	ViewDrawScene( bDrew3dSkybox, bSkyboxVisible, scopeView, 0, VIEW_MONITOR );

	render->PopView( m_Frustum );
到:
	//Set the view up and output the scene to our RenderTarget (Scope Material).
	render->Push3DView( scopeView, VIEW_CLEAR_DEPTH | VIEW_CLEAR_COLOR, pRenderTarget, GetFrustum() );

	SkyboxVisibility_t nSkyboxVisible = SKYBOX_NOT_VISIBLE;
	int ClearFlags = 0;
	CSkyboxView *pSkyView = new CSkyboxView( this );
	if( pSkyView->Setup( scopeView, &ClearFlags, &nSkyboxVisible ) != false )
		AddViewToScene( pSkyView );
	SafeRelease( pSkyView );

	ViewDrawScene( false, SKYBOX_3DSKYBOX_VISIBLE, scopeView, VIEW_CLEAR_DEPTH, VIEW_MONITOR );

	render->PopView( m_Frustum );
更换:
scopeView.fov = localPlayer->GetActiveWeapon()->GetZoomFOV();
到
scopeView.fov = 45;
(GetZoomFOV()不是默认浮点函数,它需要C_BaseCombatWeapon的命令才能工作。)
更换viewrender.cpp的末尾CViewRender::RenderView
		if(g_pMaterialSystemHardwareConfig->GetDXSupportLevel() >= 70 )
		{
			DrawScope( view );
		}
右上方
	render->PopView( GetFrustum() );
	g_WorldListCache.Flush();
view_scene.cpp
现在动态狙击镜可以在半条命第二章引擎工作了。

