Phong materials
With the release of Half-Life 2: Episode One a number enhancments were made to the way lighting works within the Source engine. The emphasis was on global illumination in order to ground characters in the game worlds and make them seem to be truly present in their environment.
One of these enhancements was the addtion of Phong shading for players with graphic cards using ps_2_b or later pixel shaders - around 40% at the time of release. This new feature gives texture artists the the ability to include Phong terms which can be driven by specular masks and exponent textures. These integrate naturally with the existing lighting and provides greater definition, particularly to key characters such as Alyx Vance.
The Phong shading can also include a Fresnel term in order to heavily favor rim lighting cases as opposed to specular highlights. Under very bright lights, the specular rim highlights are often bright enough to bloom out in a dramatic fashion as a result of HDR post-processing.
A brief introduction to Phong shading
The following short introduction is not necessary knowledge to use the Source Phong shader, but does provide some technical insights as to how the technique works and may be of interest to some readers.
In simple terms, Phong shading is a technique used in 3D graphics to get better resolution of specular reflections. It was developed by Dr. Bui Tuong Phong at the University of Utah in 1973. His original publications combined the interpolation part of technique with his reflection model, the term Phong shading is commonly used to refer to either just the reflection model or to the combination of the reflection model and the interpolation method.
The Phong Reflection Model
The Phong reflection model is basically a simplified method of deciding the shade of a specific point on a 3D surface.
- It doesn't take into account second-order reflections often found in raytraced or diffuse rendering. To compensate an extra ambient lighting term is added to the scene that is rendered.
- It divides the reflection from a surface into three subcomponents - specular reflection, diffuse reflection and ambient reflection.
Phong reflection is an empirical model based on informal observation. Dr. Phong observed that for very shiny surfaces the specular highlight was small and that the intensity fell off rapidly, while for duller surfaces it was larger and fell off more slowly.
Phong Interpolation
Phong shading provides a better approximation to a per-pixel application of an underlying reflection model by assuming a smoothly varying surface normal vector. The Phong interpolation method works particularly well when applied to the Phong reflection model or to any reflection model that has small specular highlights.
In some modern hardware, variants of the interpolation algorithm are called "pixel shading" (this should not be confused with "pixel shaders"). Usually this means that the lighting calculations can be done per-pixel and include other lighting variables such as surface normals from a normap map which are interpolated across the polygon.
Phong in the Source engine
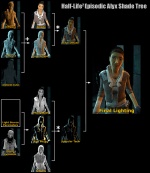
While the above gives a fairly basic explaination of Phong shading as a concept, the effect you seen in Episode One is in fact the result of a number of combined lighting effects working together. An overview of these effects and how they are combined can be seen in the diagram of the episodic shader tree.
With model lighting, Source uses methods which combine spatially varying directional irradiance samples from the radiosity solution with local light sources and environment mapping. On graphics hardware that supports 2.0 pixel shaders and lower, Source computes diffuse illumination from up to two local light sources, either per pixel or per vertex. On newer graphics chips with longer pixel shaders, Source includes specular contributions with Fresnel terms as well as more custom effects.
Phong shading is part of these extended effects and can be seen in the path starting bottom right of the shader tree. Phong exponent, mask and Fresnel terms are combined to give a specular term which is combined with the diffuse solution in the final output.
The rest of this document will focus on the Phong part of the shading tree explaining how the components work and how to create them.
Using the shader
The most basic method of using the phong shader is to enable it in your model texture using the "$phong" "1" directive and including a phong mask in the alpha channel of the normal texture and either a phong exponent texture or phong constant.
The following example is taken from Half-Life 2: Episode One and comes from the file materials/models/Alyx/alyx_faceandhair.vmt which controls the texture on Alyx's face:
"vertexlitgeneric"
{
	"$basetexture" "models/Alyx/alyx_faceandhair"
	"$bumpmap" "models/alyx/alyx_head_normal"
	"$halflambert" 1
	"$nodecal" "1"
	"$model" "1"

// -- From here down is new stuff which will only be applied if $phong is set to 1 --
	"$phong" "1"
	"$ambientocclusiontexture" "models/alyx/alyx_occlusion"
//	"$phongexponent" 33
	"$phongexponenttexture" "models/Alyx/alyx_head_exponent"
	"$phongboost"	"6"
	"$phongfresnelranges"	"[0.05 0.5 1]"
}
Lets break this down into it's component parts:
Phong mask and exponent texture
The phong mask is a greyscale image stored in the alpha channel of the models normal map (defined by $bumpmap). This mask defines on a per texel basis the intensity, or strengh, of the the phong highlight for that texel. Black represents the lowest intensity and shows no phong highlight at all (literally knocking it out), whereas white represents the brightest, or full intensity for that texel.
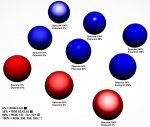
The phong exponent defines the "tightness" of the highlight. A higher exponent results in a smaller, tighter highlight while a lower exponent results in a broader flatter one.
Different materials will exhibit highlights (tighter or broader) based upon their physical properties. A harder, smoother material such as a pool ball may have a very tight highlight while a softer, rougher material like a rubber tire may have a very broad specular highlight. In the Phong lighting equation, there is an exponent which mathematically controls the shape of the resulting highlight (tight or broad), hence the naming.
The phong exponent texture can be defined in one of two ways:
$phongexponenttexturedefines a texture which on a per texel bases defines the exponent value for a surface.$phongexponentoverrides the exponent texture and is useful during development to get a quick overall specular term without painting a channel. It is then usually just commented out when a given texture map gets made and added to the mix for a given material.
The phong exponent texture uses the red and green channels of the image for different purposes. The red channel defines the phong exponent value and the green for albedo tinting. However, albedo tinting is a "work in progress" feature and currently un-supported in the current shader. For this reason, and the sake of simplicity, you should use greyscale for exponent textures.
TODO
Like, loads :D


