Optimization (Geometry): Difference between revisions
m (→Occluders) |
m (→glview) |
||
| Line 93: | Line 93: | ||
* Lots of white lines close together | * Lots of white lines close together | ||
* Bad partitioning of leaves. | * Bad partitioning of leaves. | ||
The first is easy to find, but the second requires a better feel for what's happening. Let's start with the first. | The first is easy to find, but the second requires a better feel for what's happening. Let's start with the first.[[Image:Opt_messybsp.jpg|thumb|A messy BSP. In this case, the sloped roof is the main problem. It and the top block of the building on the right are good candidates for becoming detail brushes.]] | ||
[[Image:Opt_messybsp.jpg|thumb|A messy BSP. In this case, the sloped roof is the main problem. It and the top block of the building on the right are good candidates for becoming detail brushes.]] | |||
When there are many lines close together, it means that BSP is chopping your map into unnecessary leaves. Since Source has to figure out what leaves to draw, having lots of leaves means that it takes longer for Source to do its task, and therefore your map will be slowed. In reality, often this won't be noticable; still, it's good to do what you can. Smart use of detail brushes ([[func_detail]]) will often fix this problem (discussed later). Occasionally a Hint will help (see later sections) but usually not. Rarely, slight changes in world geometry will help, such as changing the way two walls meet at a right-angle corner. | When there are many lines close together, it means that BSP is chopping your map into unnecessary leaves. Since Source has to figure out what leaves to draw, having lots of leaves means that it takes longer for Source to do its task, and therefore your map will be slowed. In reality, often this won't be noticable; still, it's good to do what you can. Smart use of detail brushes ([[func_detail]]) will often fix this problem (discussed later). Occasionally a Hint will help (see later sections) but usually not. Rarely, slight changes in world geometry will help, such as changing the way two walls meet at a right-angle corner. | ||
| Line 101: | Line 99: | ||
Bad partitioning of leaves is a more difficult subject, but is far more important. Correcting the BSP program's mistakes can tremendously speed up your map, and will usually speed up compile time. However, it's not a simple subject (if it was, BSP wouldn't need help). Sometimes problems will be apparent even to the inexperienced, such as when a leaf makes diagonal-downward cuts. Other times, understanding that there is a problem requires familiarity with the PVS idea (see Visibility section). ''Incomplete''. | Bad partitioning of leaves is a more difficult subject, but is far more important. Correcting the BSP program's mistakes can tremendously speed up your map, and will usually speed up compile time. However, it's not a simple subject (if it was, BSP wouldn't need help). Sometimes problems will be apparent even to the inexperienced, such as when a leaf makes diagonal-downward cuts. Other times, understanding that there is a problem requires familiarity with the PVS idea (see Visibility section). ''Incomplete''. | ||
Fixing this type of problem involves placing Hint brushes (covered later) to tell the BSP program where it ''should'' cut. Also, especially in complicated areas of your map, you will often need to make large parts of the geometry into detail brushes ([[func_detail]], see next section). ''Incomplete''. | Fixing this type of problem involves placing Hint brushes (covered later) to tell the BSP program where it ''should'' cut. Also, especially in complicated areas of your map, you will often need to make large parts of the geometry into detail brushes ([[func_detail]], see next section). ''Incomplete''.<br clear="right" /> | ||
==Construction== | ==Construction== | ||
Revision as of 17:35, 13 September 2005
This article deals with the more difficult aspects of map optimization: those concerned with manipulating geometry and the BSP in order to gain performance. For other map optimization information, see Optimization (Non-Geometry). For the main article, see Optimization.
Visibility
The more things that are drawn, the longer it takes to draw them. Complicated things, such as detailed models, taker longer to draw than simple things. These are obvious, but very important. When optimizing a map, we do whatever practical to reduce the number and complexity of things being drawn at any moment. When designing a map, it is very important to keep this in mind. The Potentially Visible Set is (to give a simple but incomplete intro) a record of what places can possible seen from what other places. Anything that could possibly be seen will be drawn (this is an oversimplification), and as we know, drawing things costs time. This means, for example, that if a moving train is in front of you, obscuring your view of an enemy (who is very detailed and thus expensive to draw), the enemy is still being drawn even though you can't currently see it. The reason for this is that it would actually take more time to figure out not to draw the enemy than it would to just draw it and then have the train drawn over it. In many cases, this is actually fine. When it is not, there are things you can do to stop it on a case-by-case basis, which will be discussed later.
The Wall Method
The most basic way to optimize a map is the use of walls to block visibility. This is a technique you can use by itself if you don't feel like putting much effort into optimization and don't care that the results won't be as good as they could be.
Fundamentaly, it is an attempt to draw fewer things, since fewer can be seen (there being walls in the way). As a very general guideline, you want to prevent the player from ever being able to see a long distance away, and want to prevent the player from ever being able to see a large number of objects at a time. This has the advantage of being very easy, but is also very limiting--it rarely helps in outdoor maps, and often makes indoor ones very "twisty". Also, it will not guarantee good map speeds by itself, since it only adresses visibility issues. If you are relying on this method, learn to use mat_wireframe to see whether it's doing any good.
Note that entities (brush-based or model-based) do not count as walls for this purpose--this includes doors. Also, walls with textures that are partially transparent (marked with a T in the Materials Browser) don't count either--such as transparent windows.
BSP and leaves
This is a very important topic, since it is the basis for all geometry optimization. The first stage of compiling a map, the BSP program (vbsp.exe by default) does Binary Space Partitioning (BSP). The purpose of this is to divide the map into sections that meet certain requirements of the engine and that will later be used for visibility precalculations. The sections are called leaves (singular leaf). The way the leaves are arranged is of critical importance to how fast the map runs, and also to how fast the map compiles. The BSP tries to do a good job, but a mapper can help tremendously.
The BSP program ignores everything except world brushes--in other words, all entities, even brush-based ones (this include func_detail), are ignored. The BSP process is blind to them. Transparent brushes are also ignored, except for Hint brushes (discussed later), which are actually directions to the BSP program. Other than this, the BSP program also ignores what materials are painted on the brushes
Incomplete
Once the BSP stage is complete, a .bsp file is generated containing this information. Then everything that was ignored (entities, materials, and suchlike) are placed into this file too. Detail brushes (discussed in their own section later) are converted to regular world brushes. If, when compiling a map, you elect to do BSP with Only Entities, the actual BSP process will not be performed, and only this second stage will be done. Since the previous partitioning is kept, everything is fine as long as you haven't changed any geometry since your last full BSP run. If you are only fiddling with your entities, this is a handy way to avoid a lot of compile time.
The glview tool shows the leaves in a map; it's covered later. The significance of leaves will be explained more in the next section.
If you're into computer science, you might be interested in this encyclopedia article for more information on BSP. This information is not required for optimization, and might not even be useful for it--it is linked only for the satisfaction of curiosity.
See also, this article.
PVS
The main use of the leaves generated by BSP is for the Potential Visibility Set (PVS; aka "Potentially Visible Set", "Potentially Viewable Set", and other variations). This step is done by the VIS program (vvis.exe by default). The VIS program considers only the BSP (no entities, no materials, not even world brushes). For each leaf it calculates what other leaves can be even partially seen from any point within the leaf. The result is a PVS for each leaf.
The graphics engine uses the PVS's to quickly figure out what things to consider drawing. Specifically, it knows which leaf the player is in, and the PVS for that leaf knows what other leaves can possible be seen from that leaf, so only things in those leaves are even possibly visible. The engine might not draw everything there, but it will consider drawing it. Without a PVS, the engine would have to examine every object and brush in the level and decide whether the object/brush needs drawn; this takes too much time to be done efficiently.
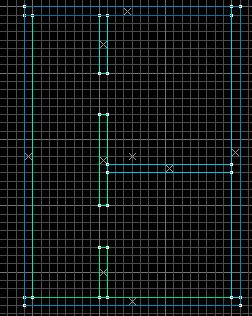
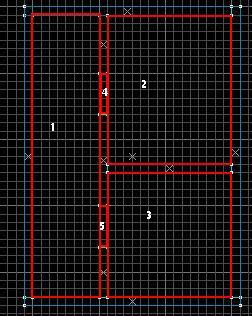
Consider the example pictured on the right (Pic 1). It features two rooms and a hall, with doorways between them. For simplicity, entities are not shown. Without a PVS, no matter where the player is, everything in the level must be considered for drawing, and this is expensive. With a proper PVS, though, when a player is in one room, things in the other room needn't be considered for drawing. If the BSP divides the scene as shown in Pic 2, this will be the case.
For Pic 2, the PVS's are:
- Leaf 1 can potentially see leaves 4, 2, 5, and 3.
- Leaf 2 can potentially see leaves 4 and 1.
- Leaf 3 can potentially see leaves 5 and 1.
- Leaf 4 can potentially see leaves 1 and 2.
- Leaf 5 can potentially see leaves 1 and 3.
Therefore, when a player is in, say, leaf 4, the engine looks up the PVS for leaf 4, and considers drawing objects in leaves 1 and 2. The graphics engine doesn't even think about leaves 3 and 5. Even if leaf three is packed with four hundred G-Men, all adjusting their ties and making goofy expressions, while you are in leaf 4 you will experience no performance hit for them.
However, notice that leaf 1 (the hall) has a large PVS. When the player is in the hall, everything in the scene must be considered for drawing. Even if the player is in the north-east corner of hall, unable to see into leaves 2 or 3, the engine will still consider drawing objects in those leaves, because they are visible from somewhere in leaf 1.
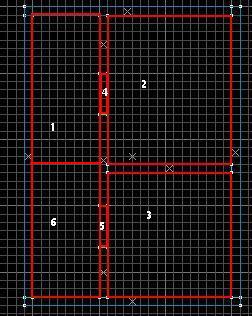
How might this be corrected? One incorrect solution would be to divide the hall in half, as in Pic 3. Does this help? Let's examine the new PVS's:
- Leaf 1 can potentially see leaves 4, 2, 6, 5, 3.
- Leaf 2 can potentially see leaves 4, 1, 6.
- Leaf 3 can potentially see leaves 5, 6, 1.
- Leaf 4 can potentially see leaves 2, 1, 6.
- Leaf 5 can potentially see leaves 3, 6, 1.
- Leaf 6 can potentially see leaves 1, 4, 2, 5, 3.
Why do I say that leaf 1 can potentially see leaf 3? Because if you are standing in the south-western corner of leaf 1 you could see into leaf 3.
Now has the change helped? If I'm standing in the north-eastern corner of the hall (leaf 1), the visibility set still includes every other leaf in the scene, even if I'm facing the corner. If you examine the new PVS's, you'll see that they are functionally equivalent to what we had in Pic 2--except now it's more complicated. Before we had 12 elements in the PVS's; now we have 22. Bloated PVS's will make your maps slower. Since we didn't gain anything except PVS bloat, this was a bad change.
A person who isn't yet convinced might try something like what's shown in Pic 4. This is an even worse solution. Notice that leaf 6 is visible from leaf 3. If you check the PVS's, you should find that the problem still occurs, and that now the bloat is far worse.
So what should be done? Well, in this scene we could easily get away with converting the walls in front of the rooms into detail brushes (but not the wall between the two rooms). The advantage of this is that the visibility is as good as in Pic 2 but now there are only three leaves. This is a gain in simplicity, and thereby speed.
Without changing the scene, that's about as good as it gets. This is probably acceptable. However, if it is not (and it will depend on the map), some slight changes in the scene might help. For example, if the doorways were much thicker and much farther apart, dividing the hall as in Pic 3 might be workable. Or, if the mapper knows that large numbers of complex models will be in certain regions of the scene, the mapper might be able to optimize with that in mind.
The 1024 cuts
The BSP program will make a cut every 1024 units, no matter what. (In Hammer, the grid shows burnt-orange in those places.) This is rarely a problem, but mappers should be aware of it, especially when using glview and hint brushes for optimization.
glview
If you're serious about optimizing, you will need to use glview. It is a program included with the SDK that shows you how BSP is breaking your map into leaves. The BSP program often does a decent job, especially with indoor maps, but sometimes it needs help, and this is how to find out where and how to help.
Setup:
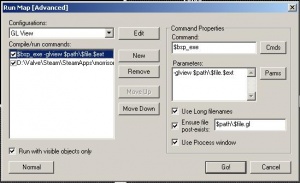
You will need to use Expert compile mode for this, but it is not actually tricky. In Hammer, go to the Run Map menu (where you normally compile the map) and click the Expert... button at the bottom. The Run Map [Advanced] dialog will appear. Click Edit, New, type "GL View" (or whatever), hit Enter then click Close. "GL View" should now be in the drop-down list. Select it. Now press New. In the Command box type
$bsp_exe
and in the Parameters box type
-glview $path\$file.$ext
Enable Use Long filenames, Ensure file post-exists, and Use Process window. In the Ensure file post-exists box type
$path\$file.gl
Click New again. Press the Cmds button and select Executable. Locate glview.exe (look in C:\Valve\Steam\SteamApps\username\sourcesdk\bin\glview.exe) and Open it. In the Parameters box type
-portals $path\$file.gl
Enable Use Long filenames and Use Process window. Now, in the Compile/run commands box, make sure both items are checked. Also check Run with visible objects only. That is the setup; you should only have to do it once.
When "GL View" is set up, it can be accessed through the Advanced run menu by selecting it from the drop-down list and clicking Go!. To get back to your regular compiling, click the Normal button. (Or you can set it up to do it from the Advanced dialog, but doing so is beyond the scope of this article.)
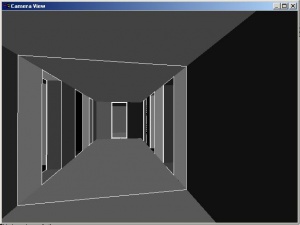
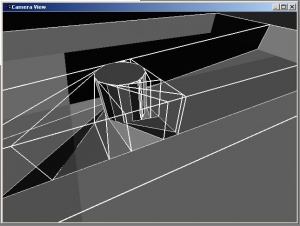
If successful, a strange window called "Camera View"
should appear, with black/gray/white contents. This is glview showing you what your level looks like when the BSP program is done with it. You can use the WASD keys and the mouse to move around. By the way, use the Esc key to close glview; otherwise it might crash. Spend some time zooming around your level. Ignore the different shades of gray--they are not important. The white lines are the important part.
There are two things to look for:
- Lots of white lines close together
- Bad partitioning of leaves.
The first is easy to find, but the second requires a better feel for what's happening. Let's start with the first.
When there are many lines close together, it means that BSP is chopping your map into unnecessary leaves. Since Source has to figure out what leaves to draw, having lots of leaves means that it takes longer for Source to do its task, and therefore your map will be slowed. In reality, often this won't be noticable; still, it's good to do what you can. Smart use of detail brushes (func_detail) will often fix this problem (discussed later). Occasionally a Hint will help (see later sections) but usually not. Rarely, slight changes in world geometry will help, such as changing the way two walls meet at a right-angle corner.
Bad partitioning of leaves is a more difficult subject, but is far more important. Correcting the BSP program's mistakes can tremendously speed up your map, and will usually speed up compile time. However, it's not a simple subject (if it was, BSP wouldn't need help). Sometimes problems will be apparent even to the inexperienced, such as when a leaf makes diagonal-downward cuts. Other times, understanding that there is a problem requires familiarity with the PVS idea (see Visibility section). Incomplete.
Fixing this type of problem involves placing Hint brushes (covered later) to tell the BSP program where it should cut. Also, especially in complicated areas of your map, you will often need to make large parts of the geometry into detail brushes (func_detail, see next section). Incomplete.
Construction
The way the world is constructed is a major factor in map speed. Good construction from the start of a map will reduce the amount of optimization that must be done later.
The Giant Box School of Construction
Many beginners start a map by enclosing it in a giant cube and procede to build everything inside it. If the map is a test level, and the cube is less than, say, 512 units per side, then this is fine. But it is not acceptable for serious levels, especially if you care about speed at all.
The Giant Box has many advantages: it's easy to make (the Hollow tool), it prevents leaks as long as everything is inside it, and it's hard to break accidentally. These advantages make it ideal for test maps (such as the sdk_whatever.vmf maps included with the SDK).
The disadvantages, though, are very bad.
- It's hard on the BSP program, resulting in slow compile times, nasty leaf divisions, and a slower map.
- Even though it seems like an empty box should be simple for the compiler, it will be cut every 1024 units (see the section The 1024 cuts).
- It doesn't so much stop leaks as hide them. Sure, the BSP program will stop complaining, but you're not doing yourself a favor.
- Resizing the box results in bad scaling of its component brushes. This makes it harder to align world geometry. (Get around this by ungrouping the side or temporarily ignoring grouping.)
- It looks ugly, which will make people dislike the map.
- It is one of the most easily recognized marks of a newbie. A person can move from being a newbie to an amateur just by refraining from using the Giant Box method.
Note: beginners who know about the tools/toolsskybox texture will often paint that on the surfaces of their cube. This does not make the cube any more or less wrong. It is unfortunate that many people on the forums advise against enclosing levels in "skyboxes", as the skybox texture has nothing to do with it. The problem is the giant box (or, more accurately, the nasty leaves it creates) regardless of the material.
The scope of the article does not include the alternatives to Giant Box construction, nor how to fix a map that previously employed it.
Brushwork
Good brushwork can have minor benefits for the speed of your level and for compile time. Bad brushwork can cause minor slow-downs. Occasionally, bad brushwork can so confuse BSP that it causes major slowness in the map and while compiling. The following are some basic brushwork tips that have some impact on map speed.
Overlap
World brushes should not overlap each other. Overlaps are considered bad brushwork, and occasionally cause minor problems.
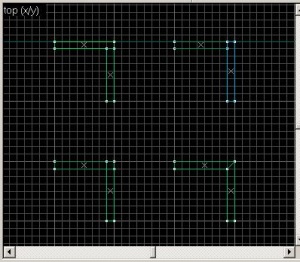
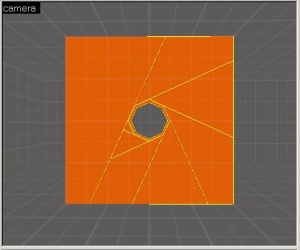
See the picture on the right:
- The top two samples are acceptable ways of making a corner with two brushes. Of course they do yield that extra edge shown on the second image.
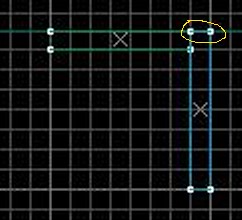
- The bottom-left sample is wrong. Do not do this with two world brushes. It is, however, acceptable in when one or both brushes are brush entities.
- The bottom-right sample is acceptable, but will only remove 1 surface. Occasionally mitering will affect the BSP, but generally not. However, mitered brushes are more difficult to resize, so you're probably better off not bothering.
Carving
The Carve tool is great for making rectangular doorways, windows, ductwork, and so on. But it is not a very smart tool, and it has become a standard saying that people should never try to carve with anything except rectangular blocks that are aligned to the grid. For example, trying to carve a cylindrical hole in a wall will horribly mangle the wall (see picture). As to optimization, there are three problems:
- This can sometimes confuse BSP, although not always.
- When the brushes are broken into triangles for drawing, there will be many more than are needed.
- If this wall is a world brush and it touches other world brushes, those brushes will also be broken into triangles poorly.
Mis-aligned Vertices
If you do not align all your vertices to the grid, you may end with rounding errors in the compile process that will leave very small gaps in places where they should not be any. This is just going to add that little bit more of a face to render, and in extreme examples, mess up your map. Always snap to the grid, and when making geometry that is generated for you (like pillars), always go through and snap all the vertices to the grid in Vertex Manipulation Mode.
3D Skybox
If you want to show a large outdoor area, but don't need to let the player run around in it, a 3D skybox is an excellent way to achieve this cheaply. Consider an urban map, where players can move through parts of a street, should be able to see down other streets, but should not be able to go down the other streets (perhaps they are fenced off). The expensive approach would be to construct the visible portions of the side streets and place tools/toolsplayerclip boxes between the playable sections and the unplayable sections. However, this complicates the BSP, which slows the map. However, if those side streets are placed in a 3D skybox, and the playable portion of the map simply ends with tools/toolsskybox where the clipping barriers used to be, then the BSP of the playable area is considerably less complicated, and so is the BSP of the 3D skybox. The speed-up of compile times and map speed can be quite dramatic. The disadvantage is that the skybox is now closer to the player, which will be detected if, say, the player tries to throw a crate over the fence, or tries shoots an RPG over it.
Leaks
You should already know what leaks are, and how to avoid them.
What a leak does is make it impossible for the BSP program to generate visibility information. Because of this the VIS program can not run, so you don't get PVS calculations. glview will not work either. As you should be aware from the PVS section above, without the PVS the engine will have to work a lot harder to figure out what to draw. In short, you can't do useful geometry optimization while you have a leak. Therefore you must avoid leaks, preferably by practicing good brushwork.
Detail brushes
World brushes (regular map geometry) can be made into func_detail entities, which are called "detail brushes". This simplifies the visibility calculations (thus speeding up the map) by allowing them to assume that those brushes do not block visibility. The compiler cannot know when this is a good assumption to make, so it is up to the mapper to tell it.
There are a number of misconceptions about detail brushes which cause endless confusion on the forums, so here are some facts:
- detail brushes do cast shadows just like regular brushes
- detail brushes are solid just like regular brushes (if you don't want solid, use func_brush)
- After BSP finishes its part, detail brushes are identical to regular brushes. BSP is the only program that cares about the difference between them.
- The only reason to use func_detail is to affect the visibility. That's all they do.
By the way, there are two settings in the properties of func_detail. You should have no reason to change them.
To make one or more world brushes into detail brushes, select them and press Ctrl+T (or select Tie To Entity from the right-click menu). This makes it/them a brush-based entity, and a dialog called Object Properties will appear. Select func_detail from the Class drop-down box and click Apply.
If you make something into a func_detail (or any type of brush-based entity) but no longer want it to be, select it and press Ctrl+Shift+W (or select Move to World from the right-click menu) to convert it back into brushes.
Many brushes should not be detail brushes. In general (especially while starting out) do not make something a detail brush unless there's a reason to (see next section for some reasons). Detail brushes do not block visibility, but most of the time you do want to block visibility--otherwise everything in your map would be drawn all the time, and your map will be much slower than it could be. Also, you are required to seal your map in world brushes in order to prevent leaks (see the section on Leaks); detail brushes will not do this. So: don't just wildly convert things into func_detail.
When to use detail brushes
This is very subjective (there are only guidelines, not actual rules), so you'll simply have to get a feel for it. However, here are some pointers.
- Columns should usually be detail brushes.
- Slanted brushes (roofs, for example) often result in silly leaf divisions; sometimes they can appropriately be made into detail brushes, othertimes not.
- When making a doorway, the part above the door that touches the ceiling is a great candidate for being a detail brush.
- When you have two windows next to each other, the part between them is often a good candidate for being a detail brush.
- Almost any brush that has been rotated, because the BSP program often does the wrong thing with rotated brushes.
- Small, unimportant brushes that are merely decorative.
Many people use detail brushes for the majority of their world geometry; others don't. This should depend on the circumstances of the map in question.
Incomplete
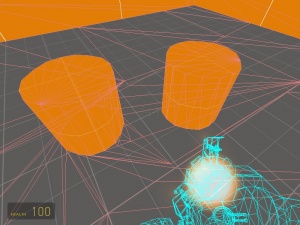
See the SDK sample map sdk_func_detail.vmf for examples. The screenshots in this section were taken from that map.
mat_leafvis
glview draws only world brushes, and sometimes you'd like to see how the leaves look in-game. This can be done, but not as well as glview does it. By turning on the console variable mat_leafvis, Source will draw a red wireframe box around whatever leaf you are in. This can occasionally be useful, and for some people will be much easier to visualize that what glview gives. Additionally, you can use it in maps where you don't have access to the .vmf file, letting you learn from professional maps.
To turn this on, go to the console and type
mat_leafvis 1
To turn it off, type
mat_leafvis 0
If you want to be able to toggle it with a button on the keyboard (i, in this case), type this
bindtoggle i mat_leafvis
Cheats do not need to be enabled to use this.
Hints
Hint brushes tell BSP that you know better that it does about where to cut up the map. (If you don't, see the Visibility section above, plus the sample map mentioned below.) Proper use of hint brushes can tremendously speed up your map. Hints are very easy to use, can help significantly, and usually won't hurt much if misused. Therefore people who have just begun learning about map optimization should initially stick with them rather than the more difficult Area Portals or Occluders.
To make a hint brush, make a regular world brush textured with material tools/toolsskip, then paint at least one side with tools/toolshint. Do not tie the brush to an entity. Each side painted with tools/toolshint with become a cut in the BSP. In some cases, adding a cut will cause the BSP program to rethink other cuts. The changes can be viewed in glview.
If you have more than a few Hint brushes, it might be a good idea to assign them all to the same Visgroup. This makes it easier to temporarily hide them while working--but remember to turn them back on before compiling!
Hints are essentially free (that is, they impose no run-time slow-down of your map), which is their advantage over Area Portals and Occluders. However, unnecessary Hints complicate the BSP, which bloats the PVS, which will result in a slower map. If you think you want to make curved Hint brushes, you almost certainly have the wrong idea.
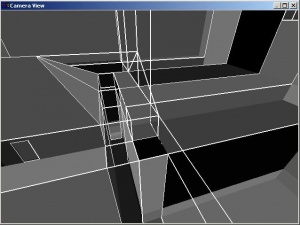
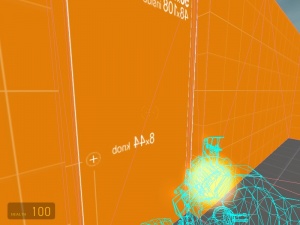
See the SDK sample map sdk_hints.vmf for an example of what a Hint brush looks like. The screenshots on the right are from that map. The top version does not have a hint brush, and the bottom version does (see the map to understand where the hint was placed). In the top version, the right leaf will be visible from the bottom left leaf, which is wrong, because things on both sides of the wall will be considered to be potentially visible to each other. In the bottom version, the bottom right leaf is not visible from the bottom left leaf, which is good, because it means that when a player is on one side of the wall the engine won't bother drawing things on the other side of the wall. In both cases the vertical cut is a 1024 cut; the ideal version of this scene would avoid this cut (by moving the room). Note that although the BSP would be simpler by making the middle wall a detail brush, this is not the right thing to do, since we do want it to block visibility.
Area portals
Area Portals are a means to partition of a portion of your map into a separate area. If you have no area portals, your entire map is one area. The major advantage of area portals is that when you are in one area, the Source engine doesn't even bother thinking about drawing anything in any other areas unless there's a portal in sight--and then it only draws things that are in leaves visible through the portal.
As an example, consider a street full of houses. For simplicity, lets assume that each house has a single door that opens to the street, and no windows. Also, every house is on the same side of the (straight) street. If you are standing in one house, then, you can see some part of the house and possibly part of the street, but no part of any other house. Source should not even consider drawing any part of any other house, because there's no way you could possibly see it. And if the door is closed, you can't see the street, so there's no reason to consider any of that, either.
By placing an area portal in the doorway, you can achieve this ideal. Here's what would happen. When the doorway (really, the area portal) is not visible at from the player's point of view, Source doesn't bother thinking about anything except what's in the current area: the house. If the doorway is in view, Source looks at the area on the other side of it (the street) and figures out which leaves are visible through the doorway. It then only draws things that are in those leaves. When viewed with mat_wireframe the effect can be dramatically illustrated. Also, area portals can be tied to doors (func_door or func_door_rotating, but not physics doors), so that when the door is closed Source doesn't bother thinking about what's behind it. In summary, this part of your map becomes almost as fast as if there weren't anything else in the map.
However, all is not perfect. They have one major restiction on how they are used (although this is much easier to handle than learning to effectively use Hint brushes): each area must be completely sealed by world brushes and area portals (more on this in a bit). Also, Source must do some run-time (in-game) calculations whenever an open area portal is in sight, so they're not "free" like Hint brushes. However, as long as they are used correctly, the benefits are orders of magnitude better than the cost.
The major restriction of area portals is that each area portal must border exactly two (not one!) areas in the map. An area is a section of a map completely sealed by world brushes and area portals; and just like in regular mapping, the usual rules about leaks apply (including, for example, that detail brushes do not seal). Failing to correctly seal areas will usually result in the BSP program complaining with something similar to
Brush 112: areaportal brush doesn't touch two areas
Unfortunately, these error messages are not as easy to spot as leak error messages. But, as for regular leaks, the BSP program will generate a pointfile to help you find the problem. When area portals compile correctly, the BSP program will report
Processing areas...done
Area portals are visible in glview as gray obstructions.
As an example for defining an area: let's say that we want to make a log cabin with two doors, four windows, and a chimney that people can enter Santa-style. Let's also say that we've identified this building as something that we want to turn into its own area. To do this, the walls, floor, and roof would have to be world brushes (not detail brushes!) so that it's completely sealed from leaks except for the aforementioned openings. Then all of those openings must be covered by area portals: both doors, all windows, and somewhere in the chimney. It doesn't matter where in the chimney the portal is, as long as a fly couldn't get inside without touching the portal. It doesn't matter if the portal overlaps some of the world geometry--if two windows are side-by-side, one area portal could be stretched to cover them both (and then you could use a detail brush for the part in between, since the portal is sealing this part). But if there's so much as a single-unit gap between a doorframe and its area portal, the area is no longer seales, and the BSP program will get snotty, and the portals will refuse to work until you fix the problem and recompile.
Once the cabin is working (not before), put a door in each doorway and attach them to their respective area portals. Since this is a log cabin, we'll put big (non-see-through) shutters in the windows (made of func_door_rotating entities) and tie them to their respective portals. The chimney portal doesn't have a door, but that's okay, especially as the view through that portal is pretty limited anyway.
To make an area portal, create a brush textured entirely with the tools/toolsareaportal texture. Make it a func_areaportal entity and position it in the doorway/windowway/whatever. According to the SDK documentation, it should be one unit thick. If you are not going to tie it to a door, make sure to change the Initial State property to Open (otherwise it will be black and opaque all the time). If you want to link it to a door, set the Initial State to Closed (unless the door is set to be initially open) and put the door's name in portal's Name of Linked Door property. See Area Portals for a tutorial.
As a note: since there is some run-time cost in using area portals whenever they are open, and because doors in multiplayer (especially Deathmatch) usually end up staying open most of the time, area portals are somewhat less useful in multiplayer than they are in singleplayer. However, there are still plenty of instances where they're useful even in Deathmatch--especially if you can get away with doors that automatically close.
When testing area portals, there are a few console variables that come in handy (especially in conjunction with mat_wireframe):
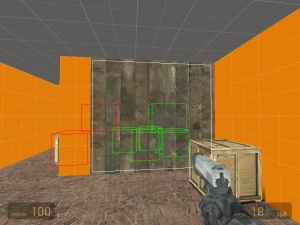
- r_DrawPortals draws two green boxes for each portal. The inner box is the actual portal (sometimes more than one portal is condensced into one), and the outer box is the smallest rectangle (relative to your screen) that encloses the portal. The outer box is what things are clipped to.
- r_portalsopenall forces all portals open.
- r_portalscloseall forces all portals closed. Try this if portals don't seem to be doing anything; it can tell you whether the problem is just that the portals aren't closing properly.
Unfortunately, there is no SDK sample map for Area Portals. (Note: See Discussion for info on a demo map.)
Occluders
Occluders perform run-time visibility blocking, as opposed to the normal compile-time visibility calculations performed by the VIS program. Since they are done at run-time, they do cost (whereas what VIS does is free).
The SDK documentation specifically says: "A note of caution -- overuse of occluders can decrease performance." http://www.valve-erc.com/srcsdk/Levels/performance_and_visibility.html
Occluders only block visibility of models, not brushes. They can be turned on and off by triggers, and can be made to block visibility in only certain directions (however, model shadows will still be drawn).
Occluders are brush-based entities. Make a brush textured with tools/toolsnodraw. For the sides that should block visibility, texture those with tools/toolsoccluder (in the sample map they used tools/toolstrigger, and this seems to work too. Then make the brush into a func_occluder.
When an occluder is active (default), any models fully behind it (from the player's view) will not be drawn. Brushes are not affected, not even brush entities. Dynamic shadows cast by props are not hidden, even when the props are. When an occluder is inactive, things are drawn normally--it is as though the occluder were not there. There is a run-time cost for active occluders; my experimentation has not established whether there is a run-time cost for inactive occluders, although I believe that there is not.
Occluders are mainly used to prevent the drawing of complex models. As an example, let's consider a large breakable wall with several scientists on both sides. The player can get to either side of the wall through some twisty ducts that go around. We want the player to be able to hear the scientists on the other side of the wall but not see them. (NPCs are expensive models, plus the glasses worn by some of the scientists use shaders. To keep things fast we don't want to draw them unless we have to.) However, the wall does not block visibility since it is an entity (a func_breakable). By placing an occluder inside the wall we can block the visibility of the scientists on the other side. In this case only two sides of the occluder would be textured in tools/toolsoccluder--texturing the other sides with it is wasteful and will slow things down unneccesarily. Then we make an OnBreak trigger for the breakable wall that deactivates the occluder. This allows the engine to draw things on the other side of where the wall was.
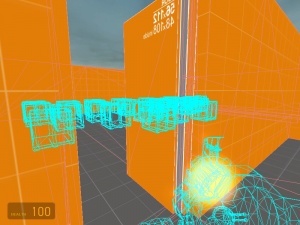
To see occluders in action, turn on the console variable r_visocclusion. Active occluder faces are outlined in white. Occluded entities are bordered in green. Drawn entities are bordered in red. Entities that aren't being considered for occlusion are not bordered. To determine whether performance is being helped or hindered by occlusion, toggle the console variable r_occlusion and check whether your framerate is being affected. Each occluder in your map should be checked this way to make sure that it's actually useful. The SDK documentation suggests that an occluder should be blocking several complicated models for it to be worthwhile.
You do not need to run VIS or RAD in order for occluders to work. Occluders do not seal geometry from leaks, but they don't need to be sealed, either (unlike area portals). Occluders and area portals are not interchangable; they both have uses in different situations. If your use of an occluder does not involve it being turned off at some point, you should probably just use a world brush instead.
See the SDK sample map sdk_occluders.vmf for examples: both the frame and the brick wall (a detail brush) feature occluders.
