Bump map: Difference between revisions
Jump to navigation
Jump to search
 Tip:VTFEdit can automatically generate bump maps. See the bottom-right of the import screen.
Anarkia777 (talk | contribs) |
Anarkia777 (talk | contribs) |
||
| Line 83: | Line 83: | ||
*[http://planetpixelemporium.com/tutorialpages/normal.html An old article that explains normal mapping quite well.] | *[http://planetpixelemporium.com/tutorialpages/normal.html An old article that explains normal mapping quite well.] | ||
*[[Material Creation]] | *[[Material Creation]] | ||
*[http://www.cgtextures.com/content.php?action=tutorial&name=normalmap] | |||
{{otherlang:en}} {{otherlang:en:jp|Creating Normal Maps:jp}} | {{otherlang:en}} {{otherlang:en:jp|Creating Normal Maps:jp}} | ||
Revision as of 11:44, 4 December 2008

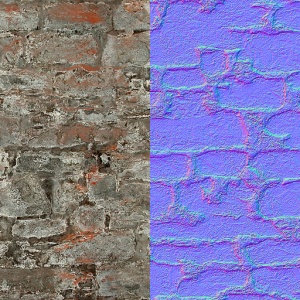
A material's albedo (left) compared to its bump map.

A bump map is an RGB image that can be used to simulate a three-dimensional surface through a process known as normal mapping. They are sometimes called normal maps.
Format
Each color channel in a bump map has a meaning:
- The red channel defines horizontal facing (X-axis)
- 0 = left
- 128 = forward (facing viewer)
- 255 = right
- The green channel defines vertical facing (Y-axis)
- 0 = up
- 128 = forward (facing viewer)
- 255 = down
- The blue channel defines height (Z-axis)
- 0 = deepest
- 128 = maximum depth capable of receiving dynamic light (it's a bad idea to go under this)
- 255 = at the material's surface
The three channels between them allow the engine to calculate a normal vector for every pixel, allowing it to generate shadows and highlights on a two-dimensional surface.
A bump map is largely useless for really flat surfaces like smooth concrete or metal, but even rough concrete sometimes has enough depth to it to make one worthwhile.
Creation
A bump map should:
- Be at the same resolution as the albedo/s it is to be used with.
- Be stored in an uncompressed format (see Conversion). (it is optionel, because the file size for map multi.)
Programs

Various programs can automate the creation of bump maps, either by image analysis or by using 3D geometry the user provides.
- 2D
- Photoshop or Paint Shop Pro
- The GIMP
- 3D
- XSI
- ZBrush2
- Lightwave
- 3D Studio Max
- Maya
- Blender
- NVIDIA Melody
- Cinema 4D
- NormalMapper
- xNormal
- Other
- CrazyBump: Produces some very good normal maps. Some of them can be argued as almost having the same depth as a parallax map.
- ShaderMap: A free alternative to CrazyBump.
- Normal2dudv: a third party tool for converting bump maps to Dx8-friendly du/dv maps.
Conversion
In VTFEdit
When converting your texture:
- Choose BGR8888 or BGRA8888 (if your texture has an alpha channel) as your image format.Tip:You can sometimes get away with DXT compression.
- Check the "Normal map" box in the texture's flags list after the import is complete. It's about 1/5 of the way down the list.
In Vtex
- Save your normal map as a TGA in the same resolution as the original texture. Give it a name that ends in _normal. The _normal at the end of the name will affect how Vtex converts it. For the brick wall example, we would name the file
brickwall_normal.tga. - Add
nocompress 1andnormal 1to <texture filename>.txt in the same folder as your texture, then compile.
Implementation
See $bumpmap.
See also
$ssbump: creation and usage of Valve's new self-shadowing bump maps.- An old article that explains normal mapping quite well.
- Material Creation
- [1]