Bump map: Difference between revisions
Jump to navigation
Jump to search
TomEdwards (talk | contribs) |
TomEdwards (talk | contribs) (merged from Normal Map Creation) |
||
| Line 1: | Line 1: | ||
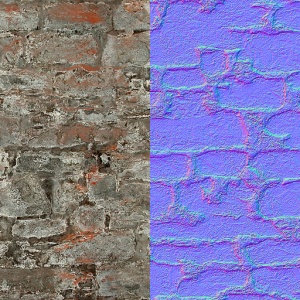
[[Image:Brickwall021a normalcompare.jpg|thumb|A material's [[albedo]] (left) compared to its bump map.]] | [[Image:Brickwall021a normalcompare.jpg|thumb|A material's [[albedo]] (left) compared to its bump map.]] | ||
[[Image:Example of bump mapping.jpg|thumb|The above material in-game.]] | [[Image:Example of bump mapping.jpg|thumb|The above material in-game.]] | ||
A '''bump map''' is an [[RGB]] image that can be used to simulate a three-dimensional surface through a process known as [[Wikipedia:Normal mapping|normal mapping]]. | A '''bump map''' is an [[RGB]] image that can be used to simulate a three-dimensional surface through a process known as [[Wikipedia:Normal mapping|normal mapping]]. | ||
== Format == | |||
Each color channel in a bump map has a meaning: | Each color channel in a bump map has a meaning: | ||
| Line 22: | Line 25: | ||
A bump map is largely useless for really flat surfaces like smooth concrete or metal, but even rough concrete sometimes has enough depth to it to make one worthwhile. | A bump map is largely useless for really flat surfaces like smooth concrete or metal, but even rough concrete sometimes has enough depth to it to make one worthwhile. | ||
== Creation == | |||
A bump map should: | |||
*Be at the same resolution as the [[albedo]]/s it is to be used with. | |||
*Be stored in an uncompressed format (see [[#Conversion|Conversion]]). | |||
=== Programs === | |||
[[Image:Test_bump.jpg|thumb|Bump maps as created by various programs.]] | |||
Various programs can automate the creation of bump maps, either by image analysis or by using 3D geometry the user provides. | |||
;2D | |||
:[[Normal Map Creation in Photoshop or Paint Shop Pro|Photoshop or Paint Shop Pro]] | |||
:[[Normal Map Creation in The GIMP|The GIMP]] | |||
;3D | |||
:[[Normal Map Creation in XSI|XSI]] | |||
:[[Normal Map Creation in ZBrush2|ZBrush2]] | |||
:[[Normal Map Creation in Lightwave|Lightwave]] | |||
:[[Normal Map Creation in 3D Studio Max|3D Studio Max]] | |||
:[[Normal Map Creation in Maya|Maya]] | |||
:[[Normal Map Creation in Blender|Blender]] | |||
:[http://developer.nvidia.com/object/melody_home.html NVIDIA Melody] | |||
:[http://planetpixelemporium.com/tutorialpages/normal2.html Cinema 4D] | |||
:[[NormalMapper]] | |||
:[http://xnormal.net/ xNormal] | |||
;Other | |||
:[http://www.crazybump.com CrazyBump]: Produces some very good normal maps. Some of them can be argued as almost having the same depth as a parallax map. | |||
:[http://shadermap.renderingsystems.com/ ShaderMap]: A free alternative to CrazyBump. | |||
:[[Normal2dudv]]: a third party tool for converting bump maps to Dx8-friendly [[du/dv maps]]. | |||
=== Conversion === | |||
==== In [[VTFEdit]] ==== | |||
When converting your texture: | |||
# Choose BGR8888 or BGRA8888 (if your texture has an alpha channel) as your image format.{{tip|You can ''sometimes'' get away with DXT compression.}} | |||
# Check the "Normal map" box in the texture's flags list after the import is complete. It's about 1/5 of the way down the list. | |||
==== In [[Vtex]] ==== | |||
# Save your normal map as a [[TGA]] in the same resolution as the original texture. Give it a name that ends in ''_normal''. The ''_normal'' at the end of the name will affect how [[Vtex]] converts it. For the brick wall example, we would name the file <code>brickwall_normal.tga</code>. | |||
# Add <code>nocompress 1</code> and <code>normal 1</code> to <texture filename>.txt in the same folder as your texture, then compile. | |||
=== Implementation === | |||
See <code>[[$bumpmap]]</code>. | |||
==See also== | ==See also== | ||
*<code>[[$ssbump]]</code> | *<code>[[$ssbump]]</code>: creation and usage of Valve's new self-shadowing bump maps. | ||
*[http://planetpixelemporium.com/tutorialpages/normal.html An old article that explains normal mapping quite well.] | |||
*[[Material Creation]] | |||
*[http://planetpixelemporium.com/tutorialpages/normal.html An old article that explains | |||
{{otherlang:en}} {{otherlang:en:jp|Creating Normal Maps:jp}} | {{otherlang:en}} {{otherlang:en:jp|Creating Normal Maps:jp}} | ||
[[ | [[Category:Material system]] | ||
[[Category:Glossary]] | [[Category:Glossary]] | ||
[[Category:Tutorials]] | |||
Revision as of 02:47, 3 December 2008

A material's albedo (left) compared to its bump map.

A bump map is an RGB image that can be used to simulate a three-dimensional surface through a process known as normal mapping.
Format
Each color channel in a bump map has a meaning:
- The red channel defines horizontal facing (X-axis)
- 0 = left
- 128 = forward (facing viewer)
- 255 = right
- The green channel defines vertical facing (Y-axis)
- 0 = up
- 128 = forward (facing viewer)
- 255 = down
- The blue channel defines height (Z-axis)
- 0 = deepest
- 128 = maximum depth capable of receiving dynamic light (it's a bad idea to go under this)
- 255 = at the material's surface
The three channels between them allow the engine to calculate a normal vector for every pixel, allowing it to generate shadows and highlights on a two-dimensional surface.
A bump map is largely useless for really flat surfaces like smooth concrete or metal, but even rough concrete sometimes has enough depth to it to make one worthwhile.
Creation
A bump map should:
- Be at the same resolution as the albedo/s it is to be used with.
- Be stored in an uncompressed format (see Conversion).
Programs

Various programs can automate the creation of bump maps, either by image analysis or by using 3D geometry the user provides.
- 2D
- Photoshop or Paint Shop Pro
- The GIMP
- 3D
- XSI
- ZBrush2
- Lightwave
- 3D Studio Max
- Maya
- Blender
- NVIDIA Melody
- Cinema 4D
- NormalMapper
- xNormal
- Other
- CrazyBump: Produces some very good normal maps. Some of them can be argued as almost having the same depth as a parallax map.
- ShaderMap: A free alternative to CrazyBump.
- Normal2dudv: a third party tool for converting bump maps to Dx8-friendly du/dv maps.
Conversion
In VTFEdit
When converting your texture:
- Choose BGR8888 or BGRA8888 (if your texture has an alpha channel) as your image format.
 Tip:You can sometimes get away with DXT compression.
 - Check the "Normal map" box in the texture's flags list after the import is complete. It's about 1/5 of the way down the list.
In Vtex
- Save your normal map as a TGA in the same resolution as the original texture. Give it a name that ends in _normal. The _normal at the end of the name will affect how Vtex converts it. For the brick wall example, we would name the file
brickwall_normal.tga. - Add
nocompress 1andnormal 1to <texture filename>.txt in the same folder as your texture, then compile.
Implementation
See $bumpmap.
See also
$ssbump: creation and usage of Valve's new self-shadowing bump maps.- An old article that explains normal mapping quite well.
- Material Creation