TF2/Territorial Control: Difference between revisions
Brandished (talk | contribs) mNo edit summary |
No edit summary |
||
| Line 1: | Line 1: | ||
[http://www.cuug.ab.ca/~lapierrs/creative/games/tf2/tc_tutorial.html Soleil's TF2 TC mapping tutorial] | [http://www.cuug.ab.ca/~lapierrs/creative/games/tf2/tc_tutorial.html Soleil's TF2 TC mapping tutorial] | ||
[[Category:Level Design Tutorials]] | [[Category:Level Design Tutorials]] | ||
TC maps like Hydro are the most complex, which is probably why there are few of them in circulation. They're also one of the most replayable map types, because because of the way a long campaign is composed of relatively short rounds and how each game can play out differently. | |||
The main reference in learning to do this was a decompiled version of tc_hydro, obtained from [http://www.tf2maps.net TF2maps.net]. | |||
== Laying out the level == | |||
Mapping in general is outside the scope of this tutorial. It is assumed that you already know how to use Hammer and have one or two maps of other types under your belt. For beginners, it's recommended that you start with a CTF (Capture-The-Flag) type, as it's the easiest to set up. | |||
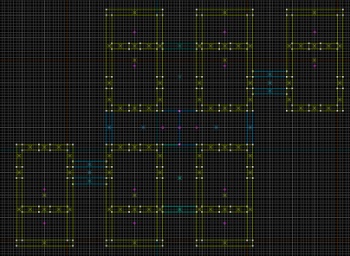
For this tutorial, we'll use a really basic map with six rooms and six spawn rooms, using the same arrangement as Hydro. It will have the same rules as Hydro: | |||
* Each team has one home base, but these are only seen when the opposing team is on the verge of winning. | |||
* Between the bases are four other zones, each with one control point. We'll call these A, B, C and D. | |||
* Each team starts off owning the control points at their home base, plus two in the central area. Blue initially owns A and B, and red initially owns C and D. | |||
* The computer randomly selects two of the four central points that have different owning teams, and starts a round between those two points. During these rounds, each team must defend its single point while trying to capture the other team's single point. | |||
* When one team controls all four central points, then a different type of round occurs. In this endgame round type, the losing team must defend its base from the winning team. These rounds can involve either control point A and the blue base (if red is winning) or D and the red base (if blue is winning). Although there are two control points in an endgame round, the point of the winning team is locked and cannot be captured. | |||
[[Image:Tc_example_overview.jpg|thumb|right|350px|An overview of our simple map.]] | |||
* If the defending team in an endgame round successfully defends their point until time runs out, they gain possession of the neighboring point and play returns to the normal type of round. | |||
* If the attacking team captures the base of the defending team, they win the game. | |||
Each of the six large rooms will contain a single control point. The six smaller attached rooms will contain the associated spawn rooms. The left and right end rooms will be the bases, and the four interconnected rooms will host each of the six possible inner rounds. | |||
Remember, just because there are four control points in the central zone doesn't mean there has to be six possible rounds played there (or ten for five points, fifteen for six, etc...). As you'll see later, you define which pairs of points can be involved in a round. | |||
== The control points == | |||
Next we'll place the base plates for each of the control points and give each one a unique name. Make them as a prop_dynamic entity with model cap_point_base.mdl, skin 0. In this example, the baseplates are named cp_baseplate_X where X is one of BLUE, A, B, C, D or RED. | |||
Then, on each baseplate, place a team_control_point entity. Give each a unique name (cp_BLUE, cp_A, cp_B, cp_C, cp_D and cp_RED in this case), and give each one a unique index number. These indexes will be important for creating the map overview later. I set mine as: cp_BLUE = 0, cp_A = 1, cp_B = 2, cp_C = 3, cp_D = 4 and cp_RED = 5. You'll probably also want to set the "Print Name" property to something informative too - this gets displayed when a capture occurs, as in "<PlayerName> captured <PrintName> for team 1!". | |||
For each of the four inner team_control_point entities, add two output events. On event OnCapTeam1, set the skin of the associated baseplate to 1, and when OnCapTeam2 occurs, set the skin to 2. This just changes the color of the light at the center of the baseplate to reflect the owning team. | |||
Set the default owner to blue for cp_BLUE, cp_A and cp_B, and red for cp_C, cp_D and cp_RED. You should also enable "Warn on capture" for all of them so that people will notice when a cap starts. | |||
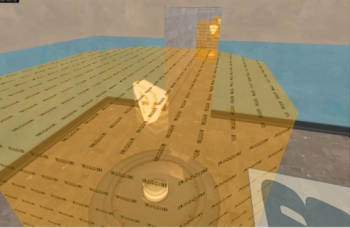
[[Image:Tc example points.jpg|thumb|left|350px|One of the control points]] | |||
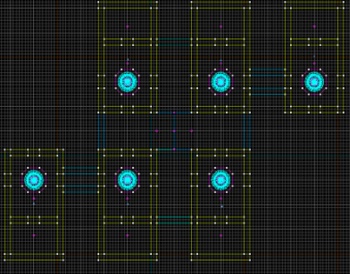
Now select the texture tools/toolstrigger. For each baseplate, draw a brush around it with this texture and then bind the brush to func_capturezone. Give each a unique name - for example, cap_trigger_BLUE, cap_trigger_A and so on. These are the zones that players must enter to capture a point. DO NOT select them all and then bind to func_capturezone, because that will group them to a single entity; we want a separate entity for each capture point. Set the associated control point of each to the name of the team_control_point entity inside it.[[Image:Tc example points top.jpg|thumb|right|350px|Our map as it stands now]] | |||
== Spawn rooms == | |||
Since the map presented here is only an example, I've really skimped on the spawn rooms. Each is just a func_respawnroom brush textured with dev/nodraw, with an info_player_teamspawn inside. Normally you should have 12-16 spawn points inside, all with the same properties. | |||
You don't need to name any of these unless for other purposes. All you have to do is open the properties for each of the info_player_teamspawn entities and set its associated control point to the name of the team_control_point that you want to belong with this spawn room. The game will automatically assign that spawn room to the team that owns that point at the start of a round that involves that point. | |||
When testing your map, you may see some warnings on the console to the effect that some of your spawn rooms cannot find spawn points inside themselves. I haven't figured out what causes this, but it doesn't seem to have any effects, and Hydro suffers from this condition too. | |||
== Entities == | |||
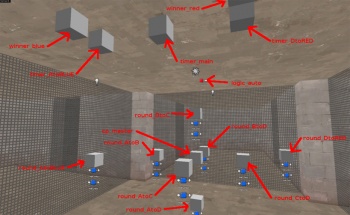
I like to keep all my main control entities grouped together in a central place in the map, to make it easy to switch between them when setting properties. In the example map, I've grouped them all at the center. | |||
[[Image:Tc example entities.jpg|thumb|right|350px|The entity layout in our map (click to read all the labels)]] | |||
Revision as of 10:54, 16 June 2008
Soleil's TF2 TC mapping tutorial
TC maps like Hydro are the most complex, which is probably why there are few of them in circulation. They're also one of the most replayable map types, because because of the way a long campaign is composed of relatively short rounds and how each game can play out differently.
The main reference in learning to do this was a decompiled version of tc_hydro, obtained from TF2maps.net.
Laying out the level
Mapping in general is outside the scope of this tutorial. It is assumed that you already know how to use Hammer and have one or two maps of other types under your belt. For beginners, it's recommended that you start with a CTF (Capture-The-Flag) type, as it's the easiest to set up.
For this tutorial, we'll use a really basic map with six rooms and six spawn rooms, using the same arrangement as Hydro. It will have the same rules as Hydro:
- Each team has one home base, but these are only seen when the opposing team is on the verge of winning.
- Between the bases are four other zones, each with one control point. We'll call these A, B, C and D.
- Each team starts off owning the control points at their home base, plus two in the central area. Blue initially owns A and B, and red initially owns C and D.
- The computer randomly selects two of the four central points that have different owning teams, and starts a round between those two points. During these rounds, each team must defend its single point while trying to capture the other team's single point.
- When one team controls all four central points, then a different type of round occurs. In this endgame round type, the losing team must defend its base from the winning team. These rounds can involve either control point A and the blue base (if red is winning) or D and the red base (if blue is winning). Although there are two control points in an endgame round, the point of the winning team is locked and cannot be captured.
- If the defending team in an endgame round successfully defends their point until time runs out, they gain possession of the neighboring point and play returns to the normal type of round.
- If the attacking team captures the base of the defending team, they win the game.
Each of the six large rooms will contain a single control point. The six smaller attached rooms will contain the associated spawn rooms. The left and right end rooms will be the bases, and the four interconnected rooms will host each of the six possible inner rounds.
Remember, just because there are four control points in the central zone doesn't mean there has to be six possible rounds played there (or ten for five points, fifteen for six, etc...). As you'll see later, you define which pairs of points can be involved in a round.
The control points
Next we'll place the base plates for each of the control points and give each one a unique name. Make them as a prop_dynamic entity with model cap_point_base.mdl, skin 0. In this example, the baseplates are named cp_baseplate_X where X is one of BLUE, A, B, C, D or RED.
Then, on each baseplate, place a team_control_point entity. Give each a unique name (cp_BLUE, cp_A, cp_B, cp_C, cp_D and cp_RED in this case), and give each one a unique index number. These indexes will be important for creating the map overview later. I set mine as: cp_BLUE = 0, cp_A = 1, cp_B = 2, cp_C = 3, cp_D = 4 and cp_RED = 5. You'll probably also want to set the "Print Name" property to something informative too - this gets displayed when a capture occurs, as in "<PlayerName> captured <PrintName> for team 1!".
For each of the four inner team_control_point entities, add two output events. On event OnCapTeam1, set the skin of the associated baseplate to 1, and when OnCapTeam2 occurs, set the skin to 2. This just changes the color of the light at the center of the baseplate to reflect the owning team.
Set the default owner to blue for cp_BLUE, cp_A and cp_B, and red for cp_C, cp_D and cp_RED. You should also enable "Warn on capture" for all of them so that people will notice when a cap starts.
Now select the texture tools/toolstrigger. For each baseplate, draw a brush around it with this texture and then bind the brush to func_capturezone. Give each a unique name - for example, cap_trigger_BLUE, cap_trigger_A and so on. These are the zones that players must enter to capture a point. DO NOT select them all and then bind to func_capturezone, because that will group them to a single entity; we want a separate entity for each capture point. Set the associated control point of each to the name of the team_control_point entity inside it.
Spawn rooms
Since the map presented here is only an example, I've really skimped on the spawn rooms. Each is just a func_respawnroom brush textured with dev/nodraw, with an info_player_teamspawn inside. Normally you should have 12-16 spawn points inside, all with the same properties.
You don't need to name any of these unless for other purposes. All you have to do is open the properties for each of the info_player_teamspawn entities and set its associated control point to the name of the team_control_point that you want to belong with this spawn room. The game will automatically assign that spawn room to the team that owns that point at the start of a round that involves that point.
When testing your map, you may see some warnings on the console to the effect that some of your spawn rooms cannot find spawn points inside themselves. I haven't figured out what causes this, but it doesn't seem to have any effects, and Hydro suffers from this condition too.
Entities
I like to keep all my main control entities grouped together in a central place in the map, to make it easy to switch between them when setting properties. In the example map, I've grouped them all at the center.


