Ko/Level Design Introduction (Portal 2)/Your First Level: Difference between revisions
m (→2D viewport) |
m (→Texturing) |
||
| Line 60: | Line 60: | ||
* 마우스 휠을 이용해 확대하거나 축소할 수 있습니다. | * 마우스 휠을 이용해 확대하거나 축소할 수 있습니다. | ||
== | == Texture 수정하기 ==<!--상술했듯이 에디터 내의 명칭을 사용해 주십시오. 다소 불편하더라도 수정 시 'Texture'와 같은 단어를 번역하지 마십시오. | ||
3D | 3D camera viewport에서 Texture를 보려면 3D camera viewport에서 '''camera''' 텍스트를 마우스 오른쪽 버튼으로 클릭하고 '''3D Textured'''를 선택하십시오. | ||
[[File:l4d_hammer_3DTextured.jpg|thumb|right|400px|caption|Selecting the 3D Textured mode in the Camera viewport.]] | [[File:l4d_hammer_3DTextured.jpg|thumb|right|400px|caption|Selecting the 3D Textured mode in the Camera viewport.]] | ||
=== | === 3D camera viewport 조작 === | ||
3D viewport 조작과 2D viewport 조작은 비슷하지만 조금 다릅니다: | |||
* | * {{key|Space}}키를 누르고 화면을 좌클릭 드래그하면 시점을 회전합니다. | ||
* | * {{key|Space}}키를 누르고 화면을 우클릭 드래그하면 자유 이동합니다. 2차원 방향으로만 이동하며 기준은 적용시점입니다. | ||
* | * {{key|Space}}키를 누르고 양쪽 마우스 키<ref>좌클릭 우클릭</ref>를 누르고 드래그하면 자유 이동합니다. 기준은 우클릭 드래그의 수직 방향입니다. | ||
* | * {{key|W}}, {{key|A}}, {{key|S}}, {{key|D}}를 이용해서도 이동할 수 있습니다. | ||
* | * {{key|Z}} 마우스를 3D viewport 중앙에 고정합니다. 마우스를 이용해 시점을 회전하고 {{key|W}}, {{key|A}}, {{key|S}}, {{key|D}}로 이동할 수 있습니다. | ||
{{note| | {{note|{{key|W}} {{key|A}} {{key|S}} {{key|D}}는{{key|Space}}와 함께 사용될 수 있습니다.}} | ||
{{clr}} | {{clr}} | ||
'''3D camera''' viewport에서 위로 이동하여 아래로 만든 바닥을 봅니다. | |||
[[File:P2_hammer_texture_browse.jpg|thumb|right|200px|caption| | [[File:P2_hammer_texture_browse.jpg|thumb|right|200px|caption|'''Texture''' 바에서 '''Browse'''를 찾으십시오.]] | ||
바닥에 기본 Texture가 적용되어있음을 알 수 있습니다. 아마도 그것을 바꾸고 싶을 것입니다. 현재 Texture를 변경하려면 '''Texture''' 상자의 '''Browse'''를 클릭하세요. | |||
Browse를 클릭하면 '''Texture Browser''' 창을 엽니다.{{clr}} | |||
[[File:l4d_hammer_texture_dev.jpg|thumb|right|200px|caption| | [[File:l4d_hammer_texture_dev.jpg|thumb|right|200px|caption|회색 developer texture입니다.]] | ||
In the '''Filter''' field at the bottom of the browse, you can filter the textures shown based on name. For this tutorial, type in the word <code>"dev_measure"</code> (with the underscore) into the field. This will bring up a listing of "developer" textures that will make it easier to create something quickly. | In the '''Filter''' field at the bottom of the browse, you can filter the textures shown based on name. For this tutorial, type in the word <code>"dev_measure"</code> (with the underscore) into the field. This will bring up a listing of "developer" textures that will make it easier to create something quickly. | ||
Revision as of 05:37, 16 March 2024
brush는 Hammer editer에서 Block을 사용해 만든 물체를 이릅니다. brush는 대부분의 레벨에서 천장과 바닥과 같은 주요한 표면을 만드는 데 사용됩니다. 이 문서에서는 brush를 이용해 작은 방을 만드는 방법을 설명합니다.
바닥 브러시 만들기
- 왼쪽의 Tool 바에서 Block Tool을 선택하십시오.
 .
. - Top 스크린에서 좌클릭하고 512*512만큼 끌어당기십시오. Right와 Downward 스크린에서도 각각의 시점으로 보여집니다.
- ↵ Enter키를 눌러 상자를 만드십시오.
이제 Tool 바의 ![]() Selection tool 아이콘을 누르거나 Esc 키를 눌러 Selection mode로 전환하십시오.
Selection tool 아이콘을 누르거나 Esc 키를 눌러 Selection mode로 전환하십시오.
selection mode에서는 선택된 브러시의 크기나 모양을 변형시킬 수 있습니다. 박스를 좌클릭하고 윤곽선의 점들을 끌어당겨 크기를 변형할 수 있습니다.
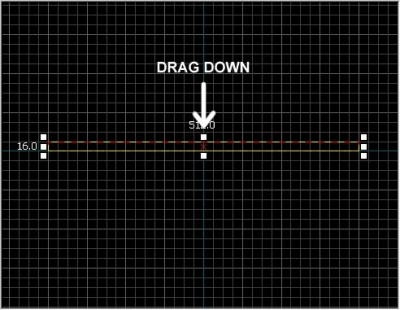
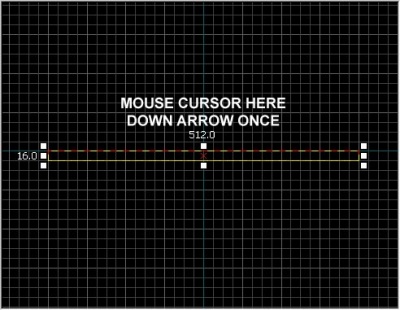
브러시가 너무 두꺼우니 두께를 64에서 16으로 바꾸십시오. 그러나 그 전에, 우리는 그리드의 크기를 수정해야 두께를 수정할 수 있습니다.
grid
2D views 스크린에서 보여집니다. 기본적으로는 모든 물체는 grid에 맞춰 고정됩니다. grid는 끌 수 있지만 grid를 킴으로써 기타 에러를 방지할 수 있어 그리드를 켜 놓는 것을 추천합니다.
기본적으로 그리드는 한 칸에 64 units입니다. 그리드의 크기는 Hammer editer 창의 오른쪽 아래에 표시됩니다.
- Smaller Grid 아이콘을 클릭하거나,
 [를 눌러 grid의 크기를 크게 만들 수 있습니다.
 - Larger Grid 아이콘을 클릭하거나,
 ]를 눌러 grid의 크기를 작게 만들 수 있습니다.
바닥 두께 수정
상자를 좌클릭해 선택한 다음 끌어당겨 16 units로 만드십시오.
그리드 크기를 전환시켜야 규격에 맞게 두께를 수정할 수 있습니다.
브러시 이동시키기
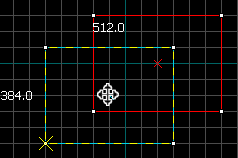
Selection Tool을 이용해 ![]() 브러시를 옮길 수 있습니다. 브러시의 윤곽선이나 브러시의 중앙에 있는 x를 클릭하여 포인터가
브러시를 옮길 수 있습니다. 브러시의 윤곽선이나 브러시의 중앙에 있는 x를 클릭하여 포인터가 ![]() 모양으로 바뀌면 브러시를 드래그해 이동시킬 수 있습니다.
모양으로 바뀌면 브러시를 드래그해 이동시킬 수 있습니다.
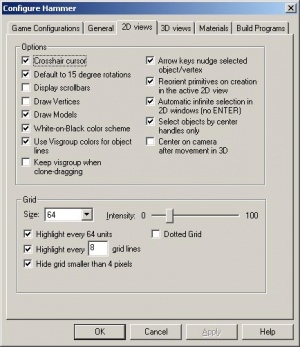
방향키(화살표 키)로도 브러시를 이동시킬 수 있습니다. 그러나 그러기 위해서는 Hammer editor 환경을 수정할 필요가 있습니다:
- 화면 상단의 Tools 메뉴에서 Options을 선택하고 Configure Hammer를 클릭하십시오.
- 2D Views 탭으로 이동하십시오.
- 많은 설정들이 있지만 지금은 Arrow keys nudge selected object/vertex를 OK로 전환하십시오.
이제 브러시를 아래 방향키Down_arrow를 눌러 이동시켜 보십시오.
2D viewport 조작
- 스크롤 바를 통해서도 시점을 이동할 수 있습니다.
- 더 빠른 방법으로, Space를 누르고 화면을 드래그하면 시점 이동이 가능합니다. 3D view에서는 방향이 전환됩니다.
- 마우스 휠을 이용해 확대하거나 축소할 수 있습니다.
