Basic Construction: Difference between revisions
m (→The Grid: Merged some info from a later article.) |
(fixed typo) |
||
| Line 37: | Line 37: | ||
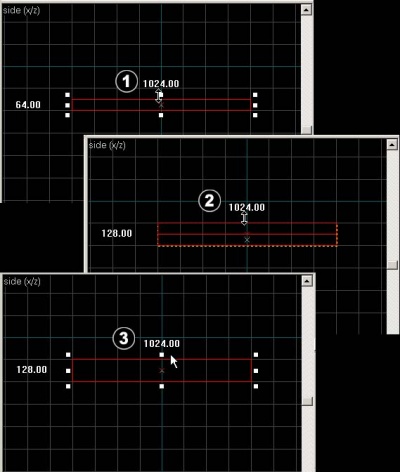
[[Image:hammer_brushheightediting.jpg|thumb|400px| Changing the height of the brush.]] | [[Image:hammer_brushheightediting.jpg|thumb|400px| Changing the height of the brush.]] | ||
To change the size of one of your brushes, select a brush and put your mouse pointer over one of its eight white handles. The cursor should change to arrows, indicating | To change the size of one of your brushes, select a brush and put your mouse pointer over one of its eight white handles. The cursor should change to arrows, indicating along which axis you can move that handle. To resize, simply click and drag one of these handles.<br style="clear:both"> | ||
* Now onto [[Creating a Room]]! | * Now onto [[Creating a Room]]! | ||
Revision as of 07:03, 10 March 2006
Brushes
You are now ready to create the most basic geometry: The brush object. Brushes are the basic building block for all maps built in the Source engine. Floors, walls and ceilings, and all geometry that aren't models, consist of brushes.
Creating brushes
To build your first brush, select the white box from the list of icons. This is the Block Tool.
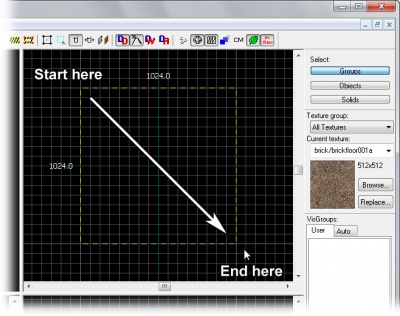
Specify the size of your brush by clicking and dragging your mouse in the Top 2D View (the upper-right window pane by default) to create a box, as shown to the right.
Now that you've set the shape and size of the brush, you can create it by pressing the ENTER key. You can also do this by clicking your right mouse-button inside the brush and choosing Create Object.
The brush you just created has been textured with a default texture in the 3D window, but as this probably is the first time that you're using Hammer, you'll need to change your view to see these textures. Click on the 3D window to select it, then go to the View menu and choose 3D Textured Polygons (or 3D Shaded Textured Polygons for even fancier results).
Selecting brushes
Select the red arrow on top of the list of icons. This is the Selection Tool. It is used to select different objects in the map. With the Selection Tool selected, select your brush by clicking on it in one of the windows. (In the 2D windows you will need to click on the edges or center of the brush. It is easier to select a brush on the 3D window.)
You will notice that the selected brush will be marked red, and get eight little white square handles in the 2D views. These handles allow you to rotate and transform the selection (see Resizing brushes, below).
The Grid
The "grid" is displayed in all the 2D views, and you might have noted that the size of your brush "snapped" to the lines of the grid when you created it. This is a good thing, as it helps prevent leaks and other errors -- so keep the grid turned on and rarely turn it off.
This doesn't mean that you cannot create detailed objects. Currently, as you can see at the bottom right, your grid size is 64, which is the default size that you start out with. This means that the grid lines are 64 units apart. You can make the grid smaller or larger by clicking on the size icons in the grid panel up to the left, or by pressing the [ and ] keys.
- Clicking the grid icon with the minus sign will make the grid half as big, for finer adjustments.
- Clicking the grid icon with the plus sign will make the grid twice as big, for larger adjustments.
Resizing brushes
To change the size of one of your brushes, select a brush and put your mouse pointer over one of its eight white handles. The cursor should change to arrows, indicating along which axis you can move that handle. To resize, simply click and drag one of these handles.
- Now onto Creating a Room!


