Adding Light: Difference between revisions
m (Some reformating. More to come.) |
(Reformated the entire article.) |
||
| Line 1: | Line 1: | ||
[[Category:Level Design Tutorials]] | [[Category:Level Design Tutorials]] | ||
{{first room menu}} | {{first room menu}} | ||
Now we'll add some lighting to the room. If no lights are placed, the map will be evenly lit when it is loaded in the game | Now we'll add some lighting to the room. If no lights are placed, the map will automatically be evenly lit when it is loaded in the game, but setting the lighting will look more realistic. | ||
<br clear="both"> | |||
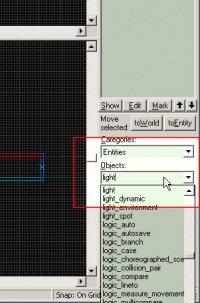
[[Image:hammer_picklight.jpg]] | [[Image:hammer_picklight.jpg|thumb|left|200px|Pick the [[light]] entity from the entity list.]] | ||
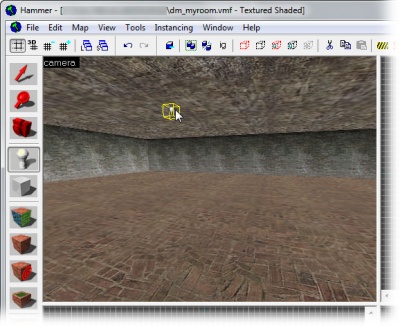
[[Image:hammer_placelight.jpg|thumb|right|400px|Place the [[light]].]] | |||
Lights are entities too. | |||
[[ | Pick the [[light]] entity from the entity drop-down list in the '''Object Toolbar'''. | ||
This is the most basic lighting entity. | |||
Place the ''light'' entity in the center area of the ceiling by clicking there in the 3D view. | |||
<br clear="both"> | |||
[[Image:hammer_openprop_sm.jpg]] | [[Image:hammer_openprop_sm.jpg|thumb|right|400px|Double-click an object in the 3D View to open the ''Object Properties'' dialog.]] | ||
We are now going to edit the characteristics of this light. | |||
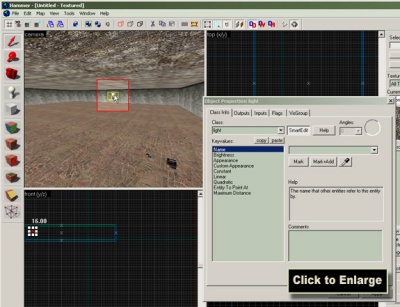
Switch back to the '''Selection Tool''', and then double-click on the ''light'' entity in the 3D View to open the '''Object Properties''' dialog containing its properties. | |||
<br clear="both"> | |||
[[Image:hammer_pickbrightness.gif]] | [[Image:hammer_pickbrightness.gif|thumb|right|400px|Select the ''Brightness'' field, then click the ''Pick color'' button.]] | ||
# To bring up the setting for the ''Brightness'' property of the light, click on the ''Brightness'' field in this dialog. | |||
# To open up the dialog for picking a color, click the ''Pick color'' button just beneath the settings values. | |||
<br clear="both"> | |||
[[Image:hammer_setcolor.gif|thumb|right|400px|Change the hue and luminance of the light, then click ''OK''.]] | |||
The ''Color'' dialog will now appear, letting us change the color of the light: | The ''Color'' dialog will now appear, letting us change the color of the light: | ||
# | # Change the hue color by clicking on the desired color in the large color spectrum area to the right. | ||
# | # Because the luminance is set to max, the color will still be white, so we'll need to lower the luminance to change the color from bright white to the hue value you picked. You can see how the color changes in the preview square at the bottom of the dialog to something more colorful, instead of white. | ||
# Then Click the ''OK'' button to confirm your color choice. | # Then Click the ''OK'' button to confirm your color choice. | ||
[[Image: | <br clear="both"> | ||
[[Image:hammer_setcolor800.jpg|thumb|right|400px|Raise the brightness of the light by increasing this number, then click ''Apply''.]] | |||
We have now set the color of the light, described by the first three numbers in the ''Brightness'' setting, so what's left is to increase its intensity - how bright it will shine. This is altered manually, through changing the fourth value in the setting. | |||
Mark this number (saying <code>200</code>) with the mouse, and enter <code>800</code> instead, to double its intensity. | |||
Now that we've made changes to the parameters, we need to apply them to the light entity. Hit the ''Apply'' button to commit the changes. | Now that we've made changes to the parameters, we need to apply them to the light entity. Hit the ''Apply'' button to commit the changes. The color of the bulb will change to the color you have selected for it. | ||
<br clear="both"> | |||
We are done with these properties now, so close the property dialog by clicking the closing button in the upper right corner. | |||
Next we will add some prop models into the map: | |||
[[Adding Prop Models]] | |||
==See also== | ==See also== | ||
Types of light entities: | |||
* [[light]] - A basic light source. | |||
* [[light_dynamic]] - A light source that can be changed and moved. | |||
* [[light_spot]] - A directed light. | |||
* [[light_environment]] - The controller for light cast from a skybox. | |||
Revision as of 03:50, 16 February 2006
Now we'll add some lighting to the room. If no lights are placed, the map will automatically be evenly lit when it is loaded in the game, but setting the lighting will look more realistic.
Lights are entities too.
Pick the light entity from the entity drop-down list in the Object Toolbar.
This is the most basic lighting entity.
Place the light entity in the center area of the ceiling by clicking there in the 3D view.
We are now going to edit the characteristics of this light.
Switch back to the Selection Tool, and then double-click on the light entity in the 3D View to open the Object Properties dialog containing its properties.
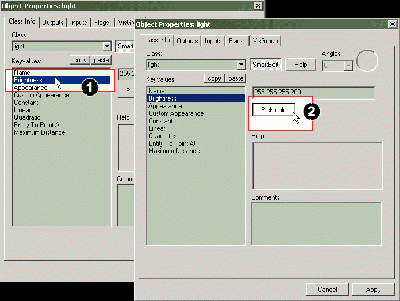
- To bring up the setting for the Brightness property of the light, click on the Brightness field in this dialog.
- To open up the dialog for picking a color, click the Pick color button just beneath the settings values.
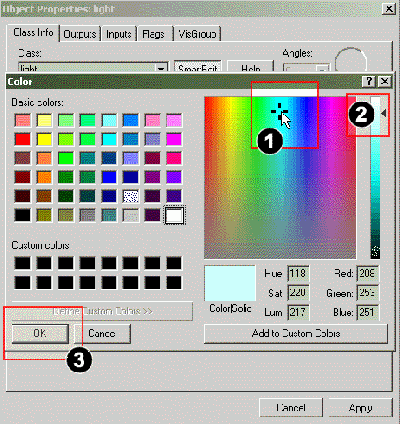
The Color dialog will now appear, letting us change the color of the light:
- Change the hue color by clicking on the desired color in the large color spectrum area to the right.
- Because the luminance is set to max, the color will still be white, so we'll need to lower the luminance to change the color from bright white to the hue value you picked. You can see how the color changes in the preview square at the bottom of the dialog to something more colorful, instead of white.
- Then Click the OK button to confirm your color choice.
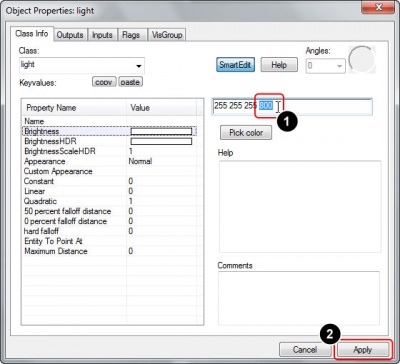
We have now set the color of the light, described by the first three numbers in the Brightness setting, so what's left is to increase its intensity - how bright it will shine. This is altered manually, through changing the fourth value in the setting.
Mark this number (saying 200) with the mouse, and enter 800 instead, to double its intensity.
Now that we've made changes to the parameters, we need to apply them to the light entity. Hit the Apply button to commit the changes. The color of the bulb will change to the color you have selected for it.
We are done with these properties now, so close the property dialog by clicking the closing button in the upper right corner.
Next we will add some prop models into the map: Adding Prop Models
See also
Types of light entities:
- light - A basic light source.
- light_dynamic - A light source that can be changed and moved.
- light_spot - A directed light.
- light_environment - The controller for light cast from a skybox.
