Ko/Level Overviews: Difference between revisions
| Line 21: | Line 21: | ||
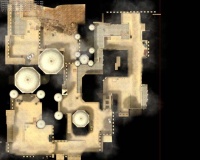
[[Image:dust2_overview.jpg|200px|thumb|예제 맵 개요 (de_dust2)]] | [[Image:dust2_overview.jpg|200px|thumb|예제 맵 개요 (de_dust2)]] | ||
<li> | <li>당신은 ''cl_leveloverview'' 모드가 켜져있을때 움직이실수 있습니다. 당신이 관전에 모드에 있고 움직이고 싶다면, 당신은 방향키를 사용하여 움직일수 있습니다, 이제 맵을 정의된 빨간 선 안으로 알맞게 배치해보세요. 당신의 맵 오른쪽 가장자리 부분은 다음 스크린샷 같이 Counter-strike:Source 에서 구동하는 <code>de_dust2</code> 처럼 되야 하니다.</li> | ||
<li> | <li>현재 투영 정보 (크기, 규모) 가 콘솔창에 실시간으로 출력됩니다, (예 "Overview: <code>scale 6.00, pos_x -2651, pos_y 4027</code>".</li> | ||
<li> | <li>당신이 완벽하게 해냇다면, 스크린샷을 찍으세요 (당신이 "스크린샷"키를 설정해놨던 것으로 찍어보세요) 그리고 투영 정보 값을 '''받아 적어두세요'''.</li> | ||
</ol> | </ol> | ||
Revision as of 08:05, 21 July 2014
몇몇 mod는 (Counter-Strike:Source, Day of Defeat:Source) 미니맵을 가지고 있습니다, 이것은 맵의 전반적인 개요와 플레이어에 대한 목표를 알려줍니다. 맵 개요 는 게임 안에서 스크린샷을 찍어서 만든것입니다. 이것은 반드시 맵의 작업이 끝난후에 만들어져야 합니다.
* Counter-Strike: Global Offensive 를 위한 미니맵 만들기
가공되지 않은 맵 개요 만들기
- 게임을 시작하세요. Options 을 클릭하시고 Video 탭으로 들어가주세요. Resolution 항목을 "1280x1024" 픽셀로 바꾸어 주세요 그리고 Aspect Ratio 항목을 "Normal" 로 맞추어주세요.
- 콘솔 명령어로 당신의 새 맵을 map
<mapname>이런 형식으로 입력하여 불러와주세요. 그리고"sv_cheats 1"을 콘솔창에 입력해주세요. - J관전자 팀으로 참여해주세요.
- 스크린샷키를 설정해주세요, 콘솔을 통하여
"bind p screenshot"등으로 말입니다. 이것은 중요합니다, 기존 스크린샷 키 (F5)는 JPEG 보다는 가공안된 TGA로 압축하기 때문입니다.
- 콘솔 창에
"cl_drawhud 0"와"hidepanel all"을 이용하여 모든 HUD 요소들을 지워주세요. - 스카이박스 같은 방해되는 맵 효과들을 삭제해주세요. (
"r_skybox 0"나"fog_override 1"그리고"fog_enable 0"), 또한 선택적으로 프롭들도 삭제하실수 있습니다 ("r_drawstaticprops 0"). - 관전자 모드로 돌아가서 당신이 당신의 맵 전체를 감상할수 있는 곳으로 이동해주세요.
- 콘솔 명령어
"cl_leveloverview x"를 이용하여 정사영의 모드로 바꾸어 주세요, x 는 규모의 값입니다. - 우측에 빨간 도움선을 보기 위해
"cl_leveloverviewmarker 1024"명령어를 사용해주세요. 당신은cl_drawhud 1명령어를 잠시동안 사용하셔도 됩니다. |
Template:Note:ko
- 당신은 cl_leveloverview 모드가 켜져있을때 움직이실수 있습니다. 당신이 관전에 모드에 있고 움직이고 싶다면, 당신은 방향키를 사용하여 움직일수 있습니다, 이제 맵을 정의된 빨간 선 안으로 알맞게 배치해보세요. 당신의 맵 오른쪽 가장자리 부분은 다음 스크린샷 같이 Counter-strike:Source 에서 구동하는
de_dust2처럼 되야 하니다. - 현재 투영 정보 (크기, 규모) 가 콘솔창에 실시간으로 출력됩니다, (예 "Overview:
scale 6.00, pos_x -2651, pos_y 4027". - 당신이 완벽하게 해냇다면, 스크린샷을 찍으세요 (당신이 "스크린샷"키를 설정해놨던 것으로 찍어보세요) 그리고 투영 정보 값을 받아 적어두세요.
빨간 줄이 나오지 않나요?
만약에 당신이 9번째 단계에서 빨간 줄이 보이지 않는다면, 당신이 cl_drawhud 1 을 설정했는지 확인하세요 (그리고 스크린샷을 찍기 전에는 꺼두세요).
이것을 한뒤, 만약 당신이 아직도 보이지 않는다면, 당신은 1280x1024 해상도 대신 1024x768 해상도로 다시 시도해 보시는 것이 좋습니다. "cl_leveloverviewmarker 768" 이것으로 설정하고 시작해보세요.
Create the overview material
- Close the game and open the screenshot in an image editor. You will find it in
<game dir>\screenshots. Using your editor, crop away the unused part of the image to the right of the red line so that the image becomes a square. If you don't see the red line, then just make sure that the image is square. - Modify the image as you see fit, perhaps adding an alpha channel to remove unused areas.
- Resize it so that its dimensions are a power of two. 1024x1024 is a good choice, assuming that your image starts off larger than that!
- Save your image in a lossless format (e.g. PNG or TGA) and create a material with it. You can use this template for the VMT:
UnlitGeneric
{
	$translucent 1
	$basetexture overviews/mapname
	$vertexalpha 1
	$no_fullbright 1
	$ignorez 1
}
Creating the VTF
Don't forget to Clamp S and Clamp T when you are creating your VTF otherwise the border pixels will stretch and look horrible. Additionally it would appear that VTFLib.dll isn't clamping correctly so you will have to use Vtex.
When making a vtf with vtex you can use this for the configs:
"clamps" "1"
"clampt" "1"
"nocompress" "1"
"nomip" "1"
You can also use this code in a bat file to run vmex:
cd steamdirectory\steamapps\username\sourcesdk_content\gamefolder\materialsrc\overviews
"%sourcesdk%\bin\orangebox\bin\vtex" mapname.tga mapname_radar.tga
pause
Be sure to create a new folder called overviews in materialsrc and place the overview tga files in there. Don't forget to also change the italics in the bat code.
개요 스크립트 작성
마침내, <game dir>\resource\overviews\ 경로에 <맵 이름>.txt 의 텍스트 파일을 만들 차례입니다. 이 파일은 개요를 정렬하는데 있어서 꼭 필요한 숫자들을 정확히 정의해 두는 용도입니다:
<mapname>
{
	material	overviews/mapname	// 텍스쳐 파일
	pos_x		-2651			// X 좌표
	pos_y		4027			// Y 좌표
	scale		6.0 			// 스크린샷을 찍을 때 사용한 규모
	rotate		0			// image editor에 의해 맵이 90도 회전됩니다.
	zoom		1.3			// 맵이 최대 크기로 보여질때 작동하는 최적의 확대기(줌)
}
