User talk:Mr.p.kiwi: Difference between revisions
No edit summary |
(more words, nothing special) |
||
| Line 65: | Line 65: | ||
== In-Depth == | == In-Depth == | ||
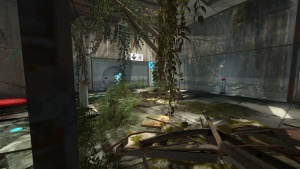
[[File:2011-05-10 00003.jpg|thumb|right|300px]] | [[File:2011-05-10 00003.jpg|thumb|right|300px|One of the earliest tests in Portal 2 used this theme to make a small test unforgettable.]] | ||
In the single-player campaign this was the first theme the player had encountered, and consequently had been designed to be visually striking and to leave as big an impact as possible on the player. This theme is supposed to everything feels very organic. On that note, however, do not confuse this with being dynamic; the player must get the feeling that everything is dying if not already dead, that this is the end, and that they are in solitude. | In the single-player campaign this was the first theme the player had encountered, and consequently had been designed to be visually striking and to leave as big an impact as possible on the player. This theme is supposed to everything feels very organic. On that note, however, do not confuse this with being dynamic; the player must get the feeling that everything is dying if not already dead, that this is the end, and that they are in solitude. | ||
The official campaign uses the theme only for two things: | The official campaign uses the theme only for two things: | ||
| Line 73: | Line 73: | ||
== Noticeable Elements == | == Noticeable Elements == | ||
The destroyed theme is characterized by the very organic feel of it, the vegetation is the most iconic element of the theme, while the [[skybox]] | The destroyed theme is characterized by the very organic feel of it, the vegetation is the most iconic element of the theme, while the [[skybox]] is the main source of light in the map. | ||
=== Skybox === | === Skybox === | ||
[[File:Sky change.png|thumb|right]] | |||
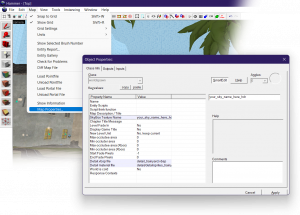
Skybox lighting is actually very easy to create | If you'd like to let the player see the puzzle, adding a light source is very important. Since the theme is supposed to give the impression the player is very close to the surface, certainly the sun shines on the test track. Skybox lighting is actually very easy to create. Go into the Map menu and select map properties. Next, find the key value that says what the skybox texture should be, and change this to sky_white - no folder, no file extension, just that. Next, create a brush where you want the skybox to be; naturally, make sure it seals the map from leaks, as always. Texture this brush with tools/toolsskybox. Create a light_environment entity and place it anywhere inside the map. Now, you could just stop there, but it's bad practice to ever use a perfectly white light, so I like to use the setting Valve uses in their maps. Use these exact key values: | ||
::{| class=standard-table | |||
! Property Name || Value | |||
|- | |||
| Pitch || -80 | |||
|- | |||
| Brightness || 255 247 217 250 | |||
|- | |||
| Ambient || 255 247 217 400 | |||
|- | |||
| Sun spread angle || 5 | |||
|- | |||
| Angles || 0 280 0 | |||
|} | |||
=== Foliage === | |||
To have swaying vegetation in your map you must have an active env_wind entity and your plant models must be prop_static with the Ignore surface normal for computing vertex lighting set to 'yes' or '1'.' So, uh, yeah. I DID just copy that directly from the VDC. However, there is a little more to it than that; it sounds like common sense, but people tend to forget these things. First off, gameplay and aesthetics ARE NOT entirely segregated; when placing foliage (or any prop, for that matter, but especially foliage and sometimes rubble), you must consider the level's puzzle. You don't want to accidentally obscure a portalable wall with vines, thereby making the whole puzzle twice as hard. Secondly, and it infuriates me when people don't do this, place foliage in logical and realistic places. If there's a gaping hole in the ceiling, have the vines hang down from the edge of the hole, not the corner of the room (it is perfectly acceptable to have foliage in corners, nooks and crannies, but it just makes more sense to have it by holes). Also, if you do have vines by a hole, don't make the newbie mistake of having the vines start at ceiling level; have them start at skybox level, so that they're not hanging from mid-air, or at least make sure the player can't see that they are, if you do. | |||
Revision as of 04:36, 11 November 2011
Tables
Trying to create good looking tables! ...You know, for the articles; but they need to reach perfection somewhere. If YOU feel like it, you can create a table here too, so that everyone can learn, including yourself. You can experiment on this page all day long - just leave your name as the title of the table, so that it'll be more organized.
To do such a thing, you would need to do something like this:
{| class="standard-table"
|+ your name goes here
!Header
|-
|Table
|}
For example:
| This will be a header | This will be a header2 | This will be a header3 |
|---|---|---|
| Column1; Row1 | Column2; Row1 | |
| Column 1; Row 2&3 | Column3; Row2 | |
| Column2; Row3 | Column3; Row3 |
External Links
Portal 2 Themes
A set of in-depth articles about the aesthetics of Portal 2. These few pages are based on Rubrica's tutorial posted on Thinking With Portals[1].
- Destroyed
- Restore
- Behind the Scenes
- Old-Aperture
- Clean
These tutorials will not cover the cooperative's campaign use of the themes; however the methods of using each theme will be described and can be used when detailing a cooperative testing track.
Gallery
Destroyed
This Portal 2 aesthetic theme is displayed during the beginning of the single player campaign, in the Aperture Laboratories chambers closest to the earth's surface. It is characterized by rusted, decayed, and moldy areas filled with debris, broken glass, swaying vegetation and cables. The lighting is harsher than other areas in the game, and has distant skylights through plants and wires which cast big shadows. Soundscapes include noises by crickets, cicadas and birds.
Level transitions are usually placed in elevators surrounded by plants, with debris floating through the tubes. Some test doors are broken or malfunctioning.
In-Depth
In the single-player campaign this was the first theme the player had encountered, and consequently had been designed to be visually striking and to leave as big an impact as possible on the player. This theme is supposed to everything feels very organic. On that note, however, do not confuse this with being dynamic; the player must get the feeling that everything is dying if not already dead, that this is the end, and that they are in solitude. The official campaign uses the theme only for two things:
- Tutorials - very simple cube and button based testing and momentum puzzles
- Plot advancement
However don't limit yourself to such simple tests. As stated above this theme is designed to leave an impact on the player so if you have a simple yet innovative and unique puzzles, or those with brilliant moments of epiphany (colloquially known as 'aha' moments) use this theme. If you have a new testing element to show off, this sort of striking theme might just ingrain it in the player's mind forever.
Noticeable Elements
The destroyed theme is characterized by the very organic feel of it, the vegetation is the most iconic element of the theme, while the skybox is the main source of light in the map.
Skybox
If you'd like to let the player see the puzzle, adding a light source is very important. Since the theme is supposed to give the impression the player is very close to the surface, certainly the sun shines on the test track. Skybox lighting is actually very easy to create. Go into the Map menu and select map properties. Next, find the key value that says what the skybox texture should be, and change this to sky_white - no folder, no file extension, just that. Next, create a brush where you want the skybox to be; naturally, make sure it seals the map from leaks, as always. Texture this brush with tools/toolsskybox. Create a light_environment entity and place it anywhere inside the map. Now, you could just stop there, but it's bad practice to ever use a perfectly white light, so I like to use the setting Valve uses in their maps. Use these exact key values:
Property Name Value Pitch -80 Brightness 255 247 217 250 Ambient 255 247 217 400 Sun spread angle 5 Angles 0 280 0
Foliage
To have swaying vegetation in your map you must have an active env_wind entity and your plant models must be prop_static with the Ignore surface normal for computing vertex lighting set to 'yes' or '1'.' So, uh, yeah. I DID just copy that directly from the VDC. However, there is a little more to it than that; it sounds like common sense, but people tend to forget these things. First off, gameplay and aesthetics ARE NOT entirely segregated; when placing foliage (or any prop, for that matter, but especially foliage and sometimes rubble), you must consider the level's puzzle. You don't want to accidentally obscure a portalable wall with vines, thereby making the whole puzzle twice as hard. Secondly, and it infuriates me when people don't do this, place foliage in logical and realistic places. If there's a gaping hole in the ceiling, have the vines hang down from the edge of the hole, not the corner of the room (it is perfectly acceptable to have foliage in corners, nooks and crannies, but it just makes more sense to have it by holes). Also, if you do have vines by a hole, don't make the newbie mistake of having the vines start at ceiling level; have them start at skybox level, so that they're not hanging from mid-air, or at least make sure the player can't see that they are, if you do.


