Saving and Compiling: Difference between revisions
m (added {{key|}} template and {{otherlang}} is replaced on {{otherlang2}}) |
TomEdwards (talk | contribs) (cleaned) |
||
| Line 7: | Line 7: | ||
{{first room menu}} | {{first room menu}} | ||
The final stage of making a level is saving and compiling it. | The final stage of making a level is '''saving and compiling''' it. | ||
A map must be compiled into the format read by the engine before it can be played. This process involves calculating visibility, so that the computer can quickly work out which parts of the map need to be drawn at any given time, and calculating static lighting such as that from our light entity. | |||
== Saving == | |||
# Click the | # Click the "File" menu and choose either "Save" or "Save As...":<p>[[File:Hammer saveas.jpg|border|200px| Choose ''Save As...'' to save the map.]]</p> {{tip|You can press {{key|Ctrl+S}} to save the map with its existing name without having to open the menu.}} | ||
# Since this is the first time you've saved the map, a "Save As..." dialog will open no matter which option you chose. Type a name for your map into the "File Name" field. {{warning|You should not include any spaces in the name.}} | |||
# | # Click the "Save" button to save the map to disk. | ||
# Click the | |||
The map is saved in the .VMF file format. | The map is saved in the uncompiled .VMF file format. | ||
== Compiling == | |||
You have saved your map to VMF, which is a text format. You will need to compile it before it can be played in a game. Compiling means converting a raw VMF file into the binary [[BSP]] format. The map's geometry is processed and the proper lighting and shadows are pre-calculated by a series of compile programs: BSP, VIS and RAD. | |||
[[ | |||
You | # Open the File menu, and choose "Run Map...". {{tip|You can also press {{key|F9}}.}} | ||
# The dialog that appears is used to set up a compile:<p>[[File:Hammer setmapparam.png|border|200px|Change the "Run Map" parameters to match these settings, then click "OK".]] | |||
## Make sure that "Normal" is set under "Run BSP", "Run VIS", and "Run RAD" settings. {{tip|If you want to compile with [[High Dynamic Range]], tick the checkbox. This will make your compile take twice as long, but with such a small map that hardly matters!}} | |||
## Under "Additional game parameters:", type <code>-toconsole -dev -console +sv_lan 1</code> | |||
## Now click the "OK" button to start the map compile process. | |||
When | The Compile Process Window will show the progress of the compile (though it may stop updating if it takes a very long time). When the compile is complete, the game you are mapping for will automatically launch and load your map in the engine. | ||
Congratulations, you've made your first map! | |||
{{bug|If you are using either of the [[Source SDK Base]] games, currently you will get a "filesystem in use" error when the game tries to load. Just launch from Steam instead. Open the [[developer console]] and type <code>map <your map, without file extension></code> to load the map manually.}} | |||
{{ | |||
== The result == | |||
[[File:Hammer engine.jpg|border|300px|The final room, compiled and running in the game.]] | |||
Here's a shot of the compiled map running in [[Half-Life 2: Deathmatch]]. It isn't much to look at yet, but it has the basic pieces you need to get started making your own maps. | |||
To continue learning abut mapping, visit [[:Category:Level Design]]. If you have problems, check [[:Category:Level Design FAQ]]. | |||
{{ | {{navbar|Adding Prop Models|Your First Map|:Category:Level Design}} | ||
[[Category:Level Design Tutorials]] | [[Category:Level Design Tutorials]] | ||
Revision as of 10:57, 30 August 2009
The final stage of making a level is saving and compiling it.
A map must be compiled into the format read by the engine before it can be played. This process involves calculating visibility, so that the computer can quickly work out which parts of the map need to be drawn at any given time, and calculating static lighting such as that from our light entity.
Saving
- Click the "File" menu and choose either "Save" or "Save As...":
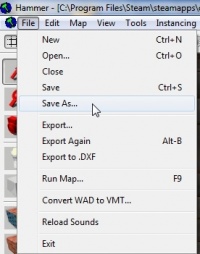
 Tip:You can press Ctrl+S to save the map with its existing name without having to open the menu.
 - Since this is the first time you've saved the map, a "Save As..." dialog will open no matter which option you chose. Type a name for your map into the "File Name" field.
 Warning:You should not include any spaces in the name.
 - Click the "Save" button to save the map to disk.

The map is saved in the uncompiled .VMF file format.
Compiling
You have saved your map to VMF, which is a text format. You will need to compile it before it can be played in a game. Compiling means converting a raw VMF file into the binary BSP format. The map's geometry is processed and the proper lighting and shadows are pre-calculated by a series of compile programs: BSP, VIS and RAD.
- Open the File menu, and choose "Run Map...". Tip:You can also press F9.
- The dialog that appears is used to set up a compile:
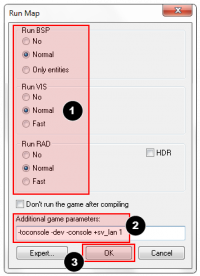
- Make sure that "Normal" is set under "Run BSP", "Run VIS", and "Run RAD" settings. Tip:If you want to compile with High Dynamic Range, tick the checkbox. This will make your compile take twice as long, but with such a small map that hardly matters!
- Under "Additional game parameters:", type
-toconsole -dev -console +sv_lan 1 - Now click the "OK" button to start the map compile process.
- Make sure that "Normal" is set under "Run BSP", "Run VIS", and "Run RAD" settings.

The Compile Process Window will show the progress of the compile (though it may stop updating if it takes a very long time). When the compile is complete, the game you are mapping for will automatically launch and load your map in the engine.
Congratulations, you've made your first map!
map <your map, without file extension> to load the map manually. [todo tested in ?]The result

Here's a shot of the compiled map running in Half-Life 2: Deathmatch. It isn't much to look at yet, but it has the basic pieces you need to get started making your own maps.
To continue learning abut mapping, visit Category:Level Design. If you have problems, check Category:Level Design FAQ.