Zh/Saving and Compiling: Difference between revisions
No edit summary |
No edit summary |
||
| Line 1: | Line 1: | ||
{{first room menu:zh-cn}} | {{first room menu:zh-cn}} | ||
制作关卡的最后一个步骤就是保存并编译。一张地图如果想在[[Source|起源引擎]]中运行则必须要编译。 | |||
{{clr}} | {{clr}} | ||
== | == 保存地图 == | ||
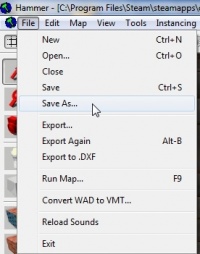
[[Image:hammer_saveas.jpg |thumb|right|200px| | [[Image:hammer_saveas.jpg |thumb|right|200px| 选择 ''另存为...''保存地图。]] | ||
<!--[[Image:hammer_setname.jpg |thumb|right|200px| | <!--[[Image:hammer_setname.jpg |thumb|right|200px| 键入地图的名字,然后点击保存按钮。]]--> | ||
首先,我们来保存地图: | |||
# | # 点击'''文件'''菜单。 | ||
# | # 因为这是你第一次保存地图,所以我们要给它命名,因此请选'''另存为...'''。 | ||
# | # '''另存为...'''对话框将会打开。在'''文件名'''文本框中键入地图的名字: | ||
#:{{warning| | #:{{warning:zh-cn|文件名中不能包含空格。}} | ||
#* [[Half-Life 2: Deathmatch]] | #* [[Half-Life 2: Deathmatch|半条命2:死亡模式]]的地图应当在地图名称前有<code>dm_</code>前缀这样才容易和其他地图区分开。 | ||
# | # 点击'''保存'''按钮将地图保存到硬盘。 | ||
地图会以.VMF文件格式保存。 | |||
{{note| | {{note:zh-cn|你也可以使用快捷键<Ctrl+S>代替打开菜单来保存地图。}}{{clr}} | ||
== | == 编译地图 == | ||
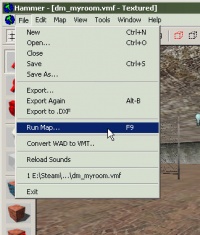
[[Image:hammer_pickrunmap.jpg |thumb|right|200px|Click the '''Run Map''' icon to compile your map.]] | [[Image:hammer_pickrunmap.jpg |thumb|right|200px|Click the '''Run Map''' icon to compile your map.]] | ||
Revision as of 03:13, 2 December 2008
制作关卡的最后一个步骤就是保存并编译。一张地图如果想在起源引擎中运行则必须要编译。
保存地图
首先,我们来保存地图:
- 点击文件菜单。
- 因为这是你第一次保存地图,所以我们要给它命名,因此请选另存为...。
- 另存为...对话框将会打开。在文件名文本框中键入地图的名字:
- 半条命2:死亡模式的地图应当在地图名称前有
dm_前缀这样才容易和其他地图区分开。
- 半条命2:死亡模式的地图应当在地图名称前有
- 点击保存按钮将地图保存到硬盘。
地图会以.VMF文件格式保存。
编译地图
You have saved your map, but you will also need to compile it before it can be played in the game engine.
When a map is compiled, it is converted from the raw .VMF file that you just saved, into the .BSP format used by the game engine. The geometry is processed and the proper lighting and shadows are pre-calculated with several compile programs.
Open the File menu, and choose Run Map....
The Run Map dialog will open.
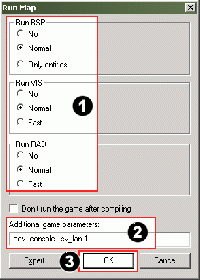
This dialog is used to set some basic compile parameters.
- Make sure that Normal is set under the Run BSP, Run VIS, and Run RAD settings.
- Under Additional game parameters:, type:
-dev -console +sv_lan 1- See Additional game parameters if you wish to learn more about these settings.
- Now click the OK button to start the map compile process.
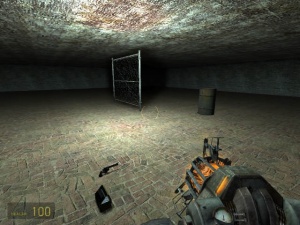
The Compile Process Window will show the progress of the compile. When the compilation is done, the game you are mapping for will automatically launch, and load your map in the engine.
Here's a shot of the compiled map in-game. It isn’t much to look at yet, but it has the basic pieces you need to get started making your own maps.
Congratulations, you’ve made your first map!
Where do I go from here?
Now that you know the basics, look at the Level Design Category page for a list of articles and tutorials on different level design topics.
If you're having problems, you may wish to consult the Level Design FAQ.
Template:Otherlang:zh-cn Template:Otherlang:zh-cn:en, Template:Otherlang:zh-cn:fr, Template:Otherlang:zh-cn:ru.


