Applying Textures: Difference between revisions
m (minoro) |
No edit summary |
||
| Line 1: | Line 1: | ||
__NOTOC__{{first room menu}} | __NOTOC__{{first room menu}} | ||
[[Image:hammer_texturebrowser1.jpg|thumb|left|200px|Click the '''Browse...''' button to open the Texture Browser.]] | [[Image:hammer_texturebrowser1.jpg|thumb|left|200px|Click the '''Browse...''' button to open the Texture Browser.]] | ||
In this section we will select textures for the walls, floor, and ceiling. | |||
To open the '''[[Hammer_Texture_Browser|Texture Browser]]''', click the '''<code>Browse...</code>''' button in the Texture group on the right side of the Hammer interface. | |||
<br style="clear:both"> | |||
== The Texture Browser == | ==[[Hammer_Texture_Browser|The Texture Browser]]== | ||
Use the '''[[Hammer_Texture_Browser|Texture Browser]]''' to view and select textures you wish to apply to brushes in your map. | |||
[[Image:hammer_texturebrowserSize.png|frame|caption|left|Texture preview size.]][[Image:hammer_texturebrowser2.jpg|thumb|right|200px|'''[[Hammer_Texture_Browser|Texture Browser]]''' Change the size of the texture preview to see more textures at once.]] To ease the browsing of textures, you may wish to adjust the textures' preview size. | |||
In the lower left corner of the '''Texture Browser''' window, select '''128x128''' from the '''Size:''' drop-down menu. | |||
This will reduce the size of the texture samples, so that we can see more at once. | |||
'''[[Hammer_Texture_Browser#Filter|Filtering Textures]]''' | |||
[[ | The [[Hammer_Texture_Browser|Texture Browser]] hosts thousands of textures, and navigating to the exact texture you wish to use could be problematic, if not for the [[Hammer_Texture_Browser#Filter|Filter]] feature. This feature allows you to specify part of a file name, such as "concrete wall", "plaster ceiling", or "metal door". The [[Hammer_Texture_Browser|Texture Browser]] then filters for only those textures that contain that text. | ||
'''Dev Textures''' | |||
When building a map, it is good practice to start with textures that help create appropriately-sized objects. Hammer includes a number of textures specifically to assist you in creating maps in proportion to the player called "dev textures". | |||
# Type <code>dev wall</code> into the filter. | |||
# Double-click the texture '''dev/dev_measurewall01a'''. | |||
The | The active texture displays under '''Current Texture''' on the right side of the Hammer interface. | ||
[[Image: | == Applying Textures == | ||
[[Image:hammer_appliedTextureExample.png|thumb|right|200px|Use the '''[[Hammer_Map_Tools_Toolbar#Apply_Current_Texture|Apply Current Texture]]''' icon to apply textures to brushes.]] | |||
# Activate the [[Hammer Selection Tool|Selection Tool]] [[Image:hammer_select.png|28px]]. | |||
# Highlight the wall you wish to texture by clicking on it in the Camera view. {{note|If you select one of the walls and it selects the whole room, then you must '''[[Hammer_Tools_Menu#Group_and_Ungroup_.3CCtrl.2BG.3E_and_.3CCtrl.2BU.3E|Ungroup]]''' the brushes. To ungroup, select the room in any view, then go to '''Tools > Ungroup'''. Then select individual walls.}} | |||
# Click the '''[[Hammer_Map_Tools_Toolbar#Apply_Current_Texture|Apply Current Texture]]''' icon [[Image:Hammer_applycurrenttextureicon.jpg|28px]] from the left panel to apply the active texture to the selected brush. | |||
'''[[Hammer_Map_Tools_Toolbar#Toggle_Texture_Application|Toggle Texture Application]]''' | |||
Depending on the texture and the surface, your texture may not fit perfectly on your wall. Using the [[Hammer_Map_Tools_Toolbar#Toggle_Texture_Application|Toggle Texture Application]] tool [[Image:Hammer_toggletextureapplicationicon.jpg|28px]], you can adjust your texture to fit the wall appropriately. The Toggle Texture Application tool opens the [[Hammer_Face_Edit_Dialog|Face Edit Sheet]] for the selected surface. | |||
[[Image:Hammer_faceeditdialog.png|250px|left|thumb|[[Hammer_Face_Edit_Dialog|Face Edit Sheet]]]] | |||
Because we are using a dev texture that is 128 units and we are applying it to a wall that is 1024 x 512 (both multiples of 128), the texture should already fit the wall perfectly, but we can still see some changes by altering the settings in the Face Edit Sheet. | |||
*'''[[Hammer_Face_Edit_Dialog#Texture_Scale_.28X.2FY.29|Texture Scale]]''' adjusts the size of the texture. Numbers smaller than 1 make the texture smaller. Numbers greater than 1 make the texture larger. Negative numbers mirror the texture. | |||
*'''[[Hammer_Face_Edit_Dialog#Texture_Shift_.28X.2FY.29|Texture Shift]]''' moves the texture along the X or Y axis. Positive numbers move the texture left (X axis) and down (Y axis). Negative numbers move the texture right (X axis) and up (Y axis). | |||
*'''[[Hammer_Face_Edit_Dialog#Current_Texture|Current Texture]]''' changes the applied texture on the surface. | |||
*'''[[Hammer_Face_Edit_Dialog#Lightmap_Scale|Lightmap scale]]''' affects how light effects apply to the surface. Smaller numbers are higher resolution and produce more expensive lighting effects. Larger numbers are lower resolution and produce cheaper lighting effects. | |||
*'''[[Hammer_Face_Edit_Dialog#Rotation|Rotation]]''' rotates the texture on a brush face. | |||
*'''[[Hammer_Face_Edit_Dialog#Justify|Justify]]''' specifies how the texture lines up to an edge. '''L''' for left, '''R''' for right, '''T''' for top, '''B''' for bottom, '''C''' for center, and '''Fit''' scales the X & Y values to fit the entire texture onto the surface. | |||
*'''[[Hammer_Face_Edit_Dialog#Align:_World_and_Face|Align]]''' specifies how the texture is treated spacially. World alignment forces the texture to be stay in place as the object it is applied to moves. Face alignment uses the coordinates of the face as a basis for alignment. | |||
*'''[[Hammer_Face_Edit_Dialog#Mode|Mode]]''' allows you to select what will happen when you click on a brush face with the left mouse button. | |||
<br style="clear:both"> | |||
Apply the same texture to the remaining three walls. | |||
Using the same process apply a dev texture to the ceiling and the floor. | |||
{{tip|To show the entire list of textures again, open the Texture Browser, select the text in the '''filter''' field, and press <Backspace> or <Delete> to delete it.}} | {{tip|To show the entire list of textures again, open the Texture Browser, select the text in the '''filter''' field, and press <Backspace> or <Delete> to delete it.}} | ||
Revision as of 15:26, 2 April 2008
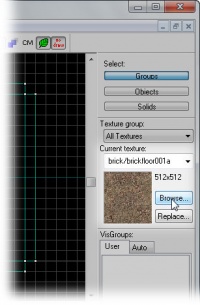
In this section we will select textures for the walls, floor, and ceiling.
To open the Texture Browser, click the Browse... button in the Texture group on the right side of the Hammer interface.
The Texture Browser
Use the Texture Browser to view and select textures you wish to apply to brushes in your map.
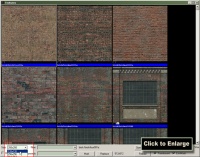
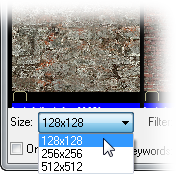
To ease the browsing of textures, you may wish to adjust the textures' preview size.
In the lower left corner of the Texture Browser window, select 128x128 from the Size: drop-down menu. This will reduce the size of the texture samples, so that we can see more at once.
The Texture Browser hosts thousands of textures, and navigating to the exact texture you wish to use could be problematic, if not for the Filter feature. This feature allows you to specify part of a file name, such as "concrete wall", "plaster ceiling", or "metal door". The Texture Browser then filters for only those textures that contain that text.
Dev Textures
When building a map, it is good practice to start with textures that help create appropriately-sized objects. Hammer includes a number of textures specifically to assist you in creating maps in proportion to the player called "dev textures".
- Type
dev wallinto the filter. - Double-click the texture dev/dev_measurewall01a.
The active texture displays under Current Texture on the right side of the Hammer interface.
Applying Textures
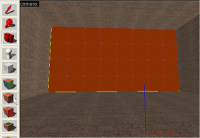
- Activate the Selection Tool
 .
. - Highlight the wall you wish to texture by clicking on it in the Camera view.
 Note:If you select one of the walls and it selects the whole room, then you must Ungroup the brushes. To ungroup, select the room in any view, then go to Tools > Ungroup. Then select individual walls.
 - Click the Apply Current Texture icon File:Hammer applycurrenttextureicon.jpg from the left panel to apply the active texture to the selected brush.
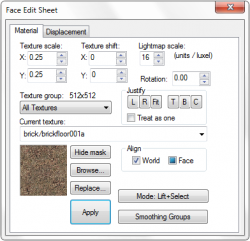
Depending on the texture and the surface, your texture may not fit perfectly on your wall. Using the Toggle Texture Application tool File:Hammer toggletextureapplicationicon.jpg, you can adjust your texture to fit the wall appropriately. The Toggle Texture Application tool opens the Face Edit Sheet for the selected surface.
Because we are using a dev texture that is 128 units and we are applying it to a wall that is 1024 x 512 (both multiples of 128), the texture should already fit the wall perfectly, but we can still see some changes by altering the settings in the Face Edit Sheet.
- Texture Scale adjusts the size of the texture. Numbers smaller than 1 make the texture smaller. Numbers greater than 1 make the texture larger. Negative numbers mirror the texture.
- Texture Shift moves the texture along the X or Y axis. Positive numbers move the texture left (X axis) and down (Y axis). Negative numbers move the texture right (X axis) and up (Y axis).
- Current Texture changes the applied texture on the surface.
- Lightmap scale affects how light effects apply to the surface. Smaller numbers are higher resolution and produce more expensive lighting effects. Larger numbers are lower resolution and produce cheaper lighting effects.
- Rotation rotates the texture on a brush face.
- Justify specifies how the texture lines up to an edge. L for left, R for right, T for top, B for bottom, C for center, and Fit scales the X & Y values to fit the entire texture onto the surface.
- Align specifies how the texture is treated spacially. World alignment forces the texture to be stay in place as the object it is applied to moves. Face alignment uses the coordinates of the face as a basis for alignment.
- Mode allows you to select what will happen when you click on a brush face with the left mouse button.
Apply the same texture to the remaining three walls.
Using the same process apply a dev texture to the ceiling and the floor.
