BTS Light Sources: Difference between revisions
(→Fans) |
No edit summary |
||
| Line 7: | Line 7: | ||
==SpotLight Lamps== | ==SpotLight Lamps== | ||
SpotLight Lamps | SpotLight Lamps are attached to the wall, ceiling, and sometimes the floor. | ||
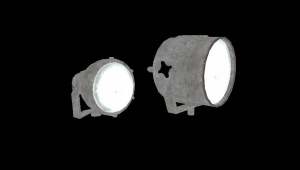
[[Image:bts_light_models.jpg|thumb|right|300px|The models used for light sources. Big Lamp is on the right, Small Lamp on the left]] | [[Image:bts_light_models.jpg|thumb|right|300px|The models used for light sources. Big Lamp is on the right, Small Lamp on the left]] | ||
[[Image:bts_light_sources_big_lamp_hammer.jpg|thumb|right|300px|The point_spotlight and light_spot are placed in front of the model]] | [[Image:bts_light_sources_big_lamp_hammer.jpg|thumb|right|300px|The point_spotlight and light_spot are placed in front of the model]] | ||
| Line 68: | Line 68: | ||
==Fans== | ==Fans== | ||
* [[Creating BTS Fans| Creating Fans]] | * [[Creating BTS Fans| Creating Fans]] | ||
==Cage Lights== | |||
There are two different types of cage lights that appear in the Original Portal. The first seems to be a drop light and is hung from cables, and appears in the Rattman den of Test Chamber 16. The second is wall-mounted, and appears in the slimy tunnels in the huge turret ambush room before GLaDOS's lair. | |||
===Drop Light=== | |||
Create a <code>[[prop static]]</code> with the world model <code>models/props_bts/cage_light.mdl</code>. | |||
Put an <code>[[env_sprite]]</code> inside the model, and enter the following properties: | |||
{| class=standard-table | |||
! Property Name || Value | |||
|- | |||
| Render Mode || World Space Glow | |||
|- | |||
| FX Color (R G B) || 250 240 205 | |||
|- | |||
| Sprite Name || <code>materials/Sprites/light_glow03.vmt</code> | |||
|- | |||
| Scale || .5 | |||
|- | |||
| Size of Glow Proxy Geometry || 4.0 | |||
|} | |||
Next, create a <code>[[Light_spot]]</code> underneath the model. Give it the following properties: | |||
{| class=standard-table | |||
! Property Name || Value | |||
|- | |||
| Brightness || 250 240 205 400 | |||
|- | |||
| Inner (Bright) Angle || 15 | |||
|- | |||
| Outer (Fading) Angle || 30 | |||
|} | |||
You may need to adjust the intensity and angles depending on the lighting needs of the area. | |||
Then, create a system of <code>[[keyframe_rope|cables]]</code> in your room if there isn't one already, and hang the drop lights from them. You can try and align the small hook on the top so it looks like its hanging from the cables, and you can also just attach it to the ceiling where the keyframes meet. | |||
===Wall-Mounted=== | |||
==Pipe Areas== | |||
== == | == == | ||
Revision as of 06:37, 13 December 2020
Introduction
This page will show and teach you how to create the light sources found in the Behind The Scenes Areas.
SpotLight Lamps
SpotLight Lamps are attached to the wall, ceiling, and sometimes the floor.
Big Lamp
Create a prop_static entity set it's world model to models/props_wasteland/light_spotlight01_lamp.mdl this model is the lamp itself. The base model is models/props_wasteland/light_spotlight01_base.mdl disable shadows for both props.
Create a point_spotlight and enter the following Properties:
| Property Name | Value |
|---|---|
| Color | 250 240 205 |
| HDR color scale | .7 |
| Spotlight Width | 80 |
| Spotlight Length | Is how long the spotlight will go.
|
Create a light_spot and enter the following Properties:
| Property Name | Value |
|---|---|
| Brightness | 250 240 205 900 |
| Constant | 500000 |
Small Lamp
Create a prop_static entity set it's world model to models/props_wasteland/light_spotlight02_lamp.mdl this model is the lamp itself. The base model is models/props_wasteland/light_spotlight02_base.mdl disable shadows for both props.
Create a point_spotlight and enter the following Properties:
| Property Name | Value |
|---|---|
| Color | 250 240 205 |
| HDR color scale | .7 |
| Spotlight Width | 32 |
| Spotlight Length | Is how long the spotlight will go.
|
Create a light_spot and enter the following Properties:
| Property Name | Value |
|---|---|
| Brightness | 250 240 205 900 |
| Constant | 500000 |
| Inner (bright) Angle | 1 |
| Outside (fading) Angle | 25 |
| Focus | 0.5 |
Fans
Cage Lights
There are two different types of cage lights that appear in the Original Portal. The first seems to be a drop light and is hung from cables, and appears in the Rattman den of Test Chamber 16. The second is wall-mounted, and appears in the slimy tunnels in the huge turret ambush room before GLaDOS's lair.
Drop Light
Create a prop static with the world model models/props_bts/cage_light.mdl.
Put an env_sprite inside the model, and enter the following properties:
| Property Name | Value |
|---|---|
| Render Mode | World Space Glow |
| FX Color (R G B) | 250 240 205 |
| Sprite Name | materials/Sprites/light_glow03.vmt
|
| Scale | .5 |
| Size of Glow Proxy Geometry | 4.0 |
Next, create a Light_spot underneath the model. Give it the following properties:
| Property Name | Value |
|---|---|
| Brightness | 250 240 205 400 |
| Inner (Bright) Angle | 15 |
| Outer (Fading) Angle | 30 |
You may need to adjust the intensity and angles depending on the lighting needs of the area.
Then, create a system of cables in your room if there isn't one already, and hang the drop lights from them. You can try and align the small hook on the top so it looks like its hanging from the cables, and you can also just attach it to the ceiling where the keyframes meet.

