Diversity Vent: Difference between revisions
Jump to navigation
Jump to search
 Note:For the purpose of this tutorial, there are three straight vents and one angled vents in use. Browse for vactube under props_bts for more vent options.
m (You can't advertise a Portal 2 wiki on the VDC. Even though it was basically copy-pasted, the original author was the one who created this page on the VDC. Credit is given to the username.) |
(Complete revision of the tutorial. May need some edits here and there, I'm not the best at explaining things. :P) |
||
| Line 1: | Line 1: | ||
Diversity vents are used to suck puzzle elements, such as turrets, out of the chambers. They were scrapped from the game as a testing element and were used instead as an updated version of the Vital Apparatus Vent. However, the tools to create them are still available. | |||
Diversity vents are used to suck elements such as turrets out of | |||
[[File:vent1.png|200px|thumb|right|Tubes]] | [[File:vent1.png|200px|thumb|right|Tubes]] | ||
== | == Creating the vent == | ||
{{note|For the purpose of this tutorial, there are three straight vents and one angled vents in use. Browse for ''vactube'' under ''props_bts'' for more vent options.}} | |||
* Create several [[prop_static]] entities with the model name ''props_bts\vactube_128_straight_b.mdl''. | |||
* Line up the tubes, then place another [[prop_static]] entity with the model name ''props_bts\vactube_90deg_01.mdl''. This is the curved tube. | |||
* To finish the vent, place one more [[prop_static]] entity with the model name ''props_bts\vactube_connector.mdl'' | |||
== Creating the vacuum == | |||
* For straight tubes: create a 64x64 [[trigger_push]] brush entity and texture it with the Trigger texture. Place it inside the straight tubes and line it up with the origin of the straight tubes to ensure it's directly in the center. | |||
* Make the brush length as long as the vent tubes. | |||
* For the curved tube: create another 64x64 [[trigger_push]] brush entity textured with Trigger. Place it inside the curved tube and stretch it down to the floor and up to the bottom of the straight tube's [[trigger_push]] entity. This will lift physics objects into the straight tubes, then carried away. | |||
In the object properties of all [[trigger_push]] entities, ensure the '''Physics Objects''' flag is checked. The '''Speed of Push''' should be set to 1500, and make sure the '''Push Direction''' is correctly set with the direction of the tubes. | |||
[[ | |||
== | == Removing vacuumed objects == | ||
* At the opposite end of the tube, where the player may lose sight of objects being carried away by the vacuum, place a [[trigger_multiple]] brush entity that is 128x128x16 large. This will be used to remove the physics objects in the tube. | |||
* For the [[trigger_multiple]] entity: | |||
::{| class=standard-table | |||
! || My Output || Target Entity || Target Input || Parameter || Delay || Only Once | |||
|- | |||
| [[Image:Io11.png]] || OnStartTouch || !activator || Kill || || 0.00 || No | |||
|} | |||
== Finishing up == | |||
[[File:vent2.png|200px|thumb|right|Finished Vent]] | |||
* Directly underneath the entry tube where objects will be sucked in, place a [[info_placement_helper]] on the floor. Set the ''Radius'' to 64, and set the ''Floor placement'' to Yes. | |||
* Above the [[info_placement_helper]], and below the entry tube, place a [[point_push]] facing up (-90, 0, 0). Adjust the '''Radius''' to about 250, and set the '''Magnitude''' to -40. This will add a smoke effect when placing portals. | |||
=== | == External links == | ||
* [http://dl.dropbox.com/u/12438082/Mods/vents.vmf Example map] | |||
[http://dl.dropbox.com/u/12438082/Mods/vents.vmf | |||
[[Category:Portal 2 Level Design]] | |||
[[Category:Portal 2 Tutorials]] | [[Category:Portal 2 Tutorials]] | ||
Revision as of 14:47, 7 June 2011
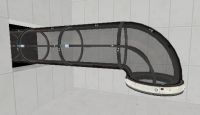
Diversity vents are used to suck puzzle elements, such as turrets, out of the chambers. They were scrapped from the game as a testing element and were used instead as an updated version of the Vital Apparatus Vent. However, the tools to create them are still available.
Creating the vent
- Create several prop_static entities with the model name props_bts\vactube_128_straight_b.mdl.
- Line up the tubes, then place another prop_static entity with the model name props_bts\vactube_90deg_01.mdl. This is the curved tube.
- To finish the vent, place one more prop_static entity with the model name props_bts\vactube_connector.mdl
Creating the vacuum
- For straight tubes: create a 64x64 trigger_push brush entity and texture it with the Trigger texture. Place it inside the straight tubes and line it up with the origin of the straight tubes to ensure it's directly in the center.
- Make the brush length as long as the vent tubes.
- For the curved tube: create another 64x64 trigger_push brush entity textured with Trigger. Place it inside the curved tube and stretch it down to the floor and up to the bottom of the straight tube's trigger_push entity. This will lift physics objects into the straight tubes, then carried away.
In the object properties of all trigger_push entities, ensure the Physics Objects flag is checked. The Speed of Push should be set to 1500, and make sure the Push Direction is correctly set with the direction of the tubes.
Removing vacuumed objects
- At the opposite end of the tube, where the player may lose sight of objects being carried away by the vacuum, place a trigger_multiple brush entity that is 128x128x16 large. This will be used to remove the physics objects in the tube.
- For the trigger_multiple entity:
Finishing up
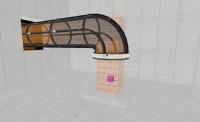
- Directly underneath the entry tube where objects will be sucked in, place a info_placement_helper on the floor. Set the Radius to 64, and set the Floor placement to Yes.
- Above the info_placement_helper, and below the entry tube, place a point_push facing up (-90, 0, 0). Adjust the Radius to about 250, and set the Magnitude to -40. This will add a smoke effect when placing portals.

