View Navigation: Difference between revisions
MossyBucket (talk | contribs) m (Never mind. Inserted template again. Undo revision 143170 by MossyBucket (Talk)) |
Rockn-Roll (talk | contribs) (Added image of origin mark and described how to bring it into view.) |
||
| Line 11: | Line 11: | ||
Moving the camera is vital if you want to be able to see what you are doing. Hammer allows you to '''navigate manually with the keyboard and/or mouse''', and to '''switch between several cameras in different locations'''. | Moving the camera is vital if you want to be able to see what you are doing. Hammer allows you to '''navigate manually with the keyboard and/or mouse''', and to '''switch between several cameras in different locations'''. | ||
{{tip|If you haven't created any brushes yet, you can use the origin mark of the map | {{tip|If you haven't created any brushes yet, you can use the origin mark of the map [[File:Hammer OriginMark.png|28px]] for something to move around. Display this origin mark by selecting View from the top menu and select Center 3D Views on Selection then hold the {{key|Spacebar}}+RMB and drag the origin mark into view. }} | ||
== Navigation == | == Navigation == | ||
Revision as of 15:31, 13 February 2011
Moving the camera is vital if you want to be able to see what you are doing. Hammer allows you to navigate manually with the keyboard and/or mouse, and to switch between several cameras in different locations.
3D views
You can navigate through a 3D view with WASD and the arrow keys: WASD are forward/backward/strafe as they are in-game, while the arrow keys turn your view. The scroll wheel can be used to give you a speed boost forwards or backwards.
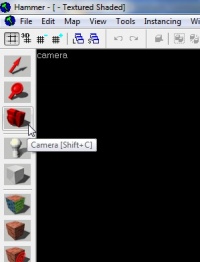
If you want to look around with the mouse, you can do so by selecting the Camera tool ![]() from the left-hand menu. Now you can spin the view by dragging with the left button, pan it by dragging with the right, and strafe by holding down both at once.
from the left-hand menu. Now you can spin the view by dragging with the left button, pan it by dragging with the right, and strafe by holding down both at once.
2D views
You can pan across a 2D view using the arrow keys or scroll bars (if enabled), or by holding Space and dragging with the left mouse button.
To magnify, you can scroll the mouse wheel, use +- (on the keypad!), or press 1 through to 0.
You can also use the Magnify tool ![]() with left or right click.
with left or right click.
Creating a camera
To set up cameras, select the Camera tool ![]() from the left-hand list of icons.
from the left-hand list of icons.
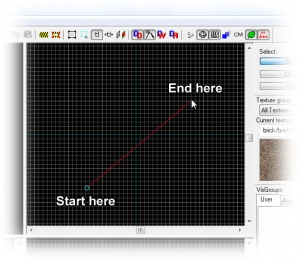
Click and drag your mouse in a 2D view to create the camera, as shown in the image below. The 3D view will snap to the new camera, and the 2D windows will display your camera as a blue circle with a line leading from it.
You can change the position of the camera by dragging the blue circle around with the mouse in the 2D views, and where it will point by dragging the tail in the same manner. The 3D view will update whenever you release the mouse button.
Hold ⇧ Shift to create multiple cameras. Use PageUp and PageDown to switch between them and Delete to remove the active one.

