Creating Brush Entities: Difference between revisions
Jump to navigation
Jump to search
m (bad nav) |
TomEdwards (talk | contribs) (unfloated all images + other minor cleaning) |
||
| Line 1: | Line 1: | ||
{{otherlang2 | |||
| ru = Creating Primitives:ru | |||
| | | fr = Creating Primitives:fr | ||
| | | zh-cn = Creating Primitives:zh-cn}} {{first room menu}} | ||
In Hammer, a [[Primitives|Primitive]] is a relatively simple [[brush]] object. Primitives can be world geometry or interactive entities subject to physics & damage. In this example, we will create an interactive primitive that can be destroyed by the player: specifically, a 32-[[unit]] [http://www.oldmanmurray.com/features/39.html crate]. | |||
[[File:Hammer primitive crate.png|thumb|none|Properly-sized cube with 32x32 texture.]] | |||
# Select the {{hammer block}} and create a cube in your map. | |||
# Open the [[Hammer_Texture_Browser|Texture Browser]] and [[Hammer_Texture_Browser#Filter|filter]] for '''dev crate'''. '''Dev/dev_measurecrate02''' should be a 32x32 crate texture. | # Open the [[Hammer_Texture_Browser|Texture Browser]] and [[Hammer_Texture_Browser#Filter|filter]] for '''dev crate'''. '''Dev/dev_measurecrate02''' should be a 32x32 crate texture. | ||
# Apply the '''dev/dev_measurecrate02''' texture to your cube. {{ | # Apply the '''dev/dev_measurecrate02''' texture to your cube. {{tip|If the grid on your 2D views is too large to get down to 32 units, press the {{key|[}} or click the '''Smaller Grid''' button [[Image:Hammer_SmallerGrid.png]] to create smaller objects on the grid.}} | ||
# Resize your cube using the | # Resize your cube using the {{hammer select}} until the texture fits properly on the cube. | ||
# | # So far, creating primitives for world geometry and for interactive objects is the same. In order to specify whether our crate is, indeed, world geometry or an interactive object, we must now select it and move it either [[Hammer_New_Objects_Toolbar#toWorld_.3CCtrl.2BShift.2BW.3E|toWorld]] or [[Hammer_New_Objects_Toolbar#toEntity_.3CCtrl.2BT.3E|toEntity]]:[[File:hammer_toEntityButton.png|none|frame|'''toEntity''' button ('''Ctrl+T''')]] | ||
# With the crate selected, click the [[Hammer_New_Objects_Toolbar#toEntity_.3CCtrl.2BT.3E|toEntity]] button to tie a [[List_of_entities#Function_.28brush.29_entities|function]] to the primitive. This will bring up the [[Hammer_Object_Properties_Dialog|Object Properties]] dialog box: [[File:Hammer object properties.png|none|thumb|func_breakable object properties]] | |||
# Select [[Func_breakable|func_breakable]] from the '''Class:''' drop-down menu. | # Select [[Func_breakable|func_breakable]] from the '''Class:''' drop-down menu. | ||
# Under '''Keyvalues''', select '''Name''' and name your crate something descriptive. | # Under '''Keyvalues''', select '''Name''' and name your crate something descriptive. | ||
| Line 19: | Line 20: | ||
# Under '''Keyvalues''', select '''Physics Impact Damage Scale'''. This scales damage energy when the object is hit by a physics object. {{Note|A value of '''0''' means this feature is disabled. Set to 1.0 for materials as strong as flesh, smaller numbers indicate stronger materials.}} | # Under '''Keyvalues''', select '''Physics Impact Damage Scale'''. This scales damage energy when the object is hit by a physics object. {{Note|A value of '''0''' means this feature is disabled. Set to 1.0 for materials as strong as flesh, smaller numbers indicate stronger materials.}} | ||
# Click '''Apply''' and close the Object Properties dialog box. | # Click '''Apply''' and close the Object Properties dialog box. | ||
==Crate Texture== | ==Crate Texture== | ||
Once our crate is correctly sized, we can apply a proper texture to it using the same technique we used previously. | Once our crate is correctly sized, we can apply a proper texture to it using the same technique we used previously. | ||
# Open the [[Hammer Texture Browser|Texture Browser]] and [[Hammer Texture Browser#Filter|filter]] for '''crate'''. | |||
# Select '''props/woodcrate001a''' and apply it to your cube. You may have to use the Face Edit Sheet to fit the texture to the cube. {{note|Ensure that the texture is aligned to '''Face'''.}} | |||
And with that, we're done: | |||
[[File:Hammer_primitive_crate2.png|thumb|315px|none|A textured, functional crate]] | |||
{{Navbar|Applying_Textures|Your First Map|Adding Entities}} | {{Navbar|Applying_Textures|Your First Map|Adding Entities}} | ||
[[Category:Level Design Tutorials]] | [[Category:Level Design Tutorials]] | ||
Revision as of 03:02, 28 August 2009
In Hammer, a Primitive is a relatively simple brush object. Primitives can be world geometry or interactive entities subject to physics & damage. In this example, we will create an interactive primitive that can be destroyed by the player: specifically, a 32-unit crate.

- Select the Block tool
 and create a cube in your map.
 - Open the Texture Browser and filter for dev crate. Dev/dev_measurecrate02 should be a 32x32 crate texture.
- Apply the dev/dev_measurecrate02 texture to your cube.
 Tip:If the grid on your 2D views is too large to get down to 32 units, press the [ or click the Smaller Grid button
  to create smaller objects on the grid.
 - Resize your cube using the Selection tool
 until the texture fits properly on the cube.
 - So far, creating primitives for world geometry and for interactive objects is the same. In order to specify whether our crate is, indeed, world geometry or an interactive object, we must now select it and move it either toWorld or toEntity:
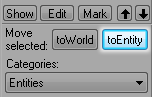 toEntity button (Ctrl+T)
 - With the crate selected, click the toEntity button to tie a function to the primitive. This will bring up the Object Properties dialog box:
- Select func_breakable from the Class: drop-down menu.
- Under Keyvalues, select Name and name your crate something descriptive.
- Under Keyvalues, select Strength. The Strength value specifies how much damage the crate can take before breaking. Set the value to 1.
- Under Keyvalues, select Material Type. The material type specifies the sounds the crate will make and also what type of gibs it will break into. Select Wood from the drop-down menu.
- Under Keyvalues, select Physics Impact Damage Scale. This scales damage energy when the object is hit by a physics object.
 Note:A value of 0 means this feature is disabled. Set to 1.0 for materials as strong as flesh, smaller numbers indicate stronger materials.
 - Click Apply and close the Object Properties dialog box.


Crate Texture
Once our crate is correctly sized, we can apply a proper texture to it using the same technique we used previously.
- Open the Texture Browser and filter for crate.
- Select props/woodcrate001a and apply it to your cube. You may have to use the Face Edit Sheet to fit the texture to the cube. Note:Ensure that the texture is aligned to Face.
And with that, we're done:
