Zh/Glass Light (Portal 2): Difference between revisions
No edit summary |
m (→第四步:玻璃罩面) |
||
| (5 intermediate revisions by the same user not shown) | |||
| Line 1: | Line 1: | ||
{{LanguageBar|Glass Light (Portal 2)|title=玻璃灯条}} | {{LanguageBar|Glass Light (Portal 2)|title=玻璃灯条}} | ||
[[File:Walllights.jpg|thumb|right|300px| | [[File:Walllights.jpg|thumb|right|300px|墙面玻璃灯条]] | ||
''' | '''玻璃灯条'''(Glass Lights),在《传送门2》中更常被称为'''光带'''(Light Strips),取代了初代《传送门》中的{{L|Creating a wall light|嵌入式壁灯}}(Recessed Lights)。它们几乎出现在《传送门2》的每个测试室里,堪称测试室的"照明担当",通常与观察室一同构成主要光源。 | ||
本教程将手把手教你为测试室打造这些"光影魔术师"。 | |||
{{note| | {{note|尽管《传送门2》中仍可制作嵌入式壁灯,但为保持风格统一,通常建议使用"新型"玻璃灯条——毕竟"与时俱进"嘛!}} | ||
== | ==实例化制作:省时省力== | ||
这比手动创建每条光带要简便得多,堪称"事半功倍"之法。先在墙面开洞用于放置实例——若墙壁较薄,需覆盖侧面以防"春光外泄"(漏光)。 | |||
在 "instances/lights" 文件夹中有多种预设实例,相关实例以 "light_panel_" 开头,任君挑选。 | |||
{{note|若安装了[https://github.com/BenVlodgi/BEE2.4/releases BEEMOD],也可使用 "instances/p2editor" 文件夹中的新版光带实例。这些实例堪称"懒人福音"——无需开洞,直接放置就能用。但需注意其光照效果稍逊于旧版实例。}} | |||
{{note| | |||
== | ==手动制作:精雕细琢== | ||
=== | ===第一步:打好地基=== | ||
创建标准房间,万丈高楼平地起。 | |||
=== | ===第二步:开墙破洞=== | ||
在需要安装光带的表面开洞,尺寸为宽128单位×高32单位,方寸之间见真章。 | |||
{{Tip| | {{Tip|制作垂直光带时请互换宽高尺寸,切记"量体裁衣"}} | ||
=== | ===第三步:暗藏玄机=== | ||
创建同等尺寸的实体(宽128单位×高32单位)。将其移入刚开的墙洞中,但需缩回墙内(注意避免漏光,否则"功亏一篑")。面向房间的内侧贴图使用<code>lights/light_panel_cool</code>(或中性/暖色调变体),其余面使用<code>tools/toolsnodraw</code>。 | |||
=== | ===第四步:玻璃罩面=== | ||
创建{{L|prop_static}}实体。将其世界模型设为<code>models/props_lab/glass_lightcover.mdl</code>并启用"禁用阴影"(Disable Shadows)。用此模型覆盖墙洞,按需旋转,犹如给灯条"穿上透明外衣"。<br> | |||
{{tip| | {{tip|可调整模型皮肤(skin)的属性: 0是冷光, 1暖光, 2中性光。}} | ||
=== | ===第五步:隐形护卫=== | ||
再创建实体(宽128单位×高32单位×厚2单位),覆盖在光带表面。所有面贴图使用 `tools/toolsinvisible`。将此实体关联至{{L|func_portal_bumper}},为传送门设置"禁入红线"。 | |||
=== | ===第六步:复制奇迹=== | ||
大功告成!依样画葫芦制作其他光带即可。 | |||
== | ==亮度调节:明暗随心== | ||
通过纹理贴图工具(Shift+A)调整灯光贴图的"纹理比例"(Texture scale)值,数值越大光线越暗——好比"拧暗灯泡"。例如:2.0的亮度远低于0.25,效果立竿见影。 | |||
<gallery> | <gallery> | ||
Image:Glass-light-bright.jpg| | Image:Glass-light-bright.jpg|基础房间内三盏亮度为0.25的灯(亮如白昼) | ||
Image:Glass-lights-dim.jpg| | Image:Glass-lights-dim.jpg|相同房间,纹理比例调至2.0的效果(暮色沉沉) | ||
</gallery> | </gallery> | ||
{{note| | {{note|需在控制台输入<code>mat_fullbright 0</code>才能看到光照变化效果,否则就是"睁眼瞎"哦!}} | ||
{{ACategory|Portal 2 Level Design|传送门2关卡设计}} | |||
{{ACategory|Portal 2 Tutorials|传送门2教程}} | |||
Latest revision as of 05:48, 1 July 2025

玻璃灯条(Glass Lights),在《传送门2》中更常被称为光带(Light Strips),取代了初代《传送门》中的嵌入式壁灯(Recessed Lights)。它们几乎出现在《传送门2》的每个测试室里,堪称测试室的"照明担当",通常与观察室一同构成主要光源。 本教程将手把手教你为测试室打造这些"光影魔术师"。
实例化制作:省时省力
这比手动创建每条光带要简便得多,堪称"事半功倍"之法。先在墙面开洞用于放置实例——若墙壁较薄,需覆盖侧面以防"春光外泄"(漏光)。
在 "instances/lights" 文件夹中有多种预设实例,相关实例以 "light_panel_" 开头,任君挑选。
手动制作:精雕细琢
第一步:打好地基
创建标准房间,万丈高楼平地起。
第二步:开墙破洞
在需要安装光带的表面开洞,尺寸为宽128单位×高32单位,方寸之间见真章。
第三步:暗藏玄机
创建同等尺寸的实体(宽128单位×高32单位)。将其移入刚开的墙洞中,但需缩回墙内(注意避免漏光,否则"功亏一篑")。面向房间的内侧贴图使用lights/light_panel_cool(或中性/暖色调变体),其余面使用tools/toolsnodraw。
第四步:玻璃罩面
创建prop_static实体。将其世界模型设为models/props_lab/glass_lightcover.mdl并启用"禁用阴影"(Disable Shadows)。用此模型覆盖墙洞,按需旋转,犹如给灯条"穿上透明外衣"。
第五步:隐形护卫
再创建实体(宽128单位×高32单位×厚2单位),覆盖在光带表面。所有面贴图使用 `tools/toolsinvisible`。将此实体关联至func_portal_bumper,为传送门设置"禁入红线"。
第六步:复制奇迹
大功告成!依样画葫芦制作其他光带即可。
亮度调节:明暗随心
通过纹理贴图工具(Shift+A)调整灯光贴图的"纹理比例"(Texture scale)值,数值越大光线越暗——好比"拧暗灯泡"。例如:2.0的亮度远低于0.25,效果立竿见影。
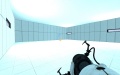
基础房间内三盏亮度为0.25的灯(亮如白昼)
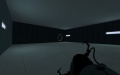
相同房间,纹理比例调至2.0的效果(暮色沉沉)


mat_fullbright 0才能看到光照变化效果,否则就是"睁眼瞎"哦!