Quick Start Facial AnimationFP: Difference between revisions
No edit summary |
m (Nesciuse moved page Quick Start Facial AnimationFP/en to Quick Start Facial AnimationFP without leaving a redirect: Move en subpage to basepage) |
||
| (11 intermediate revisions by 9 users not shown) | |||
| Line 1: | Line 1: | ||
{{LanguageBar}} | |||
== Prelude == | == Prelude == | ||
FacePoser can animate various muscles in models. This can lead to a more realistic appearances of characters, such as facial animations. This article will act as a guide to creating facial animations within a scene. | |||
== The Process == | |||
First, create a new scene by navigating to Choreography -> New. Give the new scene a name, and push Save. When asked for the name of the actor, fill in "gman_high." | |||
<center>[[File:Gman.gif]]</center> | |||
The new scene will show up in the Choreography tab: | |||
<center>[[File:Choreo.jpg]]</center> | |||
This is the work area that will be used to create a scene for Source to play back in the game. | |||
In the Choreography window, right click on gman_high, navigate to New -> Channel, and enter "audio." Repeat this process by creating a channel called "flex_face." | |||
<center>[[ | <center>[[File:Channel.jpg]]</center> | ||
<center>[[ | <center>[[File:Flex face.jpg]]</center> | ||
An audio file will be added to the audio channel: Right click on audio, select "WAV file", choose an entry in the Speak Sound menu, and push OK. | |||
<center>[[ | <center>[[File:Sound.jpg]]</center> | ||
Flex animation will be added in the same way of adding audio, except by choosing "Flex animation" instead of "WAV file" in the popup menu. If needed, align the flex animation with the audio by moving the flex animation bar in the choreography. Do this by left clicking the bar and dragging it to a more suitable place. | |||
<center>[[ | <center>[[File:Slicer.jpg]]</center> | ||
A | A useful tip is to enable the "All tools drive mouth" checkbox in the Control Panel. The Control Panel window may need to be extended to see the option. | ||
<center>[[ | <center>[[File:Qsfa-mouth.jpg]]</center> | ||
To start animating the face, select the flex_face bar and open up the Flex Animation tab. The window will look like this: | |||
<center>[[ | <center>[[File:Image29.jpg]]</center> | ||
Each description in the dialogs | Each description in the various dialogs relates to a muscle available for manipulation. Double clicking on a muscle's dialog box will reveal a more detailed view. To manipulate muscles, add "keyframe" points by holding the Control key and left clicking in any point of the opened muscle. Doing this adds a keyframe (shown as a red dot when selected, blue when not) to the timeline. | ||
<center>[[ | <center>[[File:Image31.jpg]]</center> | ||
Add more keyframes to have a more defined muscle manipulation: | |||
<center>[[ | <center>[[File:Timeline.jpg]]</center> | ||
Hint: This green time bar can be manually | Hint: This green time bar can be manually moved. Do this by holding down the left mouse button and dragging across the timeline. | ||
<center>[[ | <center>[[File:Timeslider.gif]]</center> | ||
[[category:Choreography]] | [[category:Choreography]] | ||
Latest revision as of 09:19, 12 July 2024
Prelude
FacePoser can animate various muscles in models. This can lead to a more realistic appearances of characters, such as facial animations. This article will act as a guide to creating facial animations within a scene.
The Process
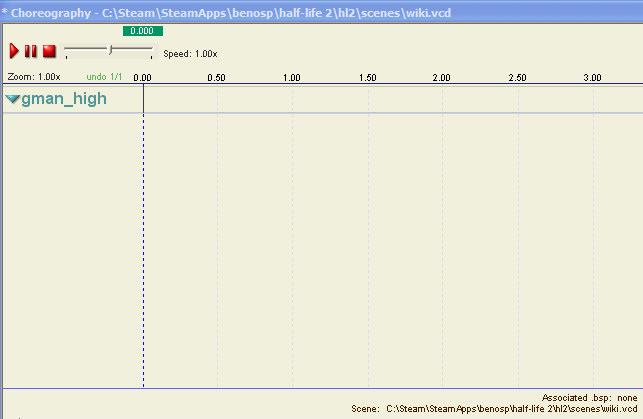
First, create a new scene by navigating to Choreography -> New. Give the new scene a name, and push Save. When asked for the name of the actor, fill in "gman_high."
The new scene will show up in the Choreography tab:

This is the work area that will be used to create a scene for Source to play back in the game.
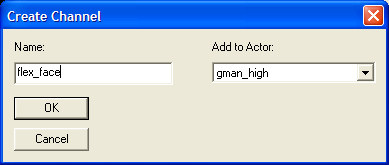
In the Choreography window, right click on gman_high, navigate to New -> Channel, and enter "audio." Repeat this process by creating a channel called "flex_face."


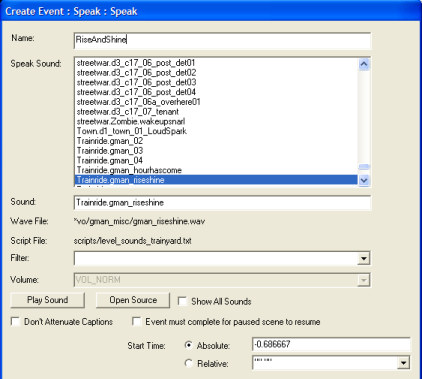
An audio file will be added to the audio channel: Right click on audio, select "WAV file", choose an entry in the Speak Sound menu, and push OK.

Flex animation will be added in the same way of adding audio, except by choosing "Flex animation" instead of "WAV file" in the popup menu. If needed, align the flex animation with the audio by moving the flex animation bar in the choreography. Do this by left clicking the bar and dragging it to a more suitable place.
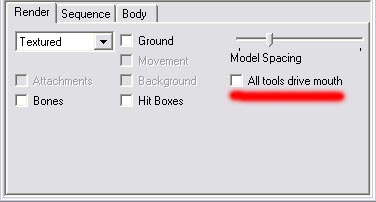
A useful tip is to enable the "All tools drive mouth" checkbox in the Control Panel. The Control Panel window may need to be extended to see the option.

To start animating the face, select the flex_face bar and open up the Flex Animation tab. The window will look like this:

Each description in the various dialogs relates to a muscle available for manipulation. Double clicking on a muscle's dialog box will reveal a more detailed view. To manipulate muscles, add "keyframe" points by holding the Control key and left clicking in any point of the opened muscle. Doing this adds a keyframe (shown as a red dot when selected, blue when not) to the timeline.

Add more keyframes to have a more defined muscle manipulation:

Hint: This green time bar can be manually moved. Do this by holding down the left mouse button and dragging across the timeline.