Detailing BTS Wall Pipes: Difference between revisions
No edit summary |
Thunder4ik (talk | contribs) m (→See also: Unicodifying, replaced: See Also → See also) |
||
| (10 intermediate revisions by 3 users not shown) | |||
| Line 1: | Line 1: | ||
{{DISPLAYTITLE: | {{DISPLAYTITLE: Portal BTS - Tutorial - Wall Pipes}}{{back| Detailing BTS Areas|Design & Detail}}{{Tutorial Skill Level | skill=1}} | ||
{{back| Detailing BTS Areas}} | |||
==Introduction== | ==Introduction== | ||
| Line 11: | Line 9: | ||
===Creating the path=== | ===Creating the path=== | ||
[[File:Portal bts wall pipes path.PNG|thumb|right|250px|Wall Pipe path]] | |||
Use the [[Clipping Tool]] to cut 128 wide gaps the wall. Push the cut blocks 16 units back | Use the [[Clipping Tool]] to cut 128 unit wide gaps in the wall. Push the cut blocks 16 units back. | ||
You can either leave the texture behind the maps with the normal metal wall texture or use <code>metal/metalwall_bts_006e_cable</code>. | |||
{{clr}} | |||
==Pipe Models== | ==Pipe Models== | ||
[[File:Portal bts wall pipes models.PNG|thumb|right|250px|Wall Pipe Models]] | |||
Create <code>[[prop_static]]</code> entities and set their model to <code>models/props/wall_pipes_horiz/wall_pipes_horiz.mdl</code>. This will be the main model to use. | Create <code>[[prop_static]]</code> entities and set their model to <code>models/props/wall_pipes_horiz/wall_pipes_horiz.mdl</code>. This will be the main model to use. | ||
| Line 23: | Line 22: | ||
Use the wall_pipes_wave models to change which side the normal models are closer to for extra detail. | Use the wall_pipes_wave models to change which side the normal models are closer to for extra detail. | ||
{{clr}} | |||
==Detailed Wall Pipes== | ==Detailed Wall Pipes== | ||
[[File:Portal bts wall pipes escape00-1.png|thumb|right|250px|Detailed Wall Pipes from escape_00]] | |||
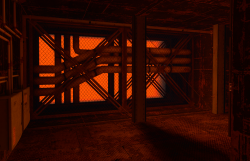
You can place an orange light behind the wall pipes if you need to. This can be used for lighting. Sometimes a <code>[[light]]</code> or <code>[[light_spot]]</code> with its color being <code>242 91 0</code> is necessary. You can also add [[Interior_Fences_BTS|Interior Fences]] if you'd like. | |||
{{clr}} | |||
== See also == | |||
== See | |||
* [[Portal Level Creation]] | * [[Portal Level Creation]] | ||
[[Category: Portal]] | [[Category:Portal]] | ||
[[Category: Level Design | [[Category:Level Design]] | ||
[[Category:Tutorials]] | |||
[[Category: Tutorials]] | |||
Latest revision as of 08:48, 8 January 2024
| Skill Level
This tutorial expects you to have this amount of knowledge within the topic to follow along smoothly. | |||||
|---|---|---|---|---|---|
| Novice | Familiar | Competent | Proficient | Expert | |
Introduction
This guide will show you how to create wall pipes.
Basic Wall Pipes
These walls pipes only have a 16 unit gap inside them.
Creating the path
Use the Clipping Tool to cut 128 unit wide gaps in the wall. Push the cut blocks 16 units back.
You can either leave the texture behind the maps with the normal metal wall texture or use metal/metalwall_bts_006e_cable.
Pipe Models
Create prop_static entities and set their model to models/props/wall_pipes_horiz/wall_pipes_horiz.mdl. This will be the main model to use.
If your path takes a 90 degree turn, use the wall_pipes_bend models and rotate any other pipe models.
Use the wall_pipes_wave models to change which side the normal models are closer to for extra detail.
Detailed Wall Pipes
You can place an orange light behind the wall pipes if you need to. This can be used for lighting. Sometimes a light or light_spot with its color being 242 91 0 is necessary. You can also add Interior Fences if you'd like.


