Creating Portal Vents: Difference between revisions
(Created page with "{{back | Portal Behind The Scenes Level Creation}} Introduction This tutorial will teach you how to create vents. {{Warning| This page is incomplete, it's recommended tha...") |
Thunder4ik (talk | contribs) m (Unicodifying, replaced: See Also → See also, [[Image: → [[File: (4)) |
||
| (31 intermediate revisions by 3 users not shown) | |||
| Line 1: | Line 1: | ||
{{back | Portal | {{DISPLAYTITLE: Portal BTS - Tutorial - Vents}} | ||
[[ | {{back | Portal Level Creation|Portal Level Creation}} | ||
This | ==Introduction== | ||
[[File:BTS_Vents.jpg|thumb|right|200px|Vents found throughout the BTS Areas]] | |||
This guide will teach you how to create vents. These vents are mainly used for lighting. | |||
{{clr}} | |||
==Vents== | |||
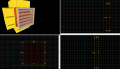
===Inside=== | |||
[[File:Portal vent inside.png|thumb|right|250px|Inside of the vent]] | |||
Create 2 <code>48w*16l*40h</code> brushes with the <code>[[nodraw]]</code> texture. | |||
Create 2 <code>48w*40l*16h</code> brushes with the <code>nodraw</code> texture. | |||
* [[Portal | Create 1 <code>16w*40l*40h</code> brush with the <code>nodraw</code> texture. | ||
Texture the back with the <code>light_orange001</code>. | |||
Texture the sides with <code>metalwall_bts_006b_gradient</code>. | |||
Use the <code>[[Hammer Face Edit Dialog|Face Edit Sheet]]</code> to align the textures. | |||
{{clr}} | |||
===Surrounding=== | |||
[[File:Portal vent surrounding textured.png|thumb|right|300px|Surrounding of the vent]] | |||
Create 2 <code>4w*2l*40h</code> brushes with the <code>nodraw</code> texture. | |||
Create 2 <code>4w*36l*2h</code> brushes with the <code>nodraw</code> texture. | |||
Texture the front faces of the vents with <code>metalvent001a</code>. | |||
Select the front visible faces and open the <code>Face Edit Sheet</code> and enter the following properties: | |||
'''Texture scale:''' | |||
* X: <code>0.15</code> | |||
* Y: <code>0.15</code> | |||
'''Texture shift:''' | |||
* X: <code>-7</code> | |||
* Y: <code>5</code> | |||
Select the top and bottom faces of the center faces, enter the following properties: | |||
'''Texture shift:''' | |||
* Y: <code>64</code> | |||
* Rotation: <code>180</code> | |||
{{clr}} | |||
===Grating=== | |||
Create a <code>4w*36l*4h</code> brush with the <code>nodraw</code> texture. | |||
Position this brush right below the top surrounding. | |||
Use the [[Clipping Tool]] to cut the brush as seen in the image. | |||
<gallery> | |||
Image:Portal vent grate.png|Grate cut | |||
</gallery> | |||
Select the front face and set its texture to <code>metalvent001a</code> and enter the following properties with the <code>Face Edit Sheet</code>: | |||
'''Texture scale:''' | |||
* X: <code>0.15</code> | |||
* Y: <code>0.15</code> | |||
'''Texture shift:''' | |||
* X: <code>-4</code> | |||
* Y: <code>219</code> | |||
Make sure the face's alignment is set to <code>World</code>. | |||
Set the bottom face's texture to <code>metalvent001a</code>. | |||
Select the back slope face. Set its texture to <code>metalvent001a</code> and enter the following properties with the <code>Face Edit Sheet</code>: | |||
'''Texture shift:''' | |||
* X: <code>8</code> | |||
* Y: <code>192</code> | |||
Make sure the face's alignment is set to <code>World</code>. | |||
Copy and paste the brush 5 times as seen in the image, moving the brush 6 units down each time. Make sure [[Hammer_Map_Operations_Toolbar#Texture_Lock| Texture Lock]] is enabled. | |||
<gallery> | |||
Image:Portal vent grating.png|Grating | |||
</gallery> | |||
Select both the Surrounding and the Grating and tie them to a <code>[[func_detail]]</code> | |||
{{clr}} | |||
===Lights=== | |||
Create a <code>[[light_spot]]</code> entity and enter the following properties: | |||
{| class=standard-table | |||
! Property Name || Value | |||
|- | |||
| Pitch Yaw Roll || -22.5 0 0 | |||
|- | |||
| Brightness || 242 91 0 800 | |||
|- | |||
| BrightnessScaleHDR || .5 | |||
|- | |||
| Constant || 200000 | |||
|- | |||
| Inner (bright) angle || 15 | |||
|- | |||
| Outer (fading) angle || 30 | |||
|- | |||
| Pitch || -22.5 | |||
|} | |||
The vent lights in Portal don't have a specific angle or position. However, it is safe to keep the lights near the orange texture face and you can modify the light to point in a specific direction (only slightly). | |||
{{note| Only use this next light in long hallways}} | |||
Create another <code>light_spot</code> and enter the following properties | |||
{| class=standard-table | |||
! Property Name || Value | |||
|- | |||
| Pitch Yaw Roll || -15 0 0 | |||
|- | |||
| Brightness || 242 91 0 150 | |||
|- | |||
| BrightnessScaleHDR || .5 | |||
|- | |||
| Constant || 200000 | |||
|- | |||
| Inner (bright) angle || 1 | |||
|- | |||
| Outer (fading) angle || 60 | |||
|- | |||
| Pitch || -15 | |||
|} | |||
Place this light as seen in the image | |||
<gallery> | |||
Image:Portal vent 2nd-light.png|Optional Light Source | |||
</gallery> | |||
===Implementation=== | |||
Assuming you build your maps in 16 units wide, put the inside of the vent just outside of the brushes. Cut a hole using the clipping tool (make sure the hole is center with the texture) and place the vent in the whole. | |||
Fill in the nodraw spaces and you have a vent. | |||
==Skinnier Vents== | |||
[[File:Portal_Skinny_Vents.jpeg|thumb|right|200px|Skinny Vents]] | |||
Skinnier vents seen in testchmb_a_15 | |||
{{todo| Finish this guide}} | |||
{{clr}} | |||
== See also == | |||
* [[BTS Light Sources | Light Sources]] | |||
* [[Portal Level Creation]] | * [[Portal Level Creation]] | ||
[[Category: | |||
[[Category:Portal]] | |||
[[Category:Level Design]] | |||
[[Category:Tutorials]] | |||
Latest revision as of 01:47, 7 January 2024
Introduction

This guide will teach you how to create vents. These vents are mainly used for lighting.
Vents
Inside

Create 2 48w*16l*40h brushes with the nodraw texture.
Create 2 48w*40l*16h brushes with the nodraw texture.
Create 1 16w*40l*40h brush with the nodraw texture.
Texture the back with the light_orange001.
Texture the sides with metalwall_bts_006b_gradient.
Use the Face Edit Sheet to align the textures.
Surrounding

Create 2 4w*2l*40h brushes with the nodraw texture.
Create 2 4w*36l*2h brushes with the nodraw texture.
Texture the front faces of the vents with metalvent001a.
Select the front visible faces and open the Face Edit Sheet and enter the following properties:
Texture scale:
- X:
0.15 - Y:
0.15
Texture shift:
- X:
-7 - Y:
5
Select the top and bottom faces of the center faces, enter the following properties:
Texture shift:
- Y:
64 - Rotation:
180
Grating
Create a 4w*36l*4h brush with the nodraw texture.
Position this brush right below the top surrounding.
Use the Clipping Tool to cut the brush as seen in the image.
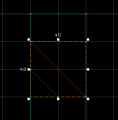
Grate cut

Select the front face and set its texture to metalvent001a and enter the following properties with the Face Edit Sheet:
Texture scale:
- X:
0.15 - Y:
0.15
Texture shift:
- X:
-4 - Y:
219
Make sure the face's alignment is set to World.
Set the bottom face's texture to metalvent001a.
Select the back slope face. Set its texture to metalvent001a and enter the following properties with the Face Edit Sheet:
Texture shift:
- X:
8 - Y:
192
Make sure the face's alignment is set to World.
Copy and paste the brush 5 times as seen in the image, moving the brush 6 units down each time. Make sure Texture Lock is enabled.
Grating

Select both the Surrounding and the Grating and tie them to a func_detail
Lights
Create a light_spot entity and enter the following properties:
| Property Name | Value |
|---|---|
| Pitch Yaw Roll | -22.5 0 0 |
| Brightness | 242 91 0 800 |
| BrightnessScaleHDR | .5 |
| Constant | 200000 |
| Inner (bright) angle | 15 |
| Outer (fading) angle | 30 |
| Pitch | -22.5 |
The vent lights in Portal don't have a specific angle or position. However, it is safe to keep the lights near the orange texture face and you can modify the light to point in a specific direction (only slightly).
Create another light_spot and enter the following properties
| Property Name | Value |
|---|---|
| Pitch Yaw Roll | -15 0 0 |
| Brightness | 242 91 0 150 |
| BrightnessScaleHDR | .5 |
| Constant | 200000 |
| Inner (bright) angle | 1 |
| Outer (fading) angle | 60 |
| Pitch | -15 |
Place this light as seen in the image
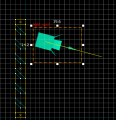
Optional Light Source

Implementation
Assuming you build your maps in 16 units wide, put the inside of the vent just outside of the brushes. Cut a hole using the clipping tool (make sure the hole is center with the texture) and place the vent in the whole.
Fill in the nodraw spaces and you have a vent.
Skinnier Vents

Skinnier vents seen in testchmb_a_15