SteamVR/Environments/Fog Tutorial: Difference between revisions
Redspike474 (talk | contribs) (First submission of SteamVR Home fog tutorial) |
m (Setting bug notice hidetested=1 param on page where the bug might not need tested in param specified) |
||
| (11 intermediate revisions by 6 users not shown) | |||
| Line 1: | Line 1: | ||
{{lang|title=Fog Tutorial|SteamVR/Environments/Fog Tutorial}} | |||
= Adding Fog to your Environments = | = Adding Fog to your Environments = | ||
[[ | [[File:Fog_first.png|thumb|256px|right|These miniature Pyros look menacing in the foggy environment.]] | ||
SteamVR Home introduces a new fog entity called <code>env_gradient_fog</code>, this entity can be utilised to create different types of fog effects. It's a pretty fancy system allowing dense ground-hugging fog with super-subtle changes in colour or density. | |||
To see | To see examples of this entity in action and used effectively, take a look at the main SteamVR Home map or at the [https://steamcommunity.com/sharedfiles/filedetails/?id=1128953611 Boxing Ring] environment. | ||
In this tutorial we will teach you how to author fog textures and add fog to your pre existing maps as well as a detailed breakdown of this | In this tutorial we will teach you how to author fog textures and add fog to your pre-existing maps as well as provide a detailed breakdown of this entity's workings. | ||
{{Tip|This tutorial assumes you already know the basics of using | {{Tip|This tutorial assumes you already know the basics of using Hammer and have already created a map in which you wish to add fog. For a beginner's introduction to level design and the SteamVR Home tools click [[SteamVR/Environments/Environment Tutorial: Hammer and Basic Lighting|here]]. }} | ||
{{Tip|Old habits die hard and | {{Tip|Old habits die hard and Source 1 veterans may be inclined to try older fog entities such as <code>env_fog_controller</code>, however these are not supported in SteamVR Home.}} | ||
{{bug| | {{bug|hidetested=1|If you delete an <code>env_gradient_fog</code> entity from your map after lighting has been baked and the map has been built, the renderer will believe there is still fog - resulting in the classic pink error texture in place of the fog texture. Closing Hammer and re-opening the map should fix this issue.}} | ||
{{clr}} | {{clr}} | ||
{{clr}} | {{clr}} | ||
== Env_Gradient_Fog Texture Guidelines == | == Env_Gradient_Fog Texture Guidelines == | ||
The env_gradient_fog entity is primarily controlled by a gradient texture, this | The <code>env_gradient_fog</code> entity is primarily controlled by a gradient texture, this texture's dimensions should be equal to powers of two and the texture should also contain an alpha channel. | ||
Suggested Image formats are | |||
At first glance | Suggested Image formats are PNG, PSD or TGA. | ||
At first glance, authoring gradient fog textures may seem like a complicated and daunting process, but really once you come to understand how they work it's a pretty straightforward affair. | |||
<div align="center"> | <div align="center"> | ||
<gallery mode="traditional" widths= | <gallery mode="traditional" widths=400px heights=300px> | ||
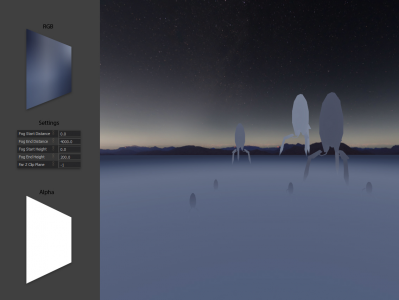
Image:Fog_tut_example1.png|Example env_gradient_fog setup showing opaque fog. | Image:Fog_tut_example1.png|Example <code>env_gradient_fog</code> setup showing opaque fog. Colour is changing depending on distance and height, but since the fog texture is completely opaque, there is no variation in opacity. Note that the skybox texture is unaffected by the fog - for realistic environments using skyboxes, make sure that the skybox and fog match each other visually. | ||
Image:Fog_tut_example2.png|Example env_gradient_fog setup showing varying fog opacity. | Image:Fog_tut_example2.png|Example <code>env_gradient_fog</code> setup showing varying fog opacity. | ||
</gallery> | </gallery> | ||
</div> | </div> | ||
{{clr}} | |||
== | == Distance and Height == | ||
The gradient fog texture acts as a two-dimensional reference for both distance and height. Left to right in the texture controls the fog's appearance over horizontal distances, while up and down controls the appearance over height, allowing you to create fog that has the illusion of variable properties as you ascend or descend through it. | |||
The | The distance is controlled by specifying a start and end distance of the fog in the <code>env_gradient fog</code> entity, with these given in world units. The player's eyes are always at a distance of zero - distance fog can never be outrun, it being mapped relative to your eye position. Consider the distance fog as a series of cylinders centred on the player's eyes, moving as the player moves. Thus you can never leave the fog as you would be able to in a volumetric solution. Note that it's not possible to specify different values for different horizontal directions - fog can't be dark one way and bright another. | ||
This is an extremely versatile system that allows for subtle or drastic changes in your fog’s | |||
{{Tip| While it is advised to use smooth gradients to illustrate | The fog values are clamped at the left hand side of the texture until it reaches the fog's start distance, at which point it blends over to the rightmost side of the texture at the fog's end distance. After this distance, fog values are clamped at that rightmost value. A good way to understand the blending is to visualise your fog texture being stretched from the start value to the end value. | ||
Whilst left to right controls | |||
Conversely, height fog is fixed to the world, being mapped to the world rather than the player's eye position. Those cylinders mentioned earlier - they'll move horizontally relative to the player, but not up and down. This means you can climb out or move above a layer of fog, this functionality being particularly useful if you want low hanging fog in specific areas. The start and end heights are again specified in world units in the <code>env_gradient_fog</code> entity, with the bottom of the texture corresponding to the start height and the top of the texture being the end height. These values do ''not'' move with the player - If your floor was at -64 units, you could give -64 units for the Fog Start Height here, and floor-hugging fog will stay close to the floor. Anything below or above these distances gets clamped to the appropriate values. | |||
{{Note|Fog doesn’t integrate through volumes, it's simply a system that changes the colour of rendered pixels according to a two-dimensional lookup texture. In other words, a waist-high band of fog will only make parts of objects drawn at that height that colour, rather than produce a visible layer of haze above the ground - the fog itself has no actual physical presence in the world. You may wish to combine this fog with particle systems to add visible dust clouds, smoke and similar.}} | |||
== The Colour of your Fog == | |||
[[File:Fog_tut_second.png|thumb|256px|right|Example RGB channels from a env_gradient_fog texture.]] | |||
The colour in the RGB channels of your texture dictate the distribution of fog colour over distance and height. This is an extremely versatile system that allows for subtle or drastic changes in your fog’s colour to match the artistic needs of your level. Changing fog colour over distance can be used as an effective tool to illustrate the depth of your scene and add atmosphere. | |||
{{Tip| While it is advised to use smooth gradients to illustrate colour, this is not enforced, try experimenting with sharper fall offs to create alien like fog systems and otherworldly effects.}} | |||
Whilst left to right controls colour over distance, up and down controls the colour over height allowing you to create fog that has the illusion of variable properties as you ascend through it. | |||
{{clr}} | |||
== Thickness, Opacity or Density of your Fog == | == Thickness, Opacity or Density of your Fog == | ||
[[ | [[File:Fog_tut_third.png|thumb|256px|right|Example Alpha channel from a env_gradient_fog texture.]] | ||
Currently we have covered how to create a texture that changes the | Currently we have covered how to create a texture that changes the colour of your fog, but you're probably wondering how to change the opacity or “thickness” of your fog. Well, it's as easy as authoring the colour, except fog opacity is stored in the alpha channel of your texture and not in the RGB channels. | ||
Left to right indicates the fog opacity over distance, and up and down fog opacity over height. | |||
Left to right indicates the fog opacity over distance, and up and down the fog opacity over height. Black represents 0 (fully transparent), and white represents 1 (fully opaque), creating a gradient between the two allows you to have gradual changes in the fogs opacity. | |||
{{Tip| More trivia than a tip | {{Tip|More trivia than a tip; in previous versions of Source 2, gradient fog textures were authored slightly differently and did not incorporate height fog into the texture. As of SteamVR Home this has changed to incorporate both height and distance fog into a single texture. }} | ||
{{bug| The texture “materials/effects/example_gradient_fog.vtex” was created before the change to the gradient fog system that allowed for height fog to be incorporated into the texture, and as such only provides an example of distance fog.}} | {{bug|hidetested=1|The default texture “materials/effects/example_gradient_fog.vtex” was created before the change to the gradient fog system that allowed for height fog to be incorporated into the texture, and as such only provides an example of distance fog.}} | ||
{{clr}} | |||
== Creating a VTEX == | == Creating a VTEX == | ||
Once you have created your texture make sure you save it to your | Once you have created your texture make sure you save it to your addon's content folder, we suggest saving it to “materials/effects/”, this is not essential but it's a good idea for organisational purposes. | ||
Next you must create a | |||
A | Next you must create a [[VTEX (Source 2)|VTEX]] file to point at your newly created texture, a VTEX being SteamVR Home's texture definition format. This is a requirement for the engine's resource compiler, the tool that takes raw textures and converts them into the engine’s optimised compiled format. A VTEX is a DME format text file that is essentially a description for the resource compiler, telling it how to process the textures according to your settings. | ||
Click here to find an example | |||
Save your | Click [[SteamVR/Environments/Fog Tutorial VTEX|here]] to find an example VTEX file that is setup to be used with a fog texture. Using a text editor, change the filename in <code>m_fileName</code> to correspond with your fog texture. | ||
Save your VTEX in the same location as your gradient fog texture. While running, the SteamVR Home tools will automatically detect this file and compile your texture. | |||
{{clr}} | |||
== Placing an env_gradient_fog entity in your map == | == Placing an env_gradient_fog entity in your map == | ||
[[ | [[File:Fog_tut_fourth.png|thumb|256px|right|Selecting the env_gradient_fog entity.]] | ||
Follow these instructions to setup the fog entity in your map | Follow these instructions to setup the fog entity in your map: | ||
* In Hammer select the entity tool located on the left panel or Shift-E. | * In Hammer select the entity tool located on the left panel or Shift-E. | ||
* In the Tool properties panel change the entity class to env_gradient_fog. | * In the Tool properties panel change the entity class to <code>env_gradient_fog</code>. | ||
* Left click in your scene to place this entity. | * Left click in your scene to place this entity. | ||
* Now return to the selection tool Shift-S and select your newly created fog entity. | * Now return to the selection tool Shift-S and select your newly created fog entity. | ||
* In the Object Properties panel on the right, assign start and end distances for both your distance and height fog. | * In the Object Properties panel on the right, assign start and end distances for both your distance and height fog. | ||
* Whilst in the Object Properties panel make sure to also assign your newly authored gradient fog texture. | * Whilst in the Object Properties panel make sure to also assign your newly authored gradient fog texture. | ||
Changes to this entity will update in real time in | |||
You should now have everything required to have fog appear in your level, build your map | Changes to this entity will update in real time in Hammer’s 3D viewports. | ||
== Example | You should now have everything required to have fog appear in your level, so build your map, then take a look at what your fog looks like in VR and marvel at its foggy splendour. | ||
To help you get to grips with this system we | {{clr}} | ||
{{Tip| The example content is only a basic example designed to help you get started, | == Example Materials == | ||
< | |||
< | To help you get to grips with this system, we will be including an example map that comes in two different variants, the first shows how fog can be setup effectively in a scene, the second is designed as a visual companion to the explanation found earlier in this article. | ||
Credit and thanks to Adam Foster (CargoCult) for originally explaining this | Some basic props are also included as part of the demo scene, you are free to use these in your own levels. | ||
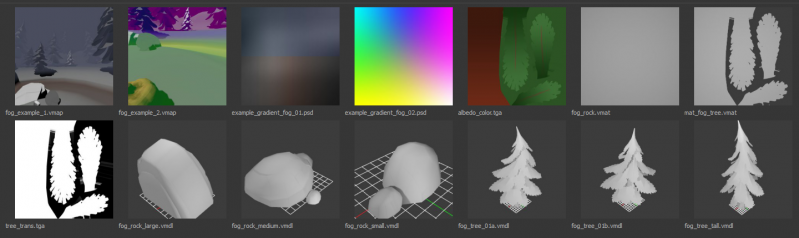
The image below shows a preview of the example content. | |||
{{Tip| The example content is only a basic example designed to help you get started, you're advised to spend time crafting level specific fog textures for your own maps. }} | |||
{{clr}} | |||
<p style="margin:1em auto 0; text-align:center; width:450;">[[File:Fog_example_content.png|link=]]</p> | |||
{{clr}} | |||
Credit and thanks to Adam Foster (CargoCult) for originally explaining this entity's functionality [http://steamcommunity.com/workshop/discussions/18446744073709551615/1482109512320448632/?appid=250820/ here] on the SteamVR Home discussion boards. | |||
[[Category:SteamVR]][[Category:SteamVR Home]] | |||
Latest revision as of 07:17, 20 May 2025
Adding Fog to your Environments

SteamVR Home introduces a new fog entity called env_gradient_fog, this entity can be utilised to create different types of fog effects. It's a pretty fancy system allowing dense ground-hugging fog with super-subtle changes in colour or density.
To see examples of this entity in action and used effectively, take a look at the main SteamVR Home map or at the Boxing Ring environment.
In this tutorial we will teach you how to author fog textures and add fog to your pre-existing maps as well as provide a detailed breakdown of this entity's workings.
env_fog_controller, however these are not supported in SteamVR Home.env_gradient_fog entity from your map after lighting has been baked and the map has been built, the renderer will believe there is still fog - resulting in the classic pink error texture in place of the fog texture. Closing Hammer and re-opening the map should fix this issue.Env_Gradient_Fog Texture Guidelines
The env_gradient_fog entity is primarily controlled by a gradient texture, this texture's dimensions should be equal to powers of two and the texture should also contain an alpha channel.
Suggested Image formats are PNG, PSD or TGA.
At first glance, authoring gradient fog textures may seem like a complicated and daunting process, but really once you come to understand how they work it's a pretty straightforward affair.
Example
env_gradient_fogsetup showing opaque fog. Colour is changing depending on distance and height, but since the fog texture is completely opaque, there is no variation in opacity. Note that the skybox texture is unaffected by the fog - for realistic environments using skyboxes, make sure that the skybox and fog match each other visually.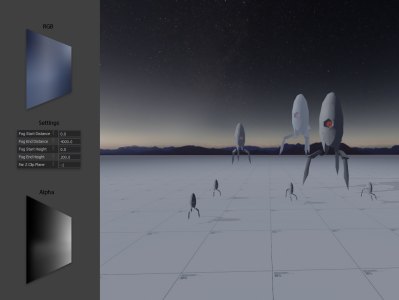
Example
env_gradient_fogsetup showing varying fog opacity.


Distance and Height
The gradient fog texture acts as a two-dimensional reference for both distance and height. Left to right in the texture controls the fog's appearance over horizontal distances, while up and down controls the appearance over height, allowing you to create fog that has the illusion of variable properties as you ascend or descend through it.
The distance is controlled by specifying a start and end distance of the fog in the env_gradient fog entity, with these given in world units. The player's eyes are always at a distance of zero - distance fog can never be outrun, it being mapped relative to your eye position. Consider the distance fog as a series of cylinders centred on the player's eyes, moving as the player moves. Thus you can never leave the fog as you would be able to in a volumetric solution. Note that it's not possible to specify different values for different horizontal directions - fog can't be dark one way and bright another.
The fog values are clamped at the left hand side of the texture until it reaches the fog's start distance, at which point it blends over to the rightmost side of the texture at the fog's end distance. After this distance, fog values are clamped at that rightmost value. A good way to understand the blending is to visualise your fog texture being stretched from the start value to the end value.
Conversely, height fog is fixed to the world, being mapped to the world rather than the player's eye position. Those cylinders mentioned earlier - they'll move horizontally relative to the player, but not up and down. This means you can climb out or move above a layer of fog, this functionality being particularly useful if you want low hanging fog in specific areas. The start and end heights are again specified in world units in the env_gradient_fog entity, with the bottom of the texture corresponding to the start height and the top of the texture being the end height. These values do not move with the player - If your floor was at -64 units, you could give -64 units for the Fog Start Height here, and floor-hugging fog will stay close to the floor. Anything below or above these distances gets clamped to the appropriate values.
The Colour of your Fog

The colour in the RGB channels of your texture dictate the distribution of fog colour over distance and height. This is an extremely versatile system that allows for subtle or drastic changes in your fog’s colour to match the artistic needs of your level. Changing fog colour over distance can be used as an effective tool to illustrate the depth of your scene and add atmosphere.
Whilst left to right controls colour over distance, up and down controls the colour over height allowing you to create fog that has the illusion of variable properties as you ascend through it.
Thickness, Opacity or Density of your Fog

Currently we have covered how to create a texture that changes the colour of your fog, but you're probably wondering how to change the opacity or “thickness” of your fog. Well, it's as easy as authoring the colour, except fog opacity is stored in the alpha channel of your texture and not in the RGB channels.
Left to right indicates the fog opacity over distance, and up and down the fog opacity over height. Black represents 0 (fully transparent), and white represents 1 (fully opaque), creating a gradient between the two allows you to have gradual changes in the fogs opacity.
Creating a VTEX
Once you have created your texture make sure you save it to your addon's content folder, we suggest saving it to “materials/effects/”, this is not essential but it's a good idea for organisational purposes.
Next you must create a VTEX file to point at your newly created texture, a VTEX being SteamVR Home's texture definition format. This is a requirement for the engine's resource compiler, the tool that takes raw textures and converts them into the engine’s optimised compiled format. A VTEX is a DME format text file that is essentially a description for the resource compiler, telling it how to process the textures according to your settings.
Click here to find an example VTEX file that is setup to be used with a fog texture. Using a text editor, change the filename in m_fileName to correspond with your fog texture.
Save your VTEX in the same location as your gradient fog texture. While running, the SteamVR Home tools will automatically detect this file and compile your texture.
Placing an env_gradient_fog entity in your map

Follow these instructions to setup the fog entity in your map:
- In Hammer select the entity tool located on the left panel or Shift-E.
- In the Tool properties panel change the entity class to
env_gradient_fog. - Left click in your scene to place this entity.
- Now return to the selection tool Shift-S and select your newly created fog entity.
- In the Object Properties panel on the right, assign start and end distances for both your distance and height fog.
- Whilst in the Object Properties panel make sure to also assign your newly authored gradient fog texture.
Changes to this entity will update in real time in Hammer’s 3D viewports.
You should now have everything required to have fog appear in your level, so build your map, then take a look at what your fog looks like in VR and marvel at its foggy splendour.
Example Materials
To help you get to grips with this system, we will be including an example map that comes in two different variants, the first shows how fog can be setup effectively in a scene, the second is designed as a visual companion to the explanation found earlier in this article. Some basic props are also included as part of the demo scene, you are free to use these in your own levels. The image below shows a preview of the example content.
Credit and thanks to Adam Foster (CargoCult) for originally explaining this entity's functionality here on the SteamVR Home discussion boards.