This article's documentation is for anything that uses the Source engine. Click here for more information.

Source VMT Editor: Difference between revisions

From Valve Developer Community
Jump to navigation Jump to search
m (→‎See also: Unicodifying, replaced: See Also → See also)
 
(39 intermediate revisions by 5 users not shown)
Line 1: Line 1:
{{cleanup}}
{{Source topicon}}
{{stub}}
== Overview ==
The Material Editor is an engine tool available in Source 2007 and later. This tool allows you to edit VMT properties while in-game with via a simplified interface that is both user friendly and real time. This heavily simplifies the material editing process as well. Previously users would have to edit the vmt outside of the engine, then go back in-game and reload all materials, or the current vmt. To use it, run your game or mod with -tools -nop4 on the command line and select 'Material Editor' from the Tools menu. This tool is used to edit the material properties with the added advantage of a preview.


{{Distinguish|VMT Editor}}


{{Note|This editor supports custom shaders, including ones from the [[:Source_shader_editor|Source Shader Editor]] !}}
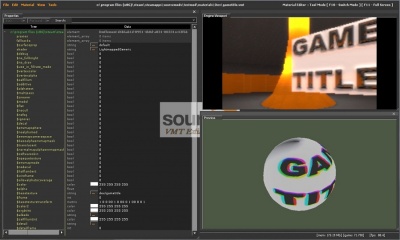
[[File:MaterialEditor.jpg|thumb|400px|right|The VMT Editor]]


{{Note| Make sure that sv_lan is set to 1 in the console located in the lower-left corner (sv_lan 1) if your game is MP based.}}
The '''VMT Editor''' is an [[:Engine tools|engine tool]] originally released with the {{src07|2}} engine branch. This tool allows you to edit [[VMT]] properties while in-game with via a simplified interface that is both user friendly and real time. This heavily simplifies the material editing process as well. Previously users would need to edit the VMT outside of the engine, then go back in-game and reload all materials, or the current vmt. To use it, run your game or mod with {{Code|[[-tools]] [[-nop4]]}} on the command line and select '''Material Editor''' from the Tools menu. This tool is used to edit the material properties with the added advantage of faster, more robust interface than the typical text editor.
{{Warning|you need to use the command: "toolload vmt" in console for {{as}}[[Alien Swarm]] to load}}


== Interface ==
{{Note|This editor supports custom shaders, including ones from the [[:Source_shader_editor|Source Shader Editor]]!}}
[[File:MaterialEditor.jpg]]


The first window on the left is the properties window. On the lower right is the preview window, and bove that is the engine viewport.  
{{Note| Make sure that {{Command|sv_lan}} is set to 1 in the console located in the lower-left corner ({{Command|sv_lan|1}}) if your game is MP based.}}


{{clr}}


'''File'''
== See also ==
* [[:Category:VMT Editor|VMT Editor Documentation]]
* [[Material]]


[[File:MaterialEditor FileMenu.jpg]]
[[Category:Engine Tools]]
{{Note|The file menu is pretty self explanitory}}
*'''Open...'''   
*'''Save'''
*'''Save As...'''
*'''Close'''
*'''Recent'''
*'''Clear Recent'''
*'''Exit'''


[[Category:VMT Editor]]
 
'''Edit'''
 
[[File:MaterialEditor EditMenu.jpg]]
*'''Undo'''
 
Shortcut keys {{key|Ctrl}} + {{key|Z}}
 
*'''Redo'''
 
Shortcut keys {{key|Shift}} + {{key|Ctrl}} + {{key|Z}}
 
*'''Describe Undo History'''
{{Confirm|What does this do??}}
 
*'''Clear Undo History'''
 
*'''Keyboard'''
 
Shortcut keys {{key|Shift}} + {{key|Ctrl}} + {{key|Alt}} + {{key|E}}


'''Material'''
 
[[File:MaterialEditor MaterialMenu.jpg]]
*'''Set Params To Default'''
Resets the material parameters


'''View'''
 
[[File:MaterialEditor ViewMenu.jpg]]
*'''Properties'''
Shows the Properties Window If Checked
 
*'''Preview'''
Shows the Preview Window If Checked
 
*'''Show Flags'''
Shows the parameter flags If Checked
 
*'''Show Tool Parameters'''
Shows the tool parameters on the properties window If Checked
 
*'''Default Layout'''
Resets the layout to the defualt view


'''Using the Preview Window'''
 
To use the preview window...
 
Left click to rotate
 
Right Click to zoom
 
Middle click to move
 
== To Create a new material ==
 
click file -> new , then begin editing
 
see [[Material]] for editing information


== Selecting Shaders ==
 
go to "shader" from the properties list and click [[File:EditorDotDotDot.jpg]]
 
the Select Shader window will appear
 
[[File:MaterialEditor Shader Select.jpg]]
 
select from the list or type in the name of the shader in the filter box
 
see [[:Category:List of Shaders|List of Shaders]]
 
 
''Ideally, you should pick one of these three.''
 
*[[LightmappedGeneric]] -> for world texturing
 
*[[VertexLitGeneric]] -> for model texturing
 
*[[UnlitGeneric]] -> for UI texturing
 
 
After your shader type is selected, the list of avalable parameters, for the selected shader, will update.
 
 
== Selecting textures ==
 
go to the $basetexture parameter and click [[File:EditorDotDotDot.jpg]].
 
the select VTF window will appear
 
[[File:MaterialEditor selectvtf.jpg]]
 
select the desired texture to be used in the material
 
 
== Selecting Colors ==
 
go to the $color parameter and click [[File:EditorColor.jpg]]
 
the Select Color window will appear
 
[[File:MaterialEditor selectcolor.jpg]]
 
adjust the settings  to get the desired color
 
the color box [[File:EditorColor.jpg]] will change to the selected color
 
 
== Shader Parameters ==
 
 
see [[:Category:List of Shader Parameters|List of Shader Parameters]] for more details
 
'''Data types'''
 
{{todo|add more information}}
 
*'''bool''' "short for boolean" in which 0 = false and 1 = true
*'''color''' <color255 + int>                (ex. 97 11 255 255)
*'''float''' "floating point" a decimal between 0 and 1 (ex. 0.75)
*'''int''' "short for integer"                (ex. 56)
*'''matrix''' "written in binary"            (ex. 1 0 0 0 0 1 0 0 0 0 1 0 0 0 0 1 )
*'''string''' "file path"                    (ex. brick\brickfloor001a.vtf) "name" (ex. VertexLitGeneric)
*'''vector2''' "two configureable values"    (ex. 23 45)
*'''vector3''' "three configureable values"  (ex. 23 45 37)
*'''vector4''' "four configureable values"    (ex. 23 45 37 89)
 
 
{{todo|Finish Tutorial}}
 
== Loading a material ==
 
{{note|Complex material designs can and may crash the editor when loading}}
{{warning|Do not load material vmts outside of the loaded mod or game directory, the associated vtf files may not load as a result}} 
 
click file -> Open..., find the file located in the mod or game directory loaded


== Saving a material ==
 
{{note|Somtimes settings may not stick, this could be due to not having valid configurations}}
{{warning|Do not save material vmts outside of the loaded mod or game directory, the material '''will not''' load as a result}}
 
click file -> save as..., give the material a name, and save in the mod or game directory loaded


== See Also ==
*[[Material]]
*[[Valve Texture Format]]
*[[Engine tools]]
 
[[Category:Tools]]

Latest revision as of 13:09, 8 January 2024

Not to be confused with VMT Editor.
The VMT Editor

The VMT Editor is an engine tool originally released with the Source 2007 Source 2007 engine branch. This tool allows you to edit VMT properties while in-game with via a simplified interface that is both user friendly and real time. This heavily simplifies the material editing process as well. Previously users would need to edit the VMT outside of the engine, then go back in-game and reload all materials, or the current vmt. To use it, run your game or mod with -tools -nop4 on the command line and select Material Editor from the Tools menu. This tool is used to edit the material properties with the added advantage of faster, more robust interface than the typical text editor.

Note.pngNote:This editor supports custom shaders, including ones from the Source Shader Editor!
Note.pngNote: Make sure that sv_lan is set to 1 in the console located in the lower-left corner (sv_lan 1) if your game is MP based.
See also