Swarm Placing Doors: Difference between revisions
(Removed redundant doorframe information and seamlessly added keypad triggering into the first section.) |
Thunder4ik (talk | contribs) m (Unicodifying, replaced: [[Image: → [[File: (5)) |
||
| (5 intermediate revisions by 2 users not shown) | |||
| Line 3: | Line 3: | ||
== Setting Up a Basic Door == | == Setting Up a Basic Door == | ||
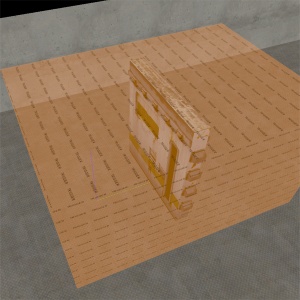
[[ | [[File:Swarm_MappingDoor.jpg|thumb|The asw_door entity and its associated trigger brush.]] | ||
For this example, our door will be represented by the stock ingame mesh - as it allows for alternate skins and animations to represent denting and damaging by the players or the Swarm. In addition, to allow the door to function properly ingame, the asw_door must be complemented by a trigger which allows it to open automatically when approached by a player. First, we will place the asw_door and set its visual appearance in the game. There are several door models within the game that have proper animations, but for our purposes we will be using doorleft.mdl. | For this example, our door will be represented by the stock ingame mesh - as it allows for alternate skins and animations to represent denting and damaging by the players or the Swarm. In addition, to allow the door to function properly ingame, the asw_door must be complemented by a trigger which allows it to open automatically when approached by a player. First, we will place the asw_door and set its visual appearance in the game. There are several door models within the game that have proper animations, but for our purposes we will be using doorleft.mdl. | ||
| Line 13: | Line 13: | ||
| Name || door_1 | | Name || door_1 | ||
|- | |- | ||
| World Model || models/props/doors/ | | World Model || models/props/doors/heavy_doors/doorleft.mdl | ||
|- | |- | ||
|} | |} | ||
| Line 34: | Line 34: | ||
=== Adding a Keypad === | === Adding a Keypad === | ||
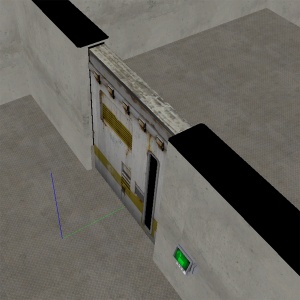
[[ | [[File:Swarm_MappingDoorframe.jpg|thumb|The door from the previous section, accompanied by a dynamic keypad model.]] | ||
You may have noticed that the majority of the doors in the original Valve campaign have a keypad embedded into the doorframe. These may serve as an added visual clue to approaching players as to whether or not a door is currently locked, and are regulated through a trigger_asw_button_area brush. | You may have noticed that the majority of the doors in the original Valve campaign have a keypad embedded into the doorframe. These may serve as an added visual clue to approaching players as to whether or not a door is currently locked, and are regulated through a trigger_asw_button_area brush. | ||
| Line 63: | Line 63: | ||
== Types of Doors == | == Types of Doors == | ||
=== | === Locked === | ||
Other doors players might come across in Alien Swarm are locked doors. In order to be opened, they require a tech to hack the panel next to them. Locked doors only require a few changes from the basic auto opening door. | |||
{{note|If it is required to enter a locked door to complete the level, an {{ent|asw_tech_marine_req}} should be placed in the level. This will require that at least one tech class to start the mission, and will end the mission if no tech players are alive.}} | |||
First, we need to make the door not open. This effectively "locks" the door until we allow it to open again. | |||
*{{ent|asw_door}} | |||
::{| class=standard-table | |||
!Property Name || Value | |||
|- | |||
| Auto Open || No | |||
|- | |||
|} | |||
Now we're going to make the panel locked. This will change its skin to red and make it hackable by tech marines. | |||
*{{ent|trigger_asw_button_area}} | |||
::{| class=standard-table | |||
!Property Name || Value | |||
|- | |||
| Locked || Yes | |||
|- | |||
|} | |||
Currently, hacking the panel won't allow the door to be opened. To link them, we need to set up an output to enable auto opening again. | |||
*{{ent|trigger_asw_button_area}} | |||
::{| class=standard-table | |||
! || My Output || Target Entity || Target Input || Parameter || Delay || Only Once | |||
|- | |||
| [[File:Io11.png]] || OnButtonHackCompleted || asw_door || EnableAutoOpen || 0 || 0.00 || No | |||
|} | |||
You now have a locked door. It won't open until a tech hacks the panel. After that it functions like a regular door. | |||
=== Sealed === | |||
Another door players might come across is an already welded door. They require the door welder to cut them open. After they are cut open they function as a regular door. Sealed doors are usually used for separate rooms with items and weapons inside. | |||
{{note|If it is required to pass through a welded door to complete the level, an {{ent| asw_pickup_welder}} should be placed near the door to allow players to get through the door, even if no one chose a door welder as a starting item.}} | |||
These doors require only a few changes to the basic auto opening door. First off, to get a common mistake out of the way, you need to make sure the trigger around the door is a [[trigger_asw_door_area]], '''not''' a [[trigger_asw_button_area]] (a keypad isn't needed for this kind of door). Secondly, you need to change Total Seal Time. This controls the total time in seconds it takes to seal the door with a welder. The default is 10 seconds, but you may want to change that to be shorter or longer. | |||
*{{ent|asw_door}} | |||
::{| class=standard-table | |||
!Property Name || Value | |||
|- | |||
| Total Seal Time || 10 | |||
|- | |||
|} | |||
The next step is to change Current Seal Time. this controls how much of the door is already welded, in seconds. Set it to your current Total Seal Time value unless you want the door to be partially welded. | |||
*{{ent|asw_door}} | |||
::{| class=standard-table | |||
!Property Name || Value | |||
|- | |||
| Current Seal Time || 10 | |||
|- | |||
|} | |||
You now have a sealed door. It won't open until a player with the door welder cuts it open. After that it functions like a regular door and can be welded again. | |||
=== Slow Locked === | === Slow Locked === | ||
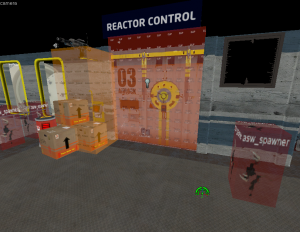
[[File:door_locked_slow.png]] | [[File:door_locked_slow.png|thumb|The slow door as seen in the Rydberg Reactor level.]] | ||
One last door players might come across are slow locked doors. They require a tech to hack them, but it is more difficult, and the door does not open immediately after the tech completes his hack. | |||
{{note|If it is required to enter a locked door to complete the level, an {{ent|asw_tech_marine_req}} should be placed in the level. This will require that at least one tech class to start the mission, and will end the mission if no tech players are alive.}} | |||
These doors require a few modifications to the basic auto opening door. The first thing we will do is delete the asw_door and the trigger_asw_door_area. We do not want the trigger_asw_door_area because the door stays permanently open after being hacked. We will replace the door with a prop_dynamic and a func_brush. | |||
*{{ent|prop_dynamic}} | |||
::{| class=standard-table | |||
!Property Name || Value | |||
|- | |||
| Name || Door | |||
|- | |||
| World Model || models/props/doors/slow_heavy_door/slow_heavy_door.mdl | |||
|} | |||
*{{ent|func_brush}} | |||
::{| class=standard-table | |||
!Property Name || Value | |||
|- | |||
| Name || Door_brush | |||
|} | |||
Next the asw_trigger_button_area needs to be updated to open this prop_dynamic door. | |||
*{{ent|trigger_asw_button_area}} | |||
::{| class=standard-table | |||
! || My Output || Target Entity || Target Input || Parameter || Delay || Only Once | |||
|- | |||
| [[File:Io11.png]] || OnButtonHackCompleted || door || SetAnimation || open || 0.00 || No | |||
|} | |||
However, the func_brush is still there. We want to disable it when the door is completely open. | |||
*{{ent|prop_dynamic}} | |||
::{| class=standard-table | |||
! || My Output || Target Entity || Target Input || Parameter || Delay || Only Once | |||
|- | |||
| [[File:Io11.png]] || OnAnimationDone || door_brush || disable || 0 || 0.00 || No | |||
|} | |||
The last optional step is to make the panel harder to hack. These are the settings found in example_map_1 | |||
*{{ent|trigger_asw_button_area}} | |||
::{| class=standard-table | |||
!Property Name || Value | |||
|- | |||
| Time to charge up || 25 | |||
|- | |||
| Num Wires || 3 | |||
|- | |||
| Wire Columns || 6 | |||
|- | |||
| Wire Rows || 3 | |||
|} | |||
== Door Properties == | == Door Properties == | ||
Latest revision as of 00:21, 7 January 2024
Doors in Alien Swarm are placed with the purpose of transitioning contrasts in atmosphere and/or gameplay across areas of a map. In the case of the Valve campaigns, they are also frequently employed as chokepoints during combat, both for the players and for the swarm. The need to destroy or unweld a locked door also serves as a miniature objective and "panic event" during maps, often triggering the appearance of parasites or a swarm of enemies whilst the players are occupied.
Setting Up a Basic Door
For this example, our door will be represented by the stock ingame mesh - as it allows for alternate skins and animations to represent denting and damaging by the players or the Swarm. In addition, to allow the door to function properly ingame, the asw_door must be complemented by a trigger which allows it to open automatically when approached by a player. First, we will place the asw_door and set its visual appearance in the game. There are several door models within the game that have proper animations, but for our purposes we will be using doorleft.mdl.
Property Name Value Name door_1 World Model models/props/doors/heavy_doors/doorleft.mdl
Using the block tool, make a brush for the door area, covering both sides of the door. This brush must have the texture tools/toolstrigger. Once the brush is placed, select Tools -> Tie to Entity (shortcut Ctrl + T) and select the class trigger_asw_door_area.
The trigger brush must target your door in order for it to open it when a player steps within the brush. Unlike doors in other Source games, Alien Swarm doors have their inputs and outputs hardcoded, so all you need to do is specify the name of the asw_door entity to be triggered, as such.
Property Name Value UseTarget door_1
That's the basics of a door. In-game your door will now open and slide to the side when a marine comes within range of the trigger brush. It can also be cut open and sealed with the welding tool.
Adding a Keypad
You may have noticed that the majority of the doors in the original Valve campaign have a keypad embedded into the doorframe. These may serve as an added visual clue to approaching players as to whether or not a door is currently locked, and are regulated through a trigger_asw_button_area brush.
First, the keypad itself - a prop_dynamic is used so that its skin may be readily changed.
Property Name Value World Model models/props/techdeco/buttonpanel/panel02.md Skin 2 Panel Prop name panel_1
The prop keypad may be named however you wish, just be sure that associated the trigger_asw_button_area targets both the proper asw_door and prop_dynamic.
Property Name Value UseTarget door_1 Panel Prop name panel_1
Types of Doors
Locked
Other doors players might come across in Alien Swarm are locked doors. In order to be opened, they require a tech to hack the panel next to them. Locked doors only require a few changes from the basic auto opening door.
First, we need to make the door not open. This effectively "locks" the door until we allow it to open again.
Property Name Value Auto Open No
Now we're going to make the panel locked. This will change its skin to red and make it hackable by tech marines.
Property Name Value Locked Yes
Currently, hacking the panel won't allow the door to be opened. To link them, we need to set up an output to enable auto opening again.
You now have a locked door. It won't open until a tech hacks the panel. After that it functions like a regular door.
Sealed
Another door players might come across is an already welded door. They require the door welder to cut them open. After they are cut open they function as a regular door. Sealed doors are usually used for separate rooms with items and weapons inside.
These doors require only a few changes to the basic auto opening door. First off, to get a common mistake out of the way, you need to make sure the trigger around the door is a trigger_asw_door_area, not a trigger_asw_button_area (a keypad isn't needed for this kind of door). Secondly, you need to change Total Seal Time. This controls the total time in seconds it takes to seal the door with a welder. The default is 10 seconds, but you may want to change that to be shorter or longer.
Property Name Value Total Seal Time 10
The next step is to change Current Seal Time. this controls how much of the door is already welded, in seconds. Set it to your current Total Seal Time value unless you want the door to be partially welded.
Property Name Value Current Seal Time 10
You now have a sealed door. It won't open until a player with the door welder cuts it open. After that it functions like a regular door and can be welded again.
Slow Locked
One last door players might come across are slow locked doors. They require a tech to hack them, but it is more difficult, and the door does not open immediately after the tech completes his hack.
These doors require a few modifications to the basic auto opening door. The first thing we will do is delete the asw_door and the trigger_asw_door_area. We do not want the trigger_asw_door_area because the door stays permanently open after being hacked. We will replace the door with a prop_dynamic and a func_brush.
Property Name Value Name Door World Model models/props/doors/slow_heavy_door/slow_heavy_door.mdl
Property Name Value Name Door_brush
Next the asw_trigger_button_area needs to be updated to open this prop_dynamic door.
However, the func_brush is still there. We want to disable it when the door is completely open.
The last optional step is to make the panel harder to hack. These are the settings found in example_map_1
Property Name Value Time to charge up 25 Num Wires 3 Wire Columns 6 Wire Rows 3
Door Properties
See the Asw door page for a list of door properties and their uses.
Door Area Flags
If you bring up the properties of your Trigger asw door area and go to the Flags tab, you can set which type of entity can trigger the Auto Open of the door. The two most relevant choices for AS:I are either "Marines and Aliens" or "Only Marines".
For consistency and background reasons, all but VERY high tech Auto Open doors should be left at the default ("Marines and Aliens").


