Manipulating the game menu items: Difference between revisions
No edit summary |
mNo edit summary |
||
| (20 intermediate revisions by 11 users not shown) | |||
| Line 1: | Line 1: | ||
[[Category:Tutorials]] [[Category: | {{lang|Manipulating the game menu items}} [[Category:Tutorials]] [[Category:Modding]] | ||
Once you have opened the <code>SteamApps | This tutorial will show you how to add new game menu items to the main HL2 game menu that will execute the console commands to hide and show the current FPS. Changing the game menu items of the HL2 GUI is as easy as changing the values in the <code>../SteamApps/SourceMods/YourMod/Resource/[[GameMenu]].res</code> using any [[text editor]]. If you have not started to create your own HL2 mod you will need to extract the GameMenu.res file from the <code>../SteamApps/source engine.gcf</code> group file using [[GCFScape]]. Look under <code>root/hl2/resource/GameMenu.res</code> to find the file. You will need to extract the GameMenu.res file into the <code>../SteamApps/<USERNAME>/half-life2/hl2/resource</code> folder. Or if you want to customize your own mod then extract the file to <code>../SteamApps/SourceMods/YourMod/Resource/GameMenu.res</code>. | ||
Once you have opened the <code>../SteamApps/SourceMods/YourMod/Resource/GameMenu.res</code> file scroll down to the bottom and add the following lines before the last curly bracket } at the end of the file ... | |||
<pre> | <pre> | ||
"14" | "14" | ||
| Line 13: | Line 15: | ||
"command" "engine cl_showfps 0" | "command" "engine cl_showfps 0" | ||
}</pre> | }</pre> | ||
{{note|To have a menu option show up only while in-game, use <code>"OnlyInGame" "1"</code>. To prevent a menu item showing up while in-game use, <code>"notmulti" "1"</code> and <code>"notsingle" "1"</code>.}} | |||
From the example above you can see that we have added 2 new label entries. The first entry "Show FPS" will set cl_showfps to 1 which will display the current FPS on the screen. The second entry will hide the current FPS. | From the example above you can see that we have added 2 new label entries. The first entry "Show FPS" will set cl_showfps to 1 which will display the current FPS on the screen. The second entry will hide the current FPS. | ||
| Line 18: | Line 22: | ||
---- | ---- | ||
You may also notice that the label for the quit item is "#GameUI_GameMenu_Quit". That is because it is a | You may also notice that the label for the quit item is "#GameUI_GameMenu_Quit". That is because it is a [[VGUI_Documentation#Localization|localized string]] in <code>../Resource/gameui_english.txt</code> . (A copy of <code>gameui_english.txt</code> can be found in the <code>../SteamApps/source engine.gcf</code> group file) You can also add your own strings in <code>gameui_english.txt</code> or <code>HL2_english.txt</code> and use them to label your game menu items. | ||
{{note|If you are making your own mod then you will need to make sure that you make a copy of <code>../Resource/HL2_english.txt</code> and rename it to <code>../Resource/NameOfYourMod_english.txt</code>. Otherwise Source will not be able to locate it.}} | |||
== Editing menu items with XBLAH's modding tool == | |||
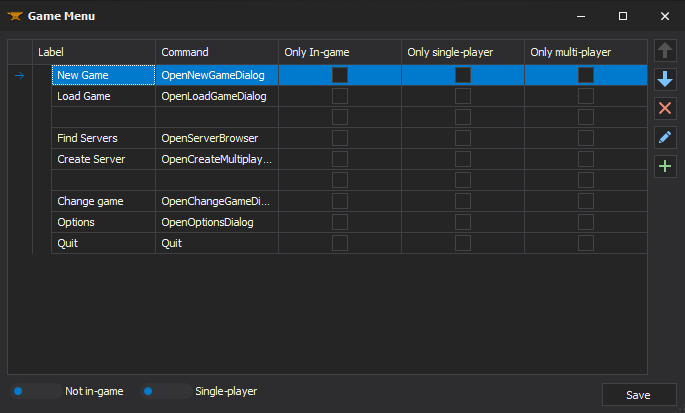
Main menu items can be added, modified or removed with {{Xblahmt|4}} based on a provided list of options. | |||
<br/><span style="color: #FFFFFF; font-weight: bold">Where to find it</span><br/> | |||
This can be accessed within the tool through '''Mod > Menu Items'''. | |||
<br/><span style="color: #FFFFFF; font-weight: bold">How to use it</span><br/> | |||
[[File:XBLAH's Modding Tool - Menu Items v1.17.png]] | |||
==== Add a menu item ==== | |||
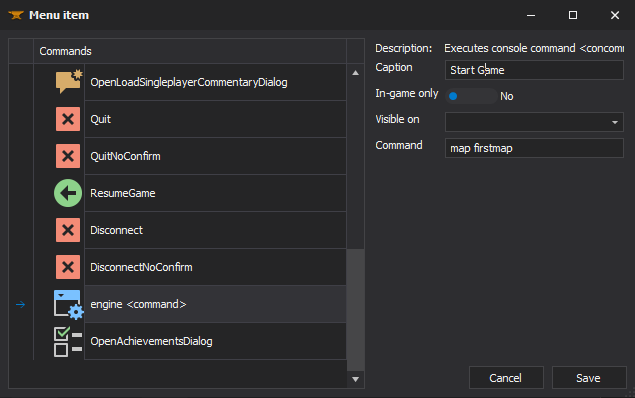
You can add a menu item by clicking on the [[File:XBLAH's Modding Tool - Add Button.png|Add button]] button, by selecting the command and choosing a caption. You can also choose whether it should only show when you have a map running. | |||
If you select the '''engine <command>''', you can set a command parameter that will be inserted and run through the console when the user clicks the menu item. | |||
You can select an '''Empty row''' to add spacing between menu items. | |||
==== Edit a menu item ==== | |||
You can edit a menu item by clicking the [[File:XBLAH's Modding Tool - Edit Button.png|Edit button]] button. | |||
==== Delete a menu item ==== | |||
You can delete a menu item by selecting the menu item and clicking the [[File:XBLAH's Modding Tool - Remove Button.png|Remove button]] button. | |||
[[File:XBLAH's Modding Tool - Add Menu Item v1.17.png]] | |||
== External links == | |||
*[https://modding-assets.net/source/tools/modding/xblah-modding-tool/ XBLAH's Modding Tool Homepage] | |||
Latest revision as of 08:40, 5 February 2023
This tutorial will show you how to add new game menu items to the main HL2 game menu that will execute the console commands to hide and show the current FPS. Changing the game menu items of the HL2 GUI is as easy as changing the values in the ../SteamApps/SourceMods/YourMod/Resource/GameMenu.res using any text editor. If you have not started to create your own HL2 mod you will need to extract the GameMenu.res file from the ../SteamApps/source engine.gcf group file using GCFScape. Look under root/hl2/resource/GameMenu.res to find the file. You will need to extract the GameMenu.res file into the ../SteamApps/<USERNAME>/half-life2/hl2/resource folder. Or if you want to customize your own mod then extract the file to ../SteamApps/SourceMods/YourMod/Resource/GameMenu.res.
Once you have opened the ../SteamApps/SourceMods/YourMod/Resource/GameMenu.res file scroll down to the bottom and add the following lines before the last curly bracket } at the end of the file ...
	"14"
	{
		"label" "Show FPS"
		"command" "engine cl_showfps 1"
	}
	"15"
	{
		"label" "Hide FPS"
		"command" "engine cl_showfps 0"
	}
"OnlyInGame" "1". To prevent a menu item showing up while in-game use, "notmulti" "1" and "notsingle" "1".From the example above you can see that we have added 2 new label entries. The first entry "Show FPS" will set cl_showfps to 1 which will display the current FPS on the screen. The second entry will hide the current FPS.
You may also notice that the label for the quit item is "#GameUI_GameMenu_Quit". That is because it is a localized string in ../Resource/gameui_english.txt . (A copy of gameui_english.txt can be found in the ../SteamApps/source engine.gcf group file) You can also add your own strings in gameui_english.txt or HL2_english.txt and use them to label your game menu items.
../Resource/HL2_english.txt and rename it to ../Resource/NameOfYourMod_english.txt. Otherwise Source will not be able to locate it.Main menu items can be added, modified or removed with ![]() XBLAH's Modding Tool based on a provided list of options.
XBLAH's Modding Tool based on a provided list of options.
Where to find it
This can be accessed within the tool through Mod > Menu Items.
How to use it
You can add a menu item by clicking on the ![]() button, by selecting the command and choosing a caption. You can also choose whether it should only show when you have a map running.
button, by selecting the command and choosing a caption. You can also choose whether it should only show when you have a map running.
If you select the engine <command>, you can set a command parameter that will be inserted and run through the console when the user clicks the menu item.
You can select an Empty row to add spacing between menu items.
You can edit a menu item by clicking the ![]() button.
button.
You can delete a menu item by selecting the menu item and clicking the ![]() button.
button.

