Goldsource to Source texture porting: Difference between revisions
(Convert those old wads to HL2) |
Thunder4ik (talk | contribs) m (Unicodifying, replaced: [[Image: → [[File: (7)) |
||
| (27 intermediate revisions by 7 users not shown) | |||
| Line 1: | Line 1: | ||
Let's say you have an old [[Half-Life]] map ported to the [[Source]] engine, but wanted to keep some of the textures as well. First of all you're going to need your custom [[WAD]] file. For this tutorial we will be using the <code>cstrike.wad</code> from [[Counter-Strike]]. | |||
What you need to do is to go to your hard drive and create an <code>HL1</code> directory somewhere. Then once inside it, make a new directory. This should be the mod's directory (for example: <code>cstrike</code> for counter-strike). Put your .wad file in that directory. For this tutorial it would be <code>C:\hl1\cstrike</code>. | |||
[[File:Tut135_1.jpg]] | |||
Now go to your <code>\sourcesdk\bin</code> directory. You will see the program <code>[[xwad]].exe</code>. Right click on it and click Create Shortcut. Take this shortcut and put it in your <code>\hl1\modname</code> directory; for our tutorial it would be <code>C:\hl1\cstrike</code>. | |||
[[File:Tut135_2.jpg]] | |||
[[File:Tut135_3.jpg]] | |||
Right click on that shortcut and go to <code>properties</code>. Under <code>Target</code> it should say something like: <code>C:\Program Files\Steam\SteamApps\<username>\sourcesdk\bin\xwad.exe</code>. We are going to need to add a string so that <code>xwad.exe</code> knows where to find our mod. So after the quotes add this: <code>-basedir C:\hl1\cstrike -wadfile C:\hl1\cstrike\cstrike.wad</code>. Hit apply, then ok. | |||
Before we go onto the next step you need to copy the <code>GameInfo.txt</code> from <code>\sourcesdk\launcher\</code> to your <code>C:\hl1\cstrike</code> directory. | |||
[[File:Tut135_4.jpg]] | |||
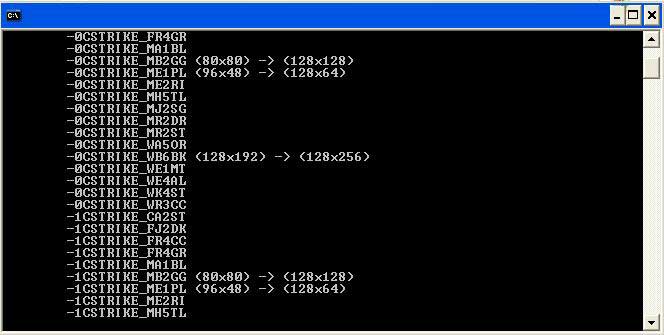
Now we are ready to convert your wad. Find your <code>C:\hl1\modname</code> folder. Click on the wad you want to convert and drag it to the <code>xwad.exe</code> shortcut we just made. It should take a few seconds and show the texture names it is converting and any changes in size it is making to the texture. | |||
[[File:Tut135_5.jpg]] | |||
After that is done you will have new <code>materials</code> and <code>materialsrc</code> directories in your <code>C:\hl1\modname</code> directory. You now need to compile your textures so that they will show up in game. What <code>xwad.exe</code> did for you is it converted all your textures to the appropriate size and save them as .[[TGA]]s and created .[[VMT]] files for those textures. Additionally {{mono|.resizeinfo}} files will be created for any non-power-of-two textures that have been resized. | |||
[[File:Tut135_6.jpg]] | |||
Now, let's run these textures through <code>vtex.exe</code>. First go to your <code>\counter-strike source\cstrike\materials</code> directory and create a new directory with your old wad's name. For this tutorial it would be <code>cstrike</code>. | |||
Then, go to your <code>\sourcesdk\bin</code> directory and find <code>vtex.exe</code>. Create a shortcut like before and put it in your <code>C:\hl1\modname</code> directory. After the <code>C:\Program Files\Steam\SteamApps\<username>\sourcesdk\bin\vtex.exe</code> you are going to add this <code>C:\hl1\yourmod\materialsrc\<wadname>\*.tga</code> (for this tutorial it will be <code>C:\hl1\cstrike\materialsrc\cstrike\*.tga</code>). | |||
This should create the .vtf's and place the compiled versions in <code>\counter-strike source\cstrike\materials\cstrike</code>. When the process finishes, copy all the other files located in <code>C:\hl1\cstrike\materials\cstrike</code> to your <code>\counter-strike source\cstrike\materials\cstrike</code> directory. | |||
Your custom textures will now load up in the [[Hammer]] and in game. | |||
==Applying converted textures to old maps== | |||
Now, open up Hammer to the mod you installed the textures under. | |||
Open the old .[[map (file format)|MAP]] or the .[[VMF]] (if you already converted the brushes). Navigate to <code>File</code> -> <code>Convert WAD to VMT...</code>. | |||
[[File:Tut135_7.jpg]] | |||
{{note|For advanced users, after the WAD file has been ran through <code>xwad.exe</code> you can modify the .vmt files (in the <code>materials</code> directory) so you can apply bump maps and or reflections.}} | |||
==See also== | |||
* [[Material Creation]] | |||
* [[Xwad]] | |||
* [[Porting GoldSrc content (maps, models, etc.) to Source]] | |||
* [[Porting GoldSrc content to Source]] | |||
* [[Goldsource to Source texture porting]] | |||
* [[User:SirYodaJedi/Porting_IdTech_3_maps_to_Source|Porting IdTech 3 Maps to Source (early WIP)]] | |||
[[Category:Material System]] | |||
[[Category:Tutorials]] | |||
[[Category:GoldSrc to Source]] | |||
Latest revision as of 09:44, 8 January 2024
Let's say you have an old Half-Life map ported to the Source engine, but wanted to keep some of the textures as well. First of all you're going to need your custom WAD file. For this tutorial we will be using the cstrike.wad from Counter-Strike.
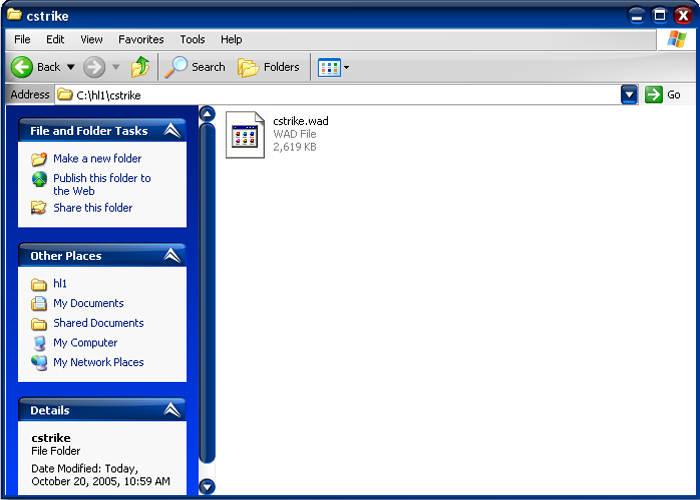
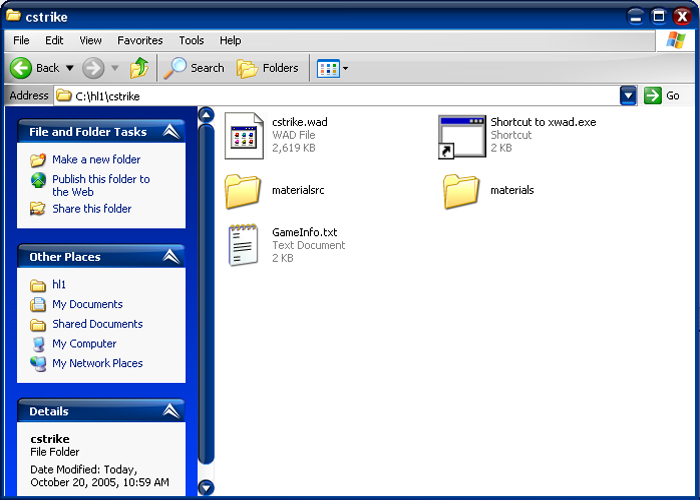
What you need to do is to go to your hard drive and create an HL1 directory somewhere. Then once inside it, make a new directory. This should be the mod's directory (for example: cstrike for counter-strike). Put your .wad file in that directory. For this tutorial it would be C:\hl1\cstrike.
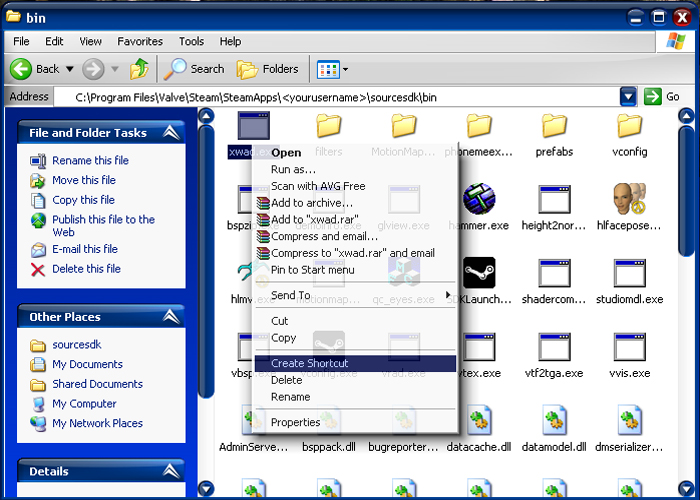
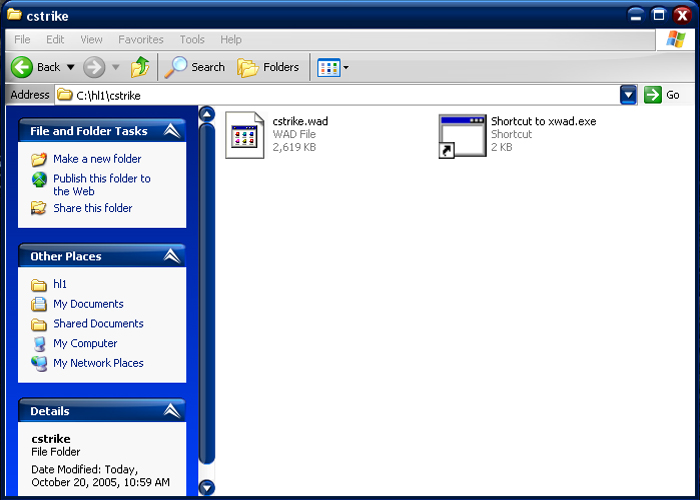
Now go to your \sourcesdk\bin directory. You will see the program xwad.exe. Right click on it and click Create Shortcut. Take this shortcut and put it in your \hl1\modname directory; for our tutorial it would be C:\hl1\cstrike.
Right click on that shortcut and go to properties. Under Target it should say something like: C:\Program Files\Steam\SteamApps\<username>\sourcesdk\bin\xwad.exe. We are going to need to add a string so that xwad.exe knows where to find our mod. So after the quotes add this: -basedir C:\hl1\cstrike -wadfile C:\hl1\cstrike\cstrike.wad. Hit apply, then ok.
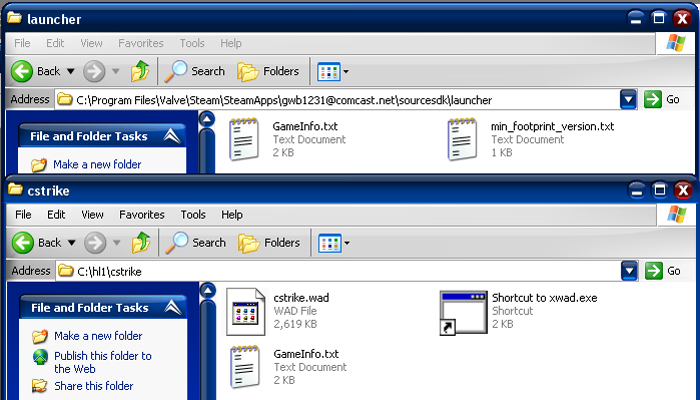
Before we go onto the next step you need to copy the GameInfo.txt from \sourcesdk\launcher\ to your C:\hl1\cstrike directory.
Now we are ready to convert your wad. Find your C:\hl1\modname folder. Click on the wad you want to convert and drag it to the xwad.exe shortcut we just made. It should take a few seconds and show the texture names it is converting and any changes in size it is making to the texture.
After that is done you will have new materials and materialsrc directories in your C:\hl1\modname directory. You now need to compile your textures so that they will show up in game. What xwad.exe did for you is it converted all your textures to the appropriate size and save them as .TGAs and created .VMT files for those textures. Additionally .resizeinfo files will be created for any non-power-of-two textures that have been resized.
Now, let's run these textures through vtex.exe. First go to your \counter-strike source\cstrike\materials directory and create a new directory with your old wad's name. For this tutorial it would be cstrike.
Then, go to your \sourcesdk\bin directory and find vtex.exe. Create a shortcut like before and put it in your C:\hl1\modname directory. After the C:\Program Files\Steam\SteamApps\<username>\sourcesdk\bin\vtex.exe you are going to add this C:\hl1\yourmod\materialsrc\<wadname>\*.tga (for this tutorial it will be C:\hl1\cstrike\materialsrc\cstrike\*.tga).
This should create the .vtf's and place the compiled versions in \counter-strike source\cstrike\materials\cstrike. When the process finishes, copy all the other files located in C:\hl1\cstrike\materials\cstrike to your \counter-strike source\cstrike\materials\cstrike directory.
Your custom textures will now load up in the Hammer and in game.
Applying converted textures to old maps
Now, open up Hammer to the mod you installed the textures under.
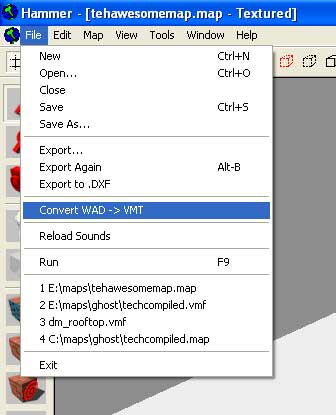
Open the old .MAP or the .VMF (if you already converted the brushes). Navigate to File -> Convert WAD to VMT....
xwad.exe you can modify the .vmt files (in the materials directory) so you can apply bump maps and or reflections.
