L4D Custom Music Tutorial: Difference between revisions
EvolvedAnt (talk | contribs) |
Thunder4ik (talk | contribs) m (→Example Tips: Unicodifying, replaced: [[IMage: → [[File: (3)) |
||
| (10 intermediate revisions by 5 users not shown) | |||
| Line 1: | Line 1: | ||
{{ | {{lang|{{PAGENAME}}}}{{L4D topicon}}{{Source topicon}}[[Category:Left 4 Dead]][[Category:Sound System]][[Category:Tutorials]] | ||
This tutorial will go over how to customize the Music Director for your campaign using the<code>mapname_level_sounds.txt</code>file. | |||
If you are planning on creating custom soundscripts as well, you should still follow this tutorial and append those scripts to the <code>level_sounds.txt</code>. | |||
There are 9 steps to this method of adding custom music to your campaign: | There are 9 steps to this method of adding custom music to your campaign: | ||
# Create a text file called <code>mapname_level_sounds.txt</code> in your add-on's maps directory. | |||
# Create a text file called | # Copy ALL the contents from the example soundscript into that file. | ||
# Copy ALL the contents from | # In the missions file of your add-on, find the NAME parameter and pick a short name that has no spaces. | ||
# In the missions file of your | # In notepad, press {{key|Ctrl|H}} to find and replace XXXXX with the same name you used in <code>missions.txt</code> NAME field. | ||
# In notepad, press | # Begin replacing any WAV files you choose in the script to reference your own files. (Do not include <code>sounds/</code> in the paths, it's assumed.) | ||
# Begin replacing any | # Load up ''Left 4 Dead'' and turn off all add-ons except the one you are working on. (Other campaigns' custom sounds may cause trouble if you don't.) | ||
# Load up Left 4 Dead and turn off all | # In the console, enter <code>snd_rebuildaudiocache</code> and wait about 5 mins for it to finish. | ||
# In the console, enter snd_rebuildaudiocache and wait about 5 mins for it to finish. | # Copy the _master.cache file from your<code>maps/soundcache</code>, place it in your add-on's <code>maps/soundcache</code> directory. | ||
# Copy the _master.cache file from your maps/soundcache, place it in your | # Package your campaign into a [[L4D Campaign Add-on Tutorial|VPK]] and test it out in-game. Your custom music should work! | ||
# | {{Note|You will need to repeat the <code>snd_rebuild</code> steps whenever you add new sound files.}} | ||
{{todo|This method seems to have a 50/50 chance of allowing users to hear your custom sounds without rebuilding their audio cache. It may be more beneficial to PAKRAT/BSPZIP the <code>_master.cache</code> file within the<code>.bsp</code>itself, thereby hiding the file from other people's add-ons, which would avoid sound conflicts and possibly force your custom soundcache to load instead of the default. This is untested, but it's worth a try.}} | |||
{{Note|You will need to repeat the snd_rebuild steps whenever you add new sound files.}} | |||
== Custom Music Script File == | == Custom Music Script File == | ||
This is the example soundscript you need to copy. | This is the example soundscript you need to copy. | ||
It is a stripped version of the game_sounds_music.txt to only include the Events you need to edit for your campaign. | It is a stripped version of the <code>game_sounds_music.txt</code> to only include the Events you need to edit for your campaign. | ||
It is highly | It is highly recommended allowing a greater insight into what each section is for when deciding on what to change. | ||
You may also opt not to change anything in the file, which will give your campaign the default music cues associated with the Airport campaign. | You may also opt not to change anything in the file, which will give your campaign the default music cues associated with the Airport campaign. | ||
http://www.evolvedant.com/soundscript/example_script.zip | http://www.evolvedant.com/soundscript/example_script.zip | ||
{{Note|There was a slight typo in the previous file. | {{Note|There was a slight typo in the previous file. If intro music wasn't working for you, redownload this file.}} | ||
== Example Tips == | == Example Tips == | ||
If your campaign is called "Awesome" and contains maps such as <code>l4d_awesome_forest</code>, <code>l4d_awesome_campsite</code>, etc… | |||
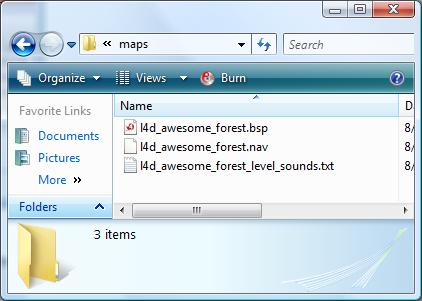
Your add-on's maps directory should contain <code>l4d_awesome_forest_level_sounds.txt</code>: | |||
[[File:L4dMapDir.jpg|center|500px]] | |||
[[ | |||
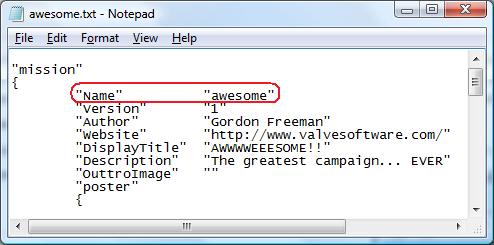
The NAME parameter in your <code>missions.txt</code> would be "awesome" and look like this: | |||
[[ | [[File:L4dmissions2.jpg|center|500px]] | ||
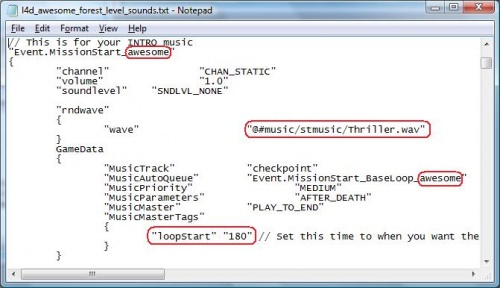
Here's how your sound script would look properly edited to make use of <code>thriller.wav</code>: | |||
[[ | [[File:L4dsoundscript.jpg|center|500px]] | ||
== See also == | == See also == | ||
* [[L4D Campaign Add-on Tutorial]] | * [[L4D Campaign Add-on Tutorial]] | ||
Latest revision as of 23:20, 6 January 2024
This tutorial will go over how to customize the Music Director for your campaign using themapname_level_sounds.txtfile.
If you are planning on creating custom soundscripts as well, you should still follow this tutorial and append those scripts to the level_sounds.txt.
There are 9 steps to this method of adding custom music to your campaign:
- Create a text file called
mapname_level_sounds.txtin your add-on's maps directory. - Copy ALL the contents from the example soundscript into that file.
- In the missions file of your add-on, find the NAME parameter and pick a short name that has no spaces.
- In notepad, press Ctrl+H to find and replace XXXXX with the same name you used in
missions.txtNAME field. - Begin replacing any WAV files you choose in the script to reference your own files. (Do not include
sounds/in the paths, it's assumed.) - Load up Left 4 Dead and turn off all add-ons except the one you are working on. (Other campaigns' custom sounds may cause trouble if you don't.)
- In the console, enter
snd_rebuildaudiocacheand wait about 5 mins for it to finish. - Copy the _master.cache file from your
maps/soundcache, place it in your add-on'smaps/soundcachedirectory. - Package your campaign into a VPK and test it out in-game. Your custom music should work!
snd_rebuild steps whenever you add new sound files._master.cache file within the.bspitself, thereby hiding the file from other people's add-ons, which would avoid sound conflicts and possibly force your custom soundcache to load instead of the default. This is untested, but it's worth a try.Custom Music Script File
This is the example soundscript you need to copy.
It is a stripped version of the game_sounds_music.txt to only include the Events you need to edit for your campaign.
It is highly recommended allowing a greater insight into what each section is for when deciding on what to change.
You may also opt not to change anything in the file, which will give your campaign the default music cues associated with the Airport campaign.
http://www.evolvedant.com/soundscript/example_script.zip
Example Tips
If your campaign is called "Awesome" and contains maps such as l4d_awesome_forest, l4d_awesome_campsite, etc…
Your add-on's maps directory should contain l4d_awesome_forest_level_sounds.txt:
The NAME parameter in your missions.txt would be "awesome" and look like this:
Here's how your sound script would look properly edited to make use of thriller.wav:


