Game directory
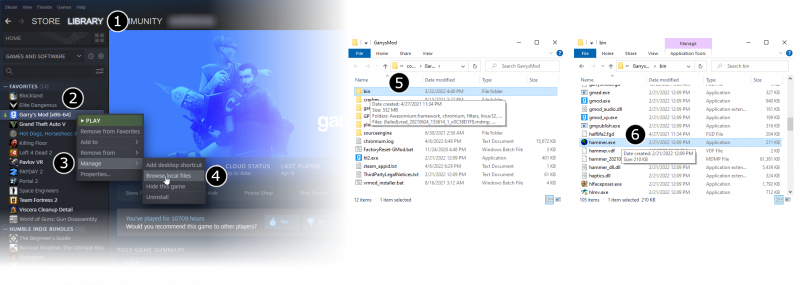
Setting up a proper game development environment is critically important when making MODs and content for the Source Engine. The most important aspect of the game environment is determining the location of the game directory. This document explains what the game directory is, and how it is used.
What is the game directory?
The game directory is the folder that the tools refer to when they are looking for a game's content. For example, the Hammer Editor needs to know where it can find your materials so it can display them. Studiomdl will compile a model, but it needs to know where to place the compiled model files. Vrad.exe will light a map, but it needs to know where to find prop models so it can load them and determine how they block light. None of the SDK tools will run unless they can find your game directory.
Examples of the game directory for the core Source games:
| Half-Life 2 | C:\Program Files\Steam\SteamApps\Common\Half-Life 2\hl2
|
| Counter-Strike: Source | C:\Program Files\Steam\SteamApps\Common\counter-strike source\cstrike
|
| Half-Life 2: Deathmatch | C:\Program Files\Steam\SteamApps\Common\half-life 2 deathmatch\hl2mp
|
In the following examples, we're going to refer to the game directory as C:\Program Files\Steam\SteamApps\sourcemods\MyMod\Blasters. This would be the case if you selected Create a Mod in the SDK launcher, entered C:\Program Files\Steam\SteamApps\sourcemods\MyMod as the directory, and entered Blasters as the mod name.
One way to determine the game directory of your game is to look for a file called GameInfo.txt. If you find the GameInfo.txt file, then the directory it sits in is the game directory. In the example above, if you had created C:\Program Files\Steam\SteamApps\sourcemods\MyMod\Blasters, there would be a file on your hard drive called C:\Program Files\Steam\SteamApps\sourcemods\MyMod\Blasters\GameInfo.txt. Once you've found the game directory, you need to tell the SDK tools where that directory is.
For information on how GameInfo.txt can be created for your own MOD, and how the contents are used, see GameInfo.txt File Structure.
Setting the current game directory
The active game directory is set so that all the tools know how to find the game content without having to specify it each time. The Current Game drop-down list on the Source SDK Launcher is the primary way to set the active game directory.
Using the Source SDK Launcher to set the game directory
To set the active game directory with the Source SDK Launcher:
- Double-click Source SDK from the Steam Play Games Menu.
- Next you must choose the correct Current Game from the Source SDK Launcher.
- Now launch one of the SDK tools, such as the Hammer Editor, by double-clicking it.
Using VConfig to set the game directory
The VConfig application can also be used to set the active game directory. It provides a similar function to setting the Current Game in the SDK Launcher.
The vconfig.exe application is found in the \sourcesdk\bin directory.
For example, if you installed Steam at C:\Program Files\Steam, VConfig would be found here:
C:\Program Files\Steam\SteamApps\Common\sourcesdk\bin\vconfig.exe
To set your active game directory with VConfig:
- Double-click the
vconfig.exeapplication. - Next you must choose the correct Current Game from the drop-down list.
- Click OK.
- Now launch one of the SDK tools, such as the Hammer Editor, by double-clicking it.
Alternatively, you can specify the game directory you wish to use without launching VConfig and choosing from the menu. To do this, simply run VConfig with the command-line parameter -game [directory]. This can be especially useful for setting the game directory in a batch file or other automated process.
For example, the following command would set the game directory to the default Half-Life 2 install path without having to actually launch VConfig:
vconfig -game "C:\Program Files\Steam\SteamApps\Common\Half-Life 2"
Specifying the game directory on the command line
An alternative method to set the current game directory is to directly specify the directory location on the command line when running each SDK tool. All of the SDK tools support the -game <directory> command line parameter. The advantage to specifying the game directory on the command line is that you are being explicit about where your game's content is to be found.
Here are some examples of running tools where you specify the game directory explicitly:
%sourcesdk%\bin\studiomdl -game C:\Program Files\Steam\SteamApps\sourcemods\MyMod\Blasters mymodel.qc
%sourcesdk%\bin\vrad -game C:\Program Files\Steam\SteamApps\sourcemods\MyMod\Blasters mymap
%sourcesdk%\bin\hammer -game C:\Program Files\Steam\SteamApps\sourcemods\MyMod\Blasters
%sourcesdk%\bin\hammer -game "C:\Program Files\Steam\SteamApps\Common\counter-strike source\cstrike"
%sourcesdk%\bin\vrad -game "C:\Program Files\Steam\SteamApps\Common\counter-strike source\cstrike" MyCstrikeMap
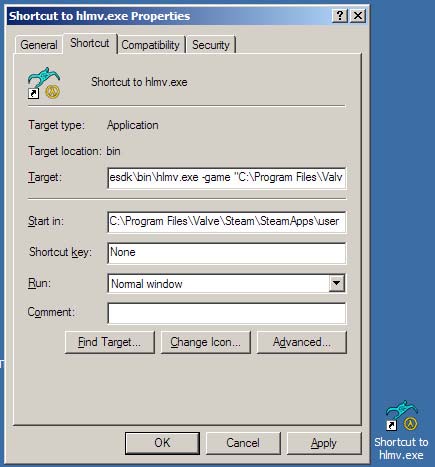
Using the -game command-line parameter to specify the current game directory gives you the advantage of being able to work on multiple games or MODs at once, and change your configurations for each. This can be easily done by making shortcuts to tools such as vtex with the -game parameter built-into the shortcut. When doing this, make sure to add quotes around the game directory path, if the path contains spaces.
Notes
Left 4 Dead 2 and later don't work properly when attempting to open the Hammer Editor on a 64-bit system after upgrading from 32-bit, as there comes one or two error messages:
VCONFIG Error
Setup file 'gameinfo.txt' doesn't exist in subdirectory
'c:\program files (x86)\steam\steamapps\common\left 4 dead 2\bin\vconfig
Check your -game parameter or VCONFIG setting.
Error
Setup file 'gameinfo.txt' doesn't exist in subdirectory
'c:\program files\steam\steamapps\common\left 4 dead 2\left4dead2
Check your -game parameter or VCONFIG setting.
{
This problem however, can be fixed by editing the GameConfig.txt in the bin folder:
English or other language: Add a space and "(x86) after "program files" on all locations Swedish: Replace "program" with "Program Files (x86)"
Browsing mounted files with XBLAH's Modding Tool
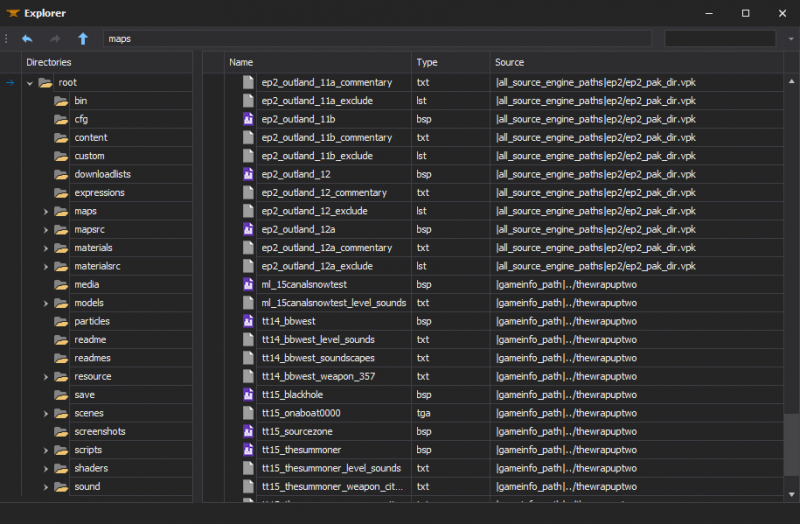
All the files mounted into the game info can be previewed with ![]() XBLAH's Modding Tool in the File Explorer. The File Explorer replaces the GCFScape as the ultimate file browsing tool, since it will mount all the VPKs and loose files according to the game info, to show the modder a compreensive list of files. This relieves the modder of having to browse vpks individually, and the integrated features of the tool usually dismisses the necessity of extracting the files from the vpks, since they can be accessed natively by double clicking the file (or right clicking for more options).
XBLAH's Modding Tool in the File Explorer. The File Explorer replaces the GCFScape as the ultimate file browsing tool, since it will mount all the VPKs and loose files according to the game info, to show the modder a compreensive list of files. This relieves the modder of having to browse vpks individually, and the integrated features of the tool usually dismisses the necessity of extracting the files from the vpks, since they can be accessed natively by double clicking the file (or right clicking for more options).
Where to find it
This can be accessed within the tool through Mod > File Explorer.
How to use it
The File Explorer contains context menus for each file, targeting them to their respective native editor, if available.
When you don't know where the file is, there is a search field in the top-right corner.


