Half-Life: Alyx Workshop Tools/Modeling/Houdini Vertex Animation
This tutorial assumes working knowledge of Houdini and only demonstrates how to correctly export vertex animations to Source 2, using Houdini version 17.5 or higher.
Install SideFX Labs
Read up on how to install SideFX Labs in Houdini here
Install Valve_outputnodes.hda
Download the Valve_outputnodes.hda file OneDrive - Download (note: the .hda file may not work for Houdini versions older than 17.5)
Read up on how to install the Houdini Digital Asset (.hda) here
Choose File > Import > Houdini Digital Asset
Create the Rigid Body Simulation
Houdini Rigid Body Simulation - Official documentation
Houdini Vertex Animation Textures - Unreal tutorial
Most of the Rigid Body Simulation tutorial applies for the simulation, with the exception of the added rest node and the exporter which is explained below.
OneDrive - Download .hip example file Contains the SideFX example with a rest node and the Valve_ouputs.hda file added.
Ideally the simulation should be done as close to origin as possible to maintain precision.
You can export geometry from Hammer as a .fbx, but do keep the export units in mind
Tools > Options > Import / Export > Export Hammer Units to FBX Units
Add a rest node
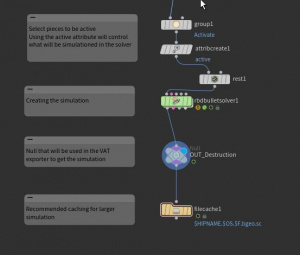
Add a rest node before starting the simulation on your mesh, this is required to avoid incorrect data on pos0 caused by texture edge bleeding.
Example: rest pose node before the rbdbulletsolver1
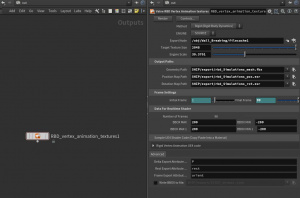
Houdini export settings
- Export node, select the last node in the simulation - a cache will be faster.
- Engine scale 39.3701 (when working in meters)
- Frame Settings ( simulation range) 1 to ..N.
- Check attributes : Delta = P ; Rest = rest ; Frame = orient.
Before exporting the simulation, choose the export path for Geometry - FBX, Position Texture and Rotation Texture. For faster iterations you can chose to export directly to the content folder.
Hit Render
Asset setup in the Material Editor and ModelDoc
Make sure your exported .fbx, position and rotation textures are present in the content folder, you can keep both the textures and the .fbx in a models/simulations folder.
Launch the Source 2 tools.
Create a material for your asset using the Material Editor, using the VR Complex Shader. (note: this material is for the asset, not for the position and rotation textures, these are used directly on the entity in Hammer)
- Check: Pre Baked Vertex Animation
- Check: Disable Z Prepass
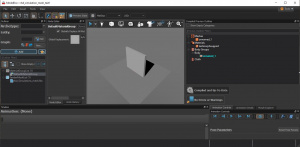
In ModelDoc click the +ADD button, add the mesh (Add Meshes) and add the material (DefaultMaterialGroup).
- Keep the Archetype and Entity in the outliner empty.
- The scale should be set in Houdini, not in the engine.
.Vtex for position and rotation textures
For the textures you'll need to create a .vtex file and a .txt file for both the position and rotation texture, these are normally automatically created from the Material Editor when the model is created and you have set things like mip levels or max/min texture sizes. Since the texture animation workflow is built into Hammer we don’t need to worry about the text files. It is important here to keep the _pos file and _rot file as 16bit floating point .exr files. We want to retain as much information as possible.
"file name"_pos.txt and _rot.txt should have the following content.
"settings"
{
	"nocompress"	"1"
	"nolod"			"1"
	"maxres"		"2048"
	"nomip"			"1"
}
"file name"_pos.vtex and _rot.vtex should have the following content.
Remember to update the m_filename to point to the correct .exr file and path.
<!-- dmx encoding keyvalues2_noids 1 format vtex 1 -->
"CDmeVtex"
{
	"m_inputTextureArray" "element_array"
	[
		"CDmeInputTexture"
		{
			"m_name" "string" "0"
			"m_fileName" "string" "simulations/rbd_simulations_pos.exr"
			"m_colorSpace" "string" "linear"
			"m_typeString" "string" "2D"
		}
	]
	"m_outputTypeString" "string" "2D"
	"m_outputFormat" "string" "RGBA16161616F"
	"m_textureOutputChannelArray" "element_array"
	[
		"CDmeTextureOutputChannel"
		{
			"m_inputTextureArray" "string_array"
				[
					"0"
				]
			"m_srcChannels" "string" "rgba"
			"m_dstChannels" "string" "rgba"
			"m_mipAlgorithm" "CDmeImageProcessor"
			{
				"m_algorithm" "string" ""
				"m_stringArg" "string" ""
				"m_vFloat4Arg" "vector4" "0 0 0 0"
			}
			"m_outputColorSpace" "string" "linear"
		}
	]
}
Hammer
Launch Hammer and open a new map
- Click on the entity tool
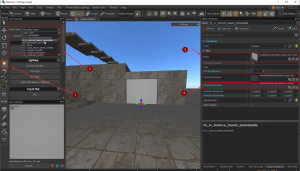
- Add an entity
"hl_vr_texture_based_animatable" - In the object properties, add your .vmdl as the model
- Add the _pos.vtex and _rot.vtex in the Position and Rotation Keyframes
Finally add a trigger and set a start input to the hl_vr_texture_based_animatable


