Setting Up Flash
Overview
User interface elements in Dota 2 are created using Adobe Flash CS5. More recent versions of this tool should also work, but these instructions are specific to CS5.
Each UI element consists of a number of files:
- The content folder for your addon (e.g. dota_ugc\content\dota_addons\holdout_example\flash) contains:
- The .fla file, where you build your custom controls and layout the UI
- The corresponding .as (Actionscript 3.0) file where your UI logic lives and communication with the game engine takes place.
- The game folder (e.g. dota_ugc\game\dota_addons\holdout_example\resource\flash3) for your addon contains:
- The .swf file. This is the compiled version of the above two files that the game actually loads at runtime.
Custom UI Manifest
The custom_ui.txt contains a list of all the .swf files to load when your addon is started. You must also specify a unique depth at which to load each element. This determines the order in which the elements are shown on screen, so if you want an element to be on top of something, make sure its depth is set to a higher number. Look at dota_ugc\game\dota_addons\holdout_example\resource\flash3\custom_ui.txt for an example.
Example Files
Example Flash files for the Holdout mid-round summary panel and the endgame panel can be found in: dota_ugc\content\dota_addons\holdout_example\flash
File Setup
When creating a new Flash file, it's recommended to copy the empty example from dota_ugc\content\dota_addons\addon_template\flash into your own addon's flash folder and then make the following adjustments:
- Rename the .fla and .as file to your desired UI element name
- Open the .fla in Flash CS5
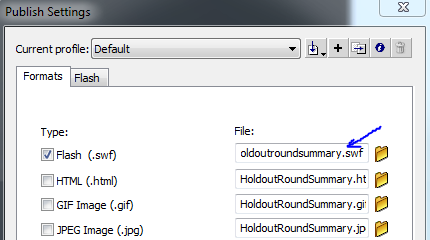
- Under File -> Publish Settings, edit the output .swf path so that your new element name is at the end and "addon_template" is replaced with your addon folder name:
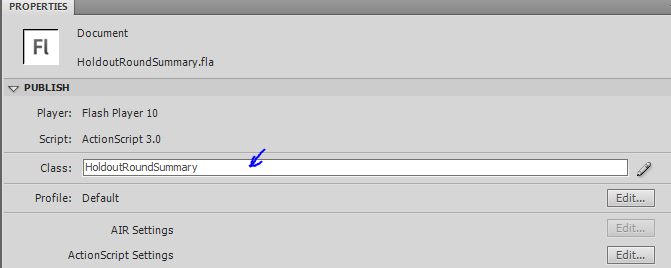
- Click outside the stage so you have nothing selected, then in the Properties panel, edit the Document Class to match your new name.
- Open the .as file in CS5
- Change the two occurrences of "Example" in the .as to be your new element name. This must match the Document Class you set previously in the Properties panel. It is case sensitive so make sure they're identical.
Fonts
Dota 2 has a set of four fonts used throughout the UI. These fonts contain characters for all supported languages. The fonts are also swapped out when running on specific platforms or languages, where appropriate. It's important to only use these four fonts in your custom UI to maintain worldwide support for your addon. You can find them in the Library of the Example.fla file. NOTE: When testing your UI from within Flash, these fonts will appear using some default system font. However, when you run the UI from inside Dota 2, they will get linked up to the correct Dota style fonts.
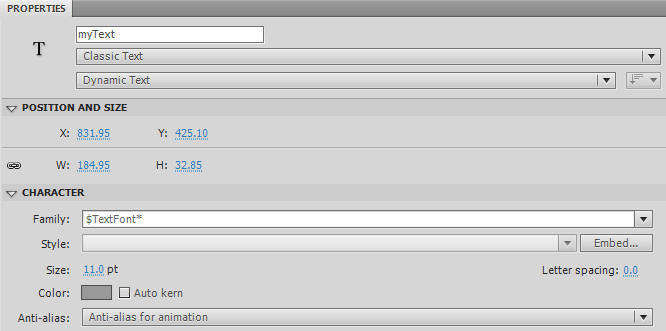
If you add a textfield, make sure it's set to Classic Text, Dynamic Text and using one of the $* fonts:
Localization
Whenever possible, you should use localization tokens in your textfields, instead of entering English directly. Localization tokens get automatically replaced with the corresponding text from the language file for your addon.
For example, dota_ugc\game\dota_addons\addon_template\resource\addon_english.txt contains a single token:
"lang"
{
	"Language"		"English"
	"Tokens"
	{
		"addon_game_name"			"YOUR ADDON NAME"
	}
}
If a textfield's text were set to "#addon_game_name", it would appear ingame as "YOUR ADDON NAME". Note the special '#' character before the token name. Additional language files (e.g. addon_french.txt) can be created so your addon can reach a wider audience. The user's current language setting in Steam is used to pick the appropriate language file, falling back to addon_english.txt if the desired one isn't found.
Communicating from the server to custom UI on a client
The primary way to trigger UI on a client is via game events. You can define your own events in the scripts/custom_events.txt file in your addon folder. An example event might look like this:
	"holdout_show_round_end_summary"
	{
		"nRoundNumber"				"short"
		"nRoundDifficulty"			"long"
		"roundName"				"string"
		"nTowers"				"short"
		"nTowersStanding"			"short"
		"nTowersStandingGoldReward"		"long"
		"nGoldBagsExpired"			"short"
	}
This is fired at the appropriate time from the game mode's server side .lua file:
	local roundEndSummary = {
		nRoundNumber = self._nRoundNumber - 1,
		nRoundDifficulty = GameRules:GetCustomGameDifficulty(),
		roundName = self._szRoundTitle,
		nTowers = nTowers,
		nTowersStanding = nTowersStanding,
		nTowersStandingGoldReward = nTowersStandingGoldReward,
		nGoldBagsExpired = self._nGoldBagsExpired
	}
	FireGameEvent( "holdout_show_round_end_summary", roundEndSummary )
In your actionscript file, you can listen to an event with the "SubscribeToGameEvent" function, then take action, e.g.:
		public function onLoaded():void
		{
			gameAPI.SubscribeToGameEvent( "holdout_show_round_end_summary", showRoundEndSummary );
		}

		public function showRoundEndSummary( eventData:Object )
		{
			// reveal UI, animate controls, set labels, etc.
			trace( "Towers standing: " + eventData.nTowersStanding );
		}
Communicating from UI to the server
Use this actionscript to send a console command to the server:
gameAPI.SendServerCommand( "my_command arg1 arg2" )
This can be a console command registered in your server side game mode .lua file. For example:
function CMyGameMode:InitGameMode()
	Convars:RegisterCommand( "my_command", function(...) return self:_MyCommand( ... ) end, "Test console command.", 0 )
end

function CMyGameMode:_MyCommand( cmdName, arg1, arg2 )
	local cmdPlayer = Convars:GetCommandClient()  -- returns the player who issued the console command
	if cmdPlayer then
		local nPlayerID = cmdPlayer:GetPlayerID()
		-- take some action
	end
end
Getting information from the engine
The globals object is your interface to the game engine on the client. See the Actionscript game engine reference for a list of functions exposed to actionscript.
External Documentation
Debug Output
You can use the trace() function to print text and variables to the console. Actionscript output will only show up in the console if ConVar scaleform_spew is set to 1, so it's recommended to add +scaleform_spew 1 to your command line.
Using FlashDevelop
It's also possible to create a .swf file using actionscript only, with the free FlashDevelop IDE. Just make sure your class derives from MovieClip, has the three public variables (gameAPI, globals and elementName) and the onLoaded and onScreenSizeChanged functions. However, with this method you don't have a visual tool for layout and animation, so this isn't a recommended or well tested way to build UI.


