Converting Entities
![]() This section will help you out with converting entities in your old Half-Life 1 map to the Source engine. It will also provide you information on the new triggering and targeting methods available for entities in Source.
This section will help you out with converting entities in your old Half-Life 1 map to the Source engine. It will also provide you information on the new triggering and targeting methods available for entities in Source.
For more reading on other aspects of map conversion, see Source Mapping for Half-Life 1 Mappers.
Introduction
How you trigger entities in a map has gone through some very large and positive changes in Source. In Half-Life 1 mapping, you typically used the "target" attribute of an entity such as a func_buttontrigger_multiple to name an entity you wished to "target" when the entity was triggered. Two big problems with this method is that you couldn't target more than one entity (without using a multi_manager), you couldn't specify HOW to trigger the target (turn a light on? off? toggle?), or when to target (when the user enters a trigger_multiple, leaves it?).
Input and Output
The new way of targeting entities is both very different than what you are used to with Half-Life 1, but also much more powerful and versatile. In Half-Life 1, a typical entity such as a func_button could only target a single entity (by name) when the button was activated. That basic concept of activation is still in Source, but now you have much more control over when the target is activated, and how the target is activated.
Hammer also now provides you with much more information as well. When you view an entity's outputs, you can see all the outputs it has. When you view it's inputs you can see all of those as well (if any).
Entity Name Changes
| Old Entity Name | New Entity Name |
|---|---|
| trigger_auto | logic_auto |
| trigger_camera | point_viewcontrol |
No More Multi_Manager
In Half-Life 1, you had to use multi_manager entities if you wanted to trigger more than one thing at once. For example if you had a button, and you wanted 5 things to happen when the button was used, you would have to make the func_button trigger a multi_manager entity which in turn would trigger the 5 other entities (sounds, lights, etc.) This made things very complex. In Source on the other hand, any entity capable of output can now trigger any number of events itself.
An Example
Suppose we want a trigger_multiple set up such that when a player enters it (first triggers it), a light goes on, and a "Hello" sound is played. When the player leaves the trigger, the light goes off and a "Good Bye" sound is played. Pretty complex to do in Half-Life 1, but easy in Source.
To set this up in Source, first we'll make a trigger_multiple, a light (light entity named "a_light"), a hello sound (ambient_generic named "say_hello") and a good bye sound (ambient_generic named "say_goodbye").
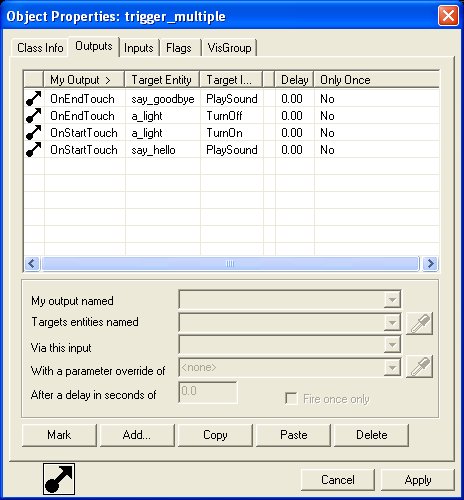
Next we'll go to the Outputs tab in the trigger_multiple Object Properties dialog box. Here we can add 4 new outputs to the entity, as illustrated below.
Notice that not only can the trigger_multiple trigger more than one thing but also at different times. It has two outputs set to only go off when first touched (OnStartTouch) and two to go off only when the player leaves (OnEndTouch). Also note how the outputs target specific actions on each target entity. When the player enters the trigger, the light is specifically targeted to turn on, and the "hello" sound to play. When the player leaves, the light is turned off, and the "goodbye" sound triggered to play.
Also notice the "Delay" column in the Outputs table. This is how many seconds you want to delay before triggering the target. Though our example has all zeros, it would be easy to modify our example to use the delay. For example if we wanted to wait 2 seconds before turning off the light as the user left the trigger, we could set the delay value to "2" for the OnEndTouch trigger that turns off the light.
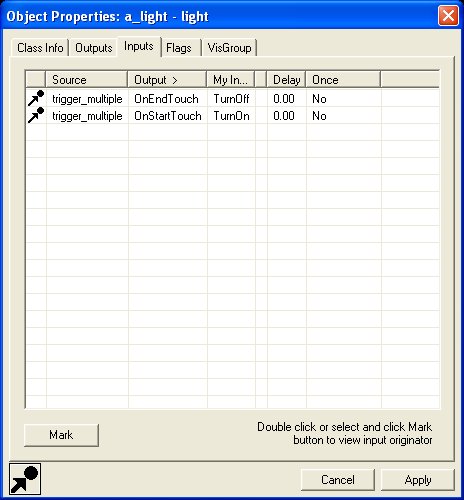
Besides viewing the outputs of an entity, you can also view the inputs - that is, what is triggering it. If we view the Inputs tab of the light entity in our example, we'll see something like this...
So now when viewing an entity in Hammer, you can see exactly what is triggering it (if anything).

