Basic Construction/ko
이 페이지에는 부분적으로 만 또는 잘못 번역 된 정보가 포함되어 있거나 아직 번역이 없습니다.
는 경우 이 페이지로 번역할 수 없는 어떤 이유로,또는 왼쪽 번역되지 않은 확장된 기간 동안의 시간 이후 통지를 게시,페이지를 요청해야를 삭제 될 수 있습니다.
또한 기사에서는
대체 언어 가이드
간단한 3D 개체(큐브, 원통, 기타 등등.) 는 해머 에디터 내부에서 brush같은 것들로 조화를 시킵니다. 이 오브젝트들은 소스엔진의 모든맵에서 만들기위한 기본적인 구조체 블록들입니다. 바닥, 벽, 천장 - 요컨대, model 보다모든 기하학적인 다른것들은 ㅡ브러쉬로 이루어져 있습니다.
Contents
브러시 만들기
- Block tool
 블럭 툴을 선택합니다.
 - 클릭으로 사이즈를 정하고 2D 톱뷰에서 마우스로 드래그를 하여 Figure 2와 같이 박스를 만듭니다..(위아래 좌표는 기본값 수치입니다 )
- ↵ Enter를 눌러 오브젝트를 생성합니다. 그대신으로도, 쓰여진 브러쉬 안에서 오른쪽 클릭,Create Object로도 만들수 있습니다..


브러쉬 선택
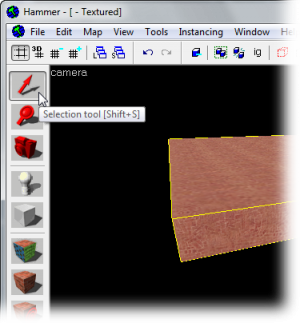
Selection tool ![]() 를 클릭합니다. 이건 여러분이 원하는 위치로 오브젝트나 그룹상 오브젝트들을 뗴어놓을수 있습니다. . Selection Tool로, 윈도우중 하나를 클릭하여 브러쉬를 강조할 수 있습니다. (2D뷰에서 브러쉬에 끝머리나 중앙에 클릭하여 보세요. 카메라 뷰에서, 오브젝트에 한해 아무데나 클릭하여 보십시오.)
를 클릭합니다. 이건 여러분이 원하는 위치로 오브젝트나 그룹상 오브젝트들을 뗴어놓을수 있습니다. . Selection Tool로, 윈도우중 하나를 클릭하여 브러쉬를 강조할 수 있습니다. (2D뷰에서 브러쉬에 끝머리나 중앙에 클릭하여 보세요. 카메라 뷰에서, 오브젝트에 한해 아무데나 클릭하여 보십시오.)
2D뷰에서 . These handles allow you to rotate and transform the selection (see below).
Note that the brush looks like a 3D wireframe box. Flatten the box so that it looks like a thin slab and move it so that the camera is above it. Think of the brush as a 3D chunk of ceiling or floor or wall, not a room all by itself. It takes 6 brushes to make a room.
격자
격자는 모든2D뷰에 표시됩니다. 기본적으로, 모든 오브젝트는 grid에 보입니다. ⇧ Shift+W를 눌러 이것을 끌수있습니다. 생각해보면, 이건 후에 좋은연습이 될수있습니다;새는 곳(안맞춰진 부문)이나 몇몇 다른 오류를 예방할수 있기 떄문입니다. 기본 격자 사이즈는 64입니다. 어느 의미에선 서로 라인이 64유닛 떨어져 있다는것입니다.. 이와 같은 방법으로 격자 사이즈를 변경할수있습니다:
- [키를 누르거나 Smaller Grid아이콘을 누릅니다.
 . 이건 전의 그리드 보다 반을 더 작게 만들어 줍니다.
 - ]키를 누르거나 Larger Grid아이콘을 누릅니다
 . 이건 전의 그리드 보다 반을 더 크게 만들어 줍니다.
맵에 적당한 사이즈를 결정하는데에 어려움이 있나요? 이Dimensions 문항을 참조 하십시오.
치수 조절하기, 회전시키기, 왜곡시키기
- 치수조절
- Select a brush using the Selection tool
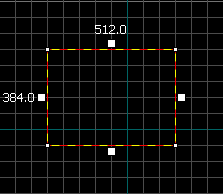
 and mouse over one of its eight white handles. The cursor should change to arrows, indicating along which axis you can move that handle. To resize, simply click and drag one of these handles.
 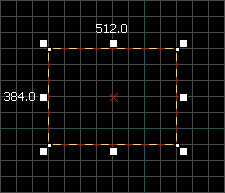 White squares on each corner mean the brush can be resized.
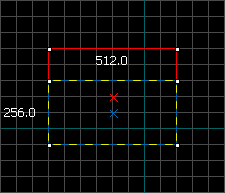 Click and drag the edge up or down in any 2D view to resize.
- 회전
- Select the object you wish to rotate using the Selection tool , then click on the object once again. You should see the squares surrounding the object at the corners turn into circles.
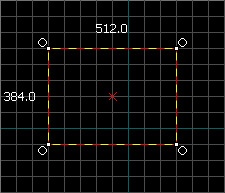 Circles on each corner mean the brush can be rotated.
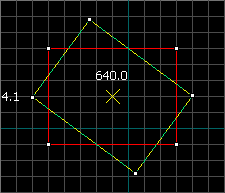 Click and drag in a circle in any 2D view to rotate.
- 왜곡
- Select the object you wish to skew using the Selection tool , then click twice on the object. You should see small white squares at the center of each edge of the object.
 White squares at the center of each edge mean the brush can be skewed.
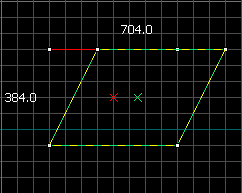 Click & drag a white square in any 2D view to skew.


